Page 24, Live image mode, Operation function modes of the event recorder – Dexaplan DV 622 User Manual
Page 22
Page 24
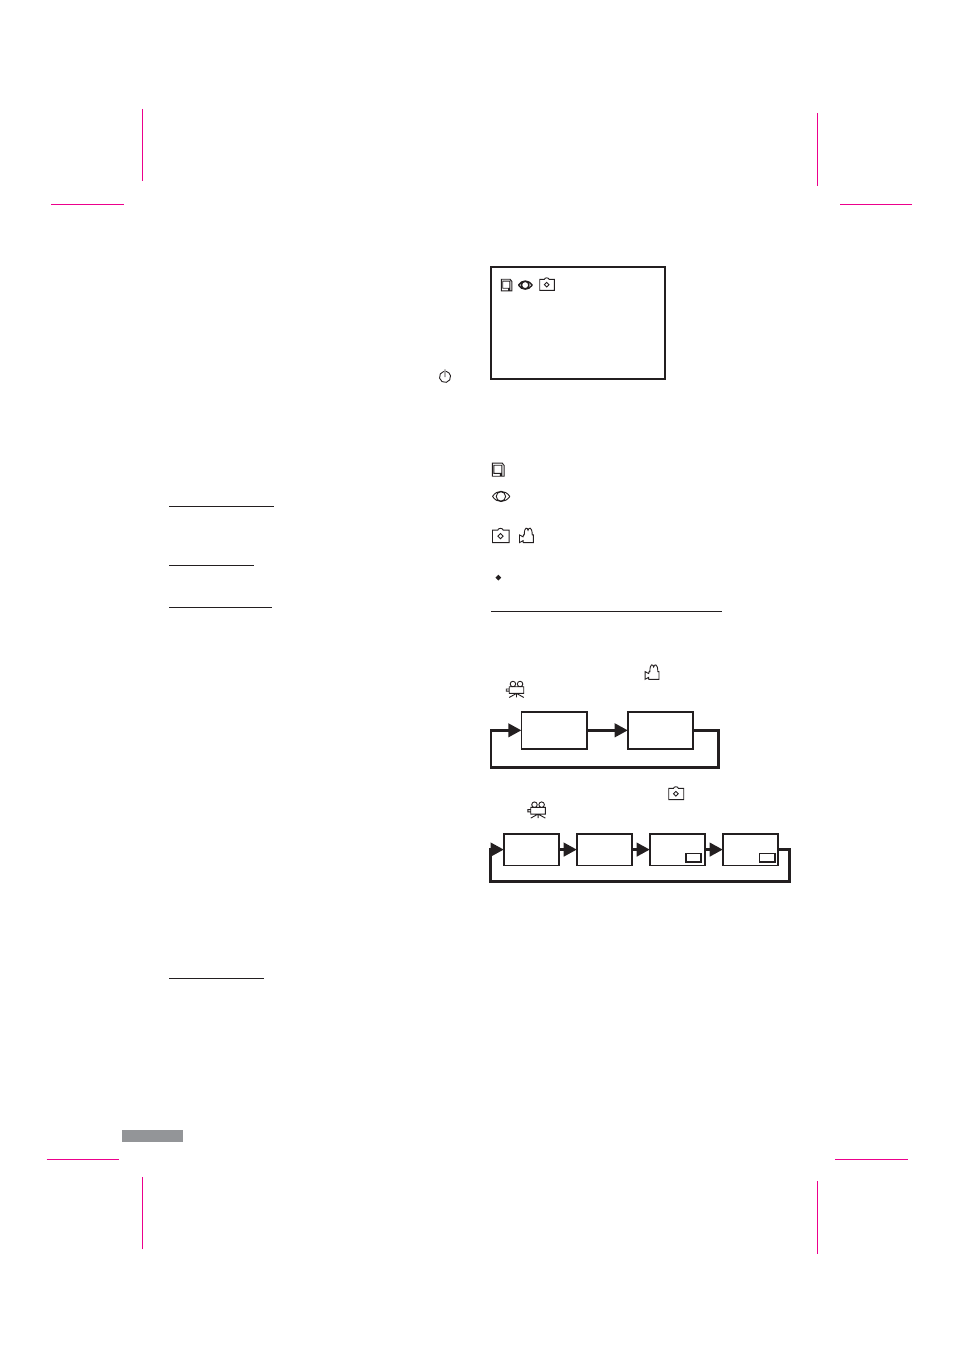
Live image mode
After switching on, the device is automatically in still image mode with the
recording function activated (factory setting).
The date and time are displayed on the top right of the screen.
The status of the event recorder is represented by the following symbols:
Memory card is inserted
recording mode is activated (lights green for automatic
recording in still image mode)
Still image mode / video mode is activated (lights red if the
memory is full and the oldest images are being overwritten)
This is displayed during the recording of a video sequence
If you have connected an optional second camera, you can toggle between
video input CH1 and CH2 by repeated pressing of the “Monitor” button
[6].
If video mode is selected (symbol
is visible on the screen or LED
[8] lights), the channels will switch as follows:
If still image mode is selected (symbol
is visible on the screen or
LED
[8] is not lit), the channels will switch as follows:
The picture-in-picture display is used for an increased level of
surveillance. As the smaller image has been digitalised, the resolution
is low and the reaction speed is slow.
The picture-in-picture display is only possible in still image mode.
Only the camera picture which is displayed in full screen in live image
mode can be stored.
After the video recorder has been switched off or in the event of power
failure, the camera image from channel 1 is displayed automatically
even if channel 2 had been selected previously.
Channel selection using the “Monitor” button
#
#
#
#
#
#
Notes:
Operation
Function modes of the event recorder
In order to avoid damage to and malfunctioning of the device, do not
connect to the mains until all the installation work is completed.
Slide the SD memory card [25] into the SD memory card slot [18].
Plug the power supply [19] into a mains power socket (230 V AC ~) .
Switch on the TV (or the monitor).
Set the TV to the corresponding AV input.
Switch on the ON / OFF switch [14] on the event recorder (LED
[7] lights). The camera image can be seen on the screen after a few
seconds.
The event recorder has four function modes:
If a TV or a video monitor is connected, the live image of the
connected camera will be displayed.
Settings such as date and time can be made in this mode.
The camera image is monitored by the internal software in this mode.
If changes in the live image are detected, the images or the video
sequences are recorded with date and time on the inserted SD memory
card. Movement detection must be activated for this.
The event recorder has an internal memory with a very small capacity
which is used for test purposes. The internal memory is used
automatically if no SD memory card has been inserted. The images
recorded in the internal memory cannot be transferred to the SD
memory card nor vice versa. If the SD card is inserted after a recording
on the internal memory, only the images stored on the SD card can be
viewed. The images can be recorded either as a still image (still image
mode) in JPG format with a resolution of 640 x 480 at a maximum
rate of 1 image per second or as a video sequence (video mode) in AVI
format (approx. 5 frames per second) with a resolution of 320 x 240.
One 10 second sequence per image change is recorded in video mode.
The images are automatically stored in directories by date to make
searching easier.
The images are stored in a ring memory system, i.e. the oldest images
are automatically overwritten if the SD card is full. Individual images
and directories can also be deleted using the event recorder or a PC.
In this mode, you can view the stored images on a TV or a video
monitor. Alternatively, you can view the images stored on the SD card
on a monitor connected to a PC. Viewing the images on a digital
camera or outputting them directly to a photo printer is not possible.
on a monitor connected to a PC. Viewing the images on a digital
camera or outputting them directly to a photo printer is not possible.
!
!
!
!
!
1. Live image mode
2. Setting mode
3. Recording mode
4. Playback mode
GB / IE - 24
2007/01/07
14:36:58
Fig. F
CH1
CH1
CH2
CH2
CH1
CH2
CH1
CH2
REC