DR Power Lawn Aerator User Manual
Page 8
8
DR
®
LAWN AERATOR
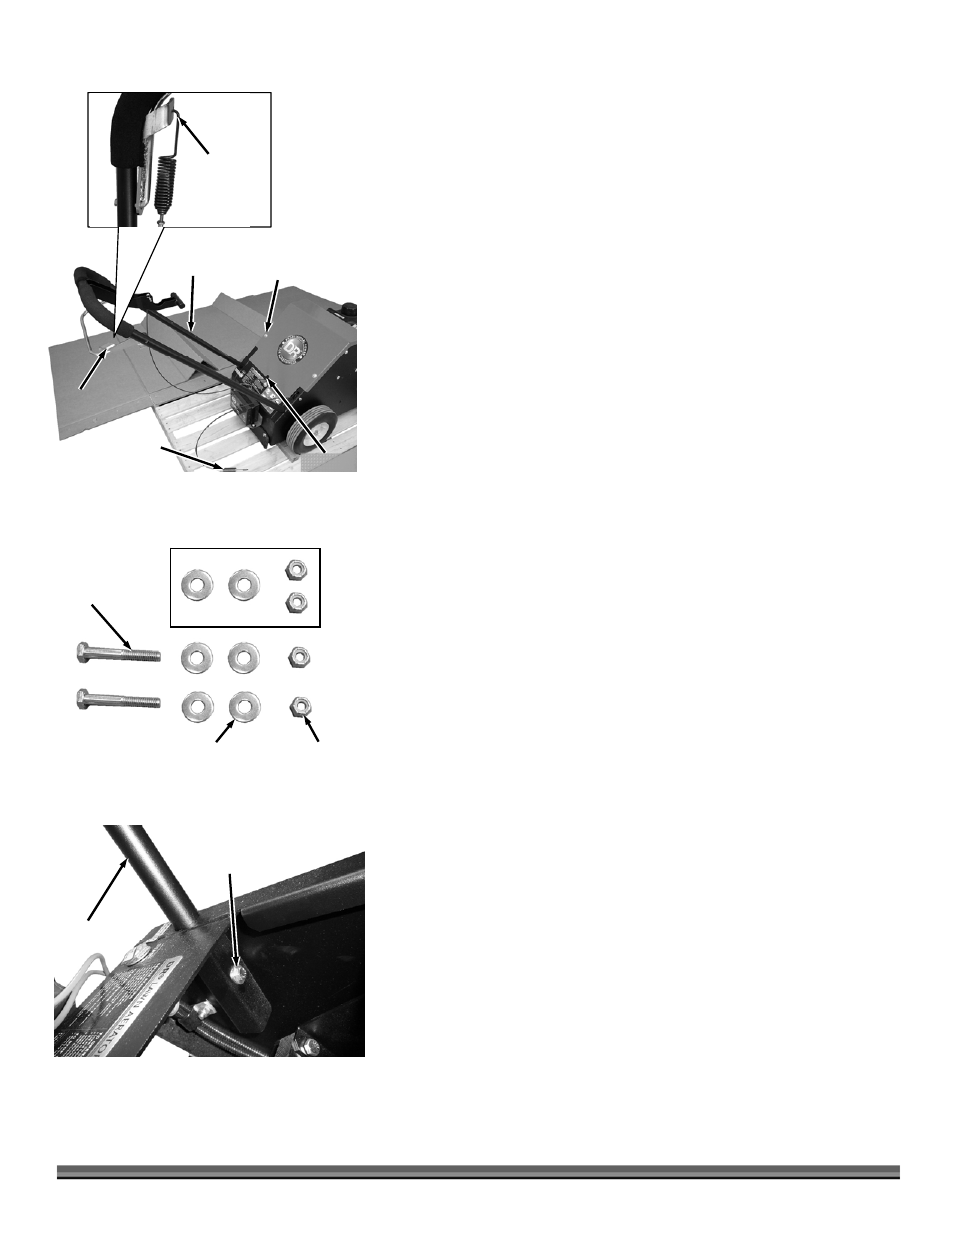
Bail Bar
Bracket
Figure 3
Bail Bar
Spring
Cable Tie
Rear
Cover
Handlebar
Assembly
Four Bolts,
Lock Washers
and Flat Washers
Attach
Spring Hook
Into Bail bar
Bracket
4.
Pull the Handlebar Assembly from under the Frame and slide both tube ends
into the holes in the Frame (Figure 3).
5.
Reconnect the Bail Bar Spring to the Bail Bar Bracket.
Note: If it is too difficult to reconnect the Spring you can carefully slide one side of the
Bail Bar out of the hole in the Handlebar tube, attach the Spring and reinstall the Bail
Bar back into the Tube.
6.
Remove the four Bolts, Lock Washers and Flat Washers that secure the Rear
Cover using a 7/16" Wrench and remove the Cover.
7.
Rotate the Tine Position Lever back towards the Handlebar and cut the Cable
Tie that is holding the Tines in the “Raised” position. Rotate the Tine Position
Lever back towards the machine to lower the Tines out of the way.
8.
Remove two Bolts, four Flat Washers and two Locknuts from the Product
Package (Figure 4). The remaining Washers and Locknuts are spares.
9.
Align the holes in the Handlebar to the Frame holes and secure each side with
a Bolt and Flat Washer (top side) and Locknut and Flat Washer (bottom side)
using two 7/16" Wrenches (Figure 5). Make sure you tighten the hardware
adequately.
10.
Reinstall the Cover.
11.
Pull the Tine Position Lever back toward the Handlebar to raise the Tines.
Push the Aerator off the Pallet.
Do not discard the shipping materials until you are fully satisfied with your new
DR
®
LAWN AERATOR.
Two 1/4-20 X
1-3/4" Bolts
Figure 4
Extra hardware
Two 1/4-20
Locknuts
Four 1/4"
Flat Washers
Bolt and Flat Washer
(Flat Washer and Locknut
on Bottom Side)
Figure 5
Frame
Handlebar