2 powering, priming and starting the analyzer – Electro-Chemical Devices (ECD) CA6 Hardness Analyzer User Manual
Page 38
•
Connect the analyzer drains (CELL and VENT DRAINS) to a waste line using 3/8” flexible tubing.
WARNING: the drain from the analyzer must be at atmospheric pressure with no restrictions.
The drain line should be properly sized to accommodate the overflow coming from external fast-
loop reservoir and the gravity fed analyzed sample.
•
Check sample level in the Fast-Loop Reservoir, if used, and adjust the sample flow rate to allow a
continuous overflow to the drain line.
•
Connect float valve switch from the Fast Flow reservoir to the connection on the upper right side
of the CA6.
6.2 Powering, Priming and Starting the Analyzer
•
Supply power to the analyzer. Turn ON Power Switch. The Main Menu will appear on the display.
•
Read the Installation and Start Up procedures in the (?) Help Menu or Section 11 below.
•
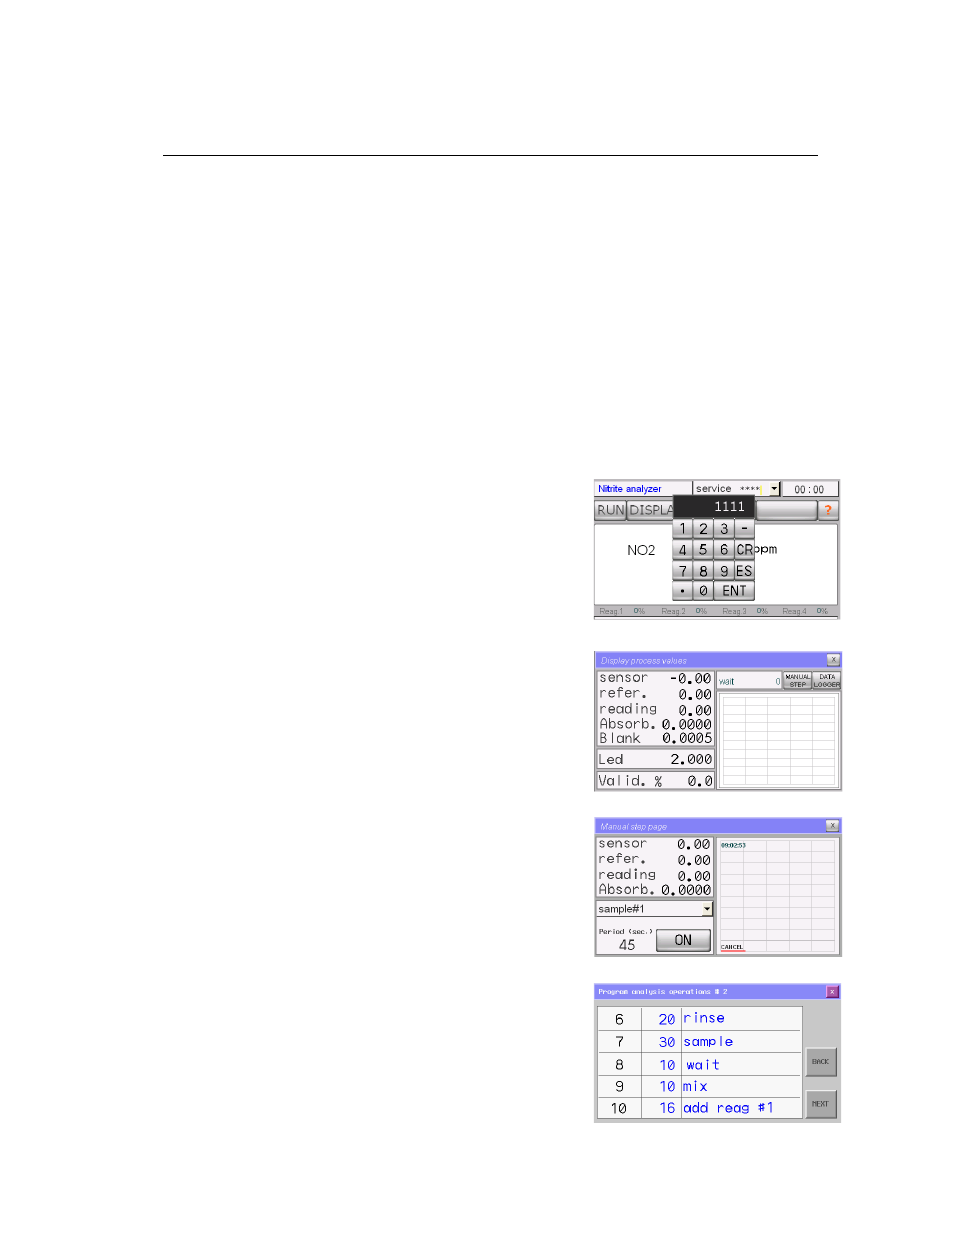
Login with the 1
st
level password, SERVICE (1111).
•
Press the DISPLAY button on the touch screen
•
Press the MANUAL STEP button. This allows manual control
of the functions.
•
Select the SAMPLE 1 function, enter 13 seconds Press ON.
This starts the sample pump and it runs for 13 seconds filling
the optical cell. After filling press and hold the Drain button.
Repeat for SAMPLE 2 if present.
•
The SAMPLE function fills the colorimetric cell with the
sample. Check the optical signal on the chart. With an
uncolored sample the red line should be approximately 9
(the reference value) when the optical cell is filled, 4-5 when
empty.
•
Select the ADD REAG 1 function and enter 30 seconds. This
will prime the reagent peristaltic Pump. When primed,
reagent will be seen dripping from the feed tube into the
optical cell. Repeat with ADD REAG 2, 3, 4 as required.
•
Verify the drain tube below the pinch valve is correctly
positioned in the drain and is not kinked or bent which
would restrict the flow.
•
Select the DRAIN function and enter 5 seconds. (Drains cell)
•
Select the SAMPLE function and enter 20 (13) seconds. (Fills
16 mm cell with sample)
•
Verify the programmed settings of the Analysis Cycle/Extra
Cycle programs currently loaded in the analyzer, (PROGRAM
→ ANALYSIS CYCLE, protected with 2
nd
level password
ADMIN 6699) agree with the Analysis Cycle/Extra Cycle
detailed in Section 11 at the rear of the manual.
•
Close all the menu windows and start the measurements by
27