Snowmelt install-4.ai, Detail 3 – Infloor Snow Melt Heavy-Duty Cable User Manual
Page 4
CONCRETE APPLICATIONS (Cable Depth, Min. 1” - Max. 3” from Surface)
FLAT AREAS: Install re-bar or wire mesh in the area to be heated. Tie heating
cable to re-ar or wire mesh with wire ties.
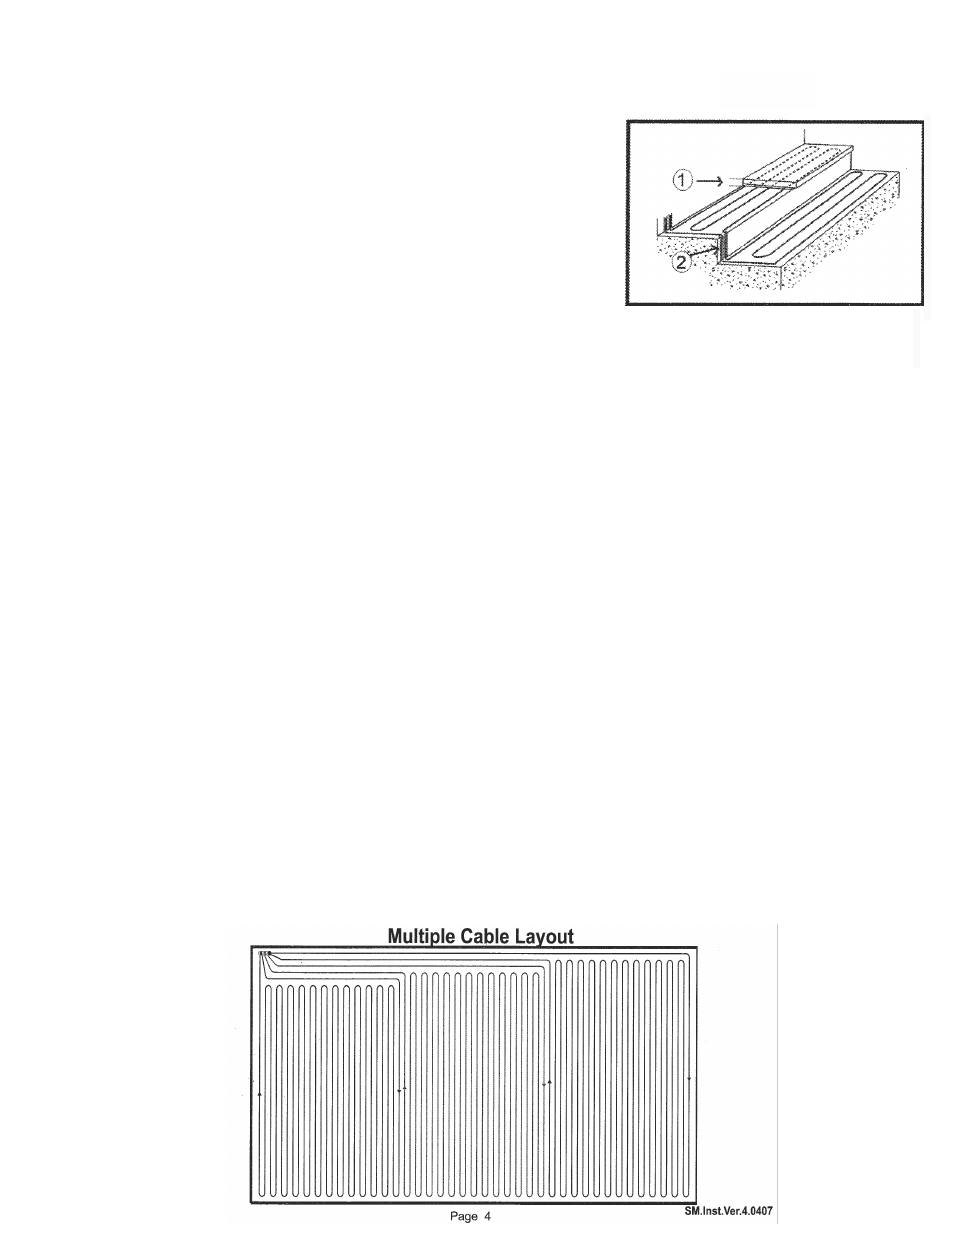
EXTERNAL STAIRS: The cable should be laid lengthwise on the steps so that they only
lie on the horizontal surfaces. Detail 3 shows a section of a stairway with heating
cables laid directly on the concrete. For installations of this kind it is essential to have
a roughcast concrete step as a base. The cables should be installed with the first run
no more than 2” from the front edge of the step. Then refer to UL Tag for number of
runs per step and lay the remaining cable spaced evenly on the step tread.
(DISREGARD THE SPACING FORMULA WHEN DEALING WITH STEPS) When running the
cable up the riser of the step it is suggested that a groove be made in the riser in
order to keep the cable flat
.
LAYING OF CONCRETE: Concrete can be poured directly from the cement truck and spread and leveled manually.
PAVERS IN SAND APPLICATIONS (Max. Cable Depth 4” From Paver Surface)
A minimum of 1” compacted sand should be applied for the base to lay the cable on. DO NOT lay the cable down directly on the stone base
or any other sharp surface. The cable should be arranged and tied down to wire mesh / deer fencing or equivalent, following the UL Tag “on
center” spacing formula using cable ties. A minimum of 1” compacted sand should then be applied on top of the cable after the sand is
compacted the final layer of Pavers can be installed.
ASPHALT APPLICATIONS (Cable Depth should be 1 1/2” - 2” from surface)
DRIVEWAYS (With Complete Cable Coverage): Cable can be installed directly on the binder layer or the existing driveway with our CMC-1
mounting clips and 2” round serrated masonry nails spaced no further than 18” apart or tied to wire mesh. (See instructions Below for
“Laying of Asphalt”).
TIRE TRACKS: The cable is laid across the tire tracks and secured with our CMC-1 mounting clips and 2” round serrated masonry nails or tied
to wire mesh. (See “Mat Section below) it can be laid on the binder layer or on the existing driveway. (routing channels for heating cable
installation is not an approved method and can cause pre-mature cable failure)
Laying of the Asphalt: It is required that all asphalt be laid manually. Top coat grade material must be used and hand shoveled to cover the
cable then using manual panel vibrators for compacting. A rubber tired paving machine can then be used when applying the final layer and
a small roller for compaction but great care must be taken not to damage the cables. (NO TRACK MACHINES, RUBBER OR METAL CAN BE
USED) Top coat thickness must be between 1 1/2 and inches. The temperature of the asphalt cannot exceed 275 F. Don’t start or stop the
roller on any type of grade where a cable is buried. Damage will result to the insulation and compromise the integrity of the cable.
Mats: Our cable can be pre-assembled on many sub-straights such as chicken wire, safety netting and deer fencing to fabricate a mat
system. Tie the cable with standard wire ties every 1 foot and make sure the cable is running across the shorter dimension and clip the ends
of the cable ties. These mats are a time saver when dealing with large or long and marrow areas.
Marker Plate: Install the supplied Marker Plate(s) in a clear and visible location as per NEC requirement described below.
NATIONAL ELECTRIC CODE ARTICLE 426, SECTION 13 “ The presence of outdoor electric deicing and snow melting equipment shall be
evident by the posting of appropriate caution signs or markings where clearly visible”
1) 2” Cover
2) Grooves made in the risers
Detail 3