Installing the duct, Pro series duct – Legrand WKD Pro Series System User Manual
Page 5
5
CAUTION:
A solid foundation of grout or concrete
must be provided beneath the entire
junction box to prevent excessive cover
plate deflection and damage. Vibrate
concrete at junction box and duct to
insure that concrete completely fills
underneath the system.
CAUTION:
Heavy rolling loads during construction can
damage cover plate. Install 3/4" [19.1mm]
planking over all junction boxes.
CAUTION:
A vapor barrier is recommended
when duct is installed directly on
grade to prevent ground moisture
from reaching the underside of
concrete slab.
Prepour a work slab, pads, or
sidewalk to protect vapor barrier from
penetration of anchoring means.
CAUTION:
Do not use concrete
additive containing
chlorides. This will
cause severe rusting
of the duct system.
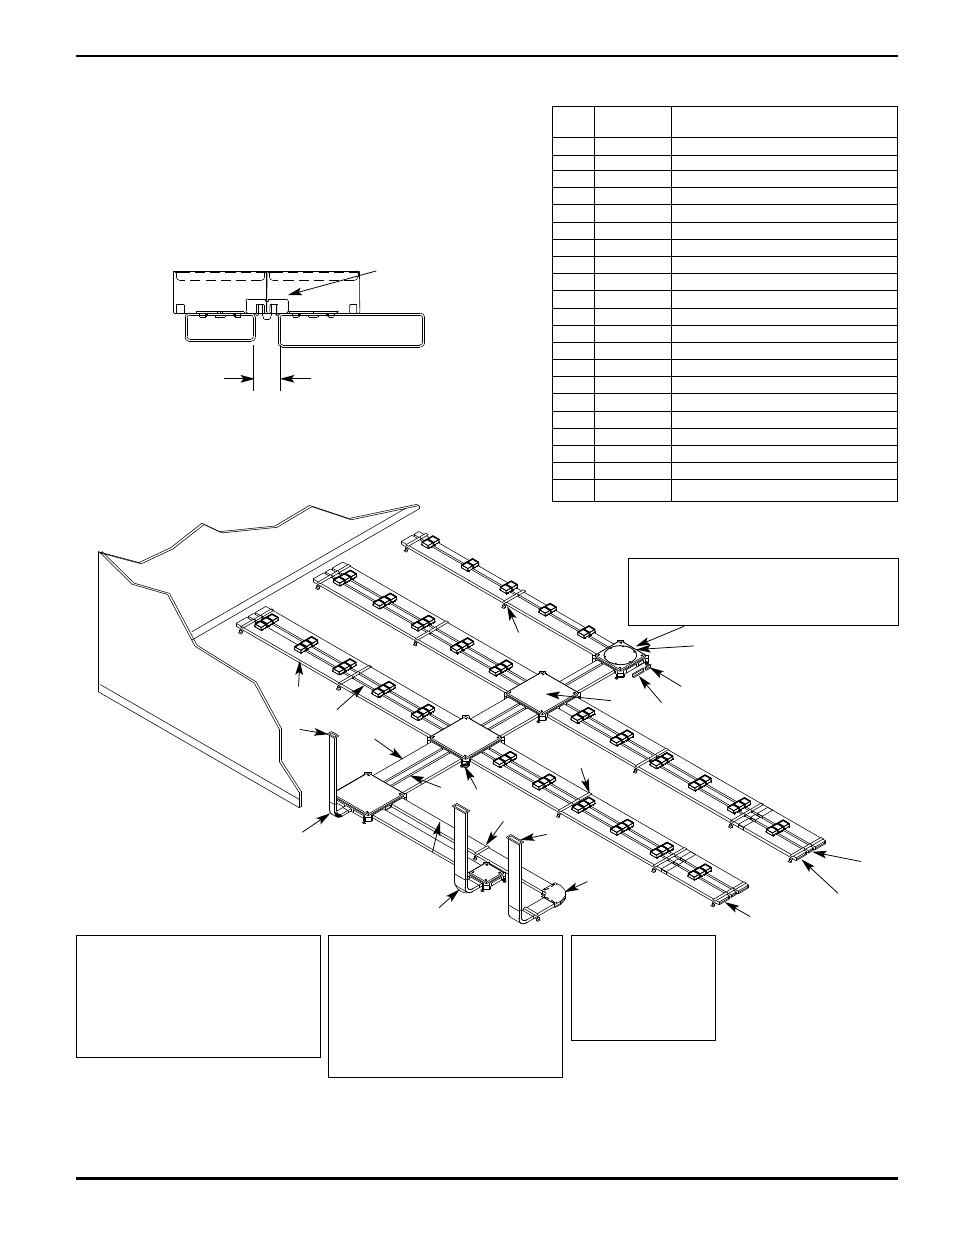
Install Duct Tape
to Secure End Cap
In all cases be sure the duct is
fully extended into fittings.
15
21
19
11
18
20
10
14
5
7
8
1
4
13
12
3
2
6
17
16
INSTALLING THE DUCT:
1.
After the junction boxes are roughed in, lay the duct in place and
position, but do not fasten duct supports or hold down straps.
(See page 8)
2.
Begin at one corner of layout, insert duct into box opening and work
toward the next box. Join each length of duct to the next with a duct
support/ coupling.
3.
Whenever possible, begin each run of duct with a full piece. However, if a field cut section is needed, be sure that distance
from the field cut end to the center of the first insert is proper length to maintain the uniform spacing between inserts.
4.
Cutting of the duct is to be preformed in the field as required. All sharp edges must be removed.
PRO SERIES DUCT
Alignment Clip
1" [25mm]
Standard Spacing
NOTE: For Walkerduct Pro Series, alignment clips must be installed at first
preset on each length of duct before supports/ couplings are secured.
All presets must be aligned within 1/8" [3.2mm]. Cut last length of
duct as required to fit snugly into the next box opening.
ITEM
CAT. NO.
DESCRIPTION
1
255-3/4
Conduit adapter for 3/4" [19.1mm] conduit
2
D42410
No. 4 Duct w/1" [25mm] high presets
3
D22410
No. 2 Duct w/1" [25mm] high presets
4
4-0
No. 4 Blank duct
5
2-0
No. 2 Blank duct
6
224JR-1
Combination single level j-box (round)
7
3424JS-1
Combination single level j- box (square)
8
H338
No. 4 duct 90° horizontal elbow
9
H302
No. 4 Duct coupling*
10
302
No. 2 Duct coupling*
11
H334
No. 4 Duct cabinet connector
12
334UF
No. 2 Duct cabinet connector
13
H332
No. 4 Duct vertical elbow
14
332UF
No. 2 Duct vertical elbow
15
H203
Junction box closure for No. 4 duct
16
203UFD
Junction box closure for No. 2 duct
17
S3424-28
Duct support for one No. 2 & two No. 4
18
S224-28
Duct support for one No. 2 & one No. 4
19
S14-28
Duct support for one No. 4 duct
20
H304
No. 4 Duct end closure
21
304
No. 2 Duct end closure
* Couplings are only required when using hold down
straps or splicing ducts.