Wll-tr-1p – Soundtube WLL-RX1p User Manual
Page 3
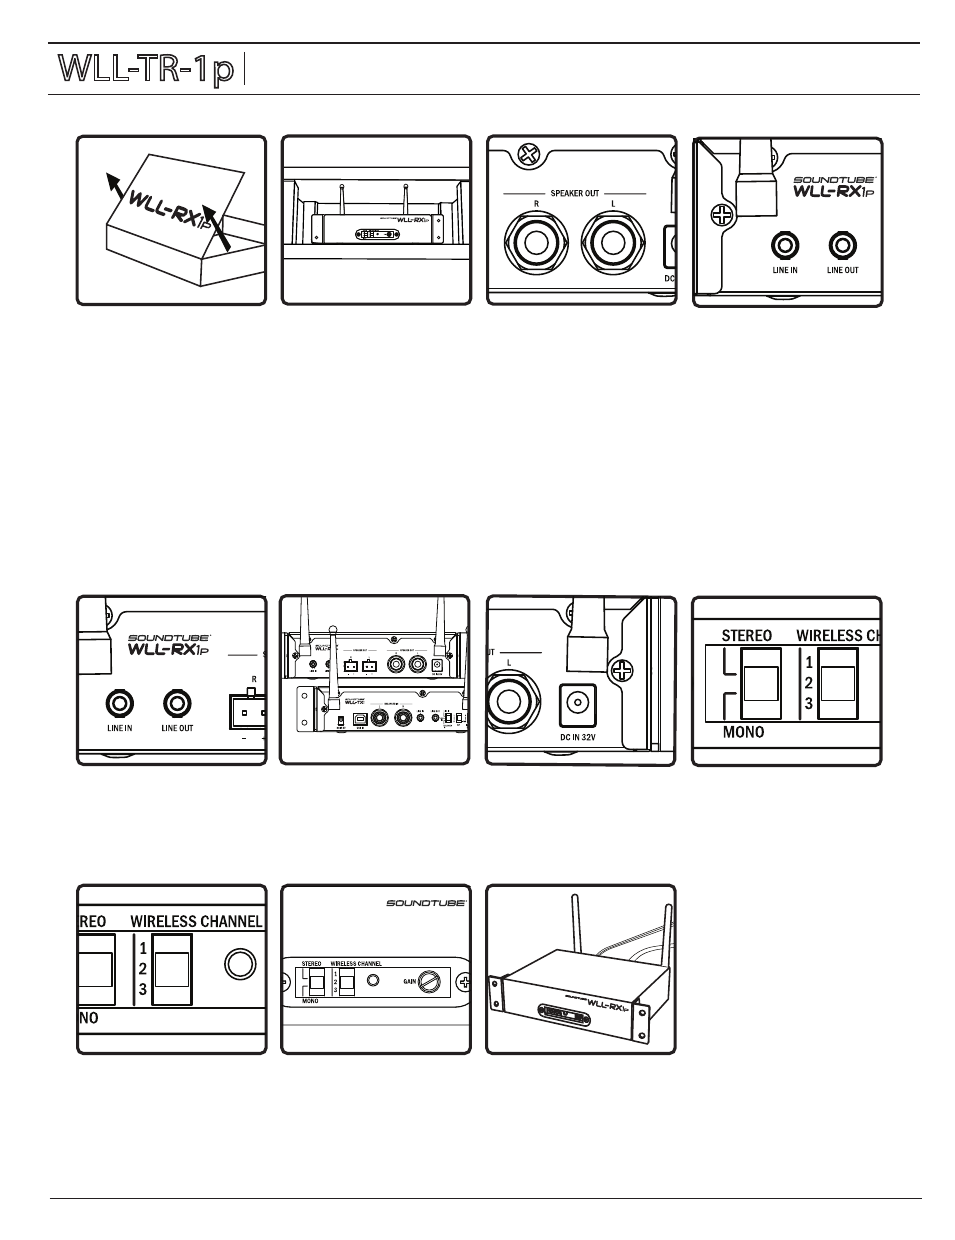
WLL-TR-1p
Install Instructions For:
WLL-TR-1p (WLL-TX1 transmitter and WLL-RX1p receiver/amp).
1. Remove unit from box.
8. Select either the Stereo or
Mono operation mode via the
selector switch on the front
panel.
7. Connect the power supply
to the DC IN 32V power
connector.
6. For best results, Transmitter
and Receiver antennas should
face the same direction (either
vertically or horizontally).
5. If desired, a fixed LINE OUT
audio signal is provided by the
stereo mini jack for operating a
device such as an ADA hearing
assistance system.
2. Determine location for
placement of WLL-RX1p. The
WLL-RX1p may be installed in
an equipment rack (half rack
adapter required) or on a shelf.
The antennas may be remoted
using a wifi antenna cable (not
included; available through
third party vendors).
4. If desired, a direct audio
source can be connected to the
WLL-RX1p via the mini “LINE IN”
jack. Note: If an audio source is
connected to this input, it will
interrupt any RF feed being
sent via the WLL-TX1.
3. Connect 4 ohm or 8 ohm
speakers to the L and R channel
output leads using the
Euroblock connectors and push
into place in the appropriate
SPEAKER OUT locations.
Alternatively, speakers may be
connected via ¼” plugs at the L
and R “SPEAKER OUT” jacks to
the right of the Euroblock
connectors. Do not connect
both. Be certain to check for the
correct connection polarity.
11. Done!
10. Apply power to unit. Adjust
front panel gain control as
needed.
9. Select the receiving channel 1,
2 or 3 on the front panel. NOTE:
the WLL-TX1 must be set on the
same channel.
Note: If the signal appearing at the receiver is intermittent or noisy, (a) make sure the transmitter’s RF Gain switch is on High; (b) change the location of
the transmitter and/or receiver for line-of-sight position with one another; (c) place the antennas in a line-of-sight position using an antenna extension
cable (available from third party vendors).
WLL-RX1p Install Instructions
Installation Notes: 2a: an installation that puts the WLL-TX1 in line-of-sight with the WLL-RX1(p) will provide the best results. 2b: Do not install transmitter
more than 230 feet (70 meters line of site or 50 meters indoors) from the desired receiver location(s). 3a: Unit output is 50 watts per channel.