Recording, Recording screen, About recording standby – Teac DR-05 V.2.00 User Manual
Page 10: Menu structure
10
TASCAM DR-05
10
TASCAM DR-05
Recording
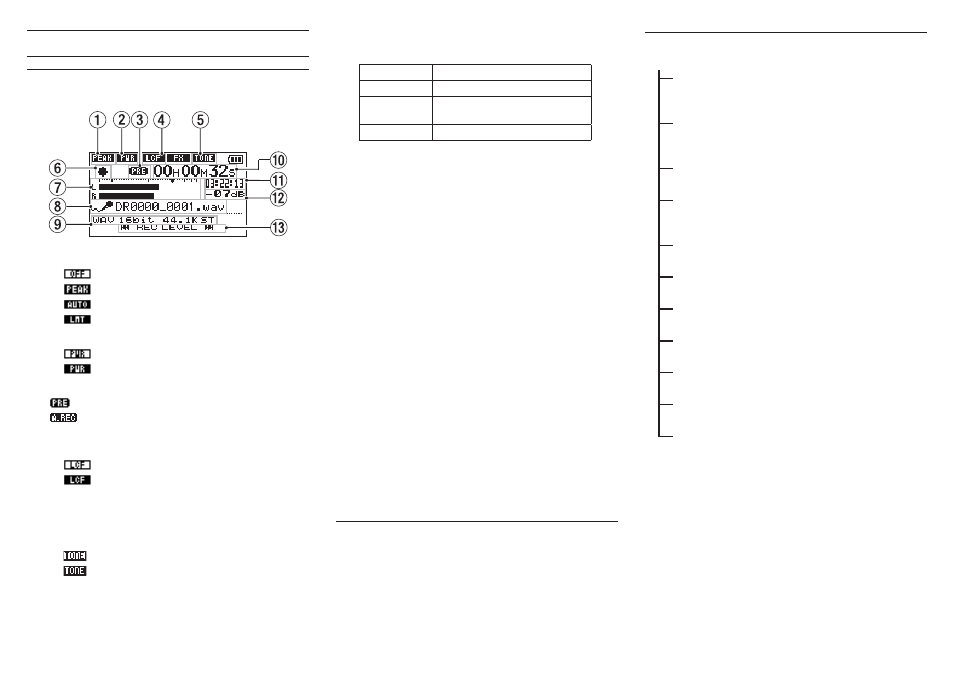
Recording Screen
This screen appears when recording or in recording standby.
1
Level control function status
: Level control off
: Peak reduction on
: Automatic level control on
: Limiter on
2
Plug-in power status
: Plug-in power off
: Plug-in power on
3
Pre or Auto recording function status
appears when the prerecording function is ON.
appears when the auto recording function is ON,
and the unit is recording.
4
Low cut filter on/off status
: Low cut filter off
: Low cut filter on
5
Auto tone function status
This icon shows whether the auto tone function is on or
off. (See "Using the auto tone function" in the Reference
Manual.
: Auto tone off
: Auto tone on
6
Recorder operation status
This icon shows the recorder operation status.
Indicator
Meaning
8
Recording standby
9
Recording paused (recording
standby)
0
Recording
7
Level meters
The input signal levels are shown.
When overdubbing, the levels of the mixed input and
playback sounds are shown.
8
File name
The file name that will automatically be given to the
recorded file is shown.
9
Recording mode
The recording file format, sampling frequency and stereo/
mono (ST/MONO) status are shown.
0
Elapsed recording time
The elapsed recording time of the file appears as hours:
minutes: seconds.
q
Remaining recording time
The remaining recording time until the selected
maximum file size is reached is shown (in hours: minutes:
seconds). If the remaining recording time on the microSD
card is less, however, the remaining recording time on the
card is shown.
w
Peak value in decibels (dB)
The peak recording level value is shown digitally.
e
Input level button display
The . and / buttons are shown as a reminder that
they can be used to change the input level.
About recording standby
This unit has a recording standby function like that of a profes-
sional recorder. In recording standby mode, you can adjust the
input level, for example, and then start recording quickly.
When in recording standby, the REC indicator blinks and the
recording screen appears.
Menu structure
REC SETTING
FORMAT
Set the file format
WAV: 16/24-bit,
MP3: 32–320kbps
SAMPLE
Set the sampling frequency
44.1kHz, 48kHz, 96kHz (96kHz for
WAV only)
TYPE
Set to mono or stereo
MONO, STEREO
SIZE
Set the maximum file size
64MB, 128MB, 256MB, 512MB, 1GB,
2GB
MIC POWER
Turn plug-in power on/off
ON, OFF
LOW CUT
Set the low-cut filter
OFF, 40Hz, 80Hz, 120Hz
PRE REC
Set the pre-recording function
ON, OFF
AUTO TONE
Set the auto tone function
OFF, HEAD, HEAD+TAIL
TONE SECS
Set the length of the auto tone
0.5sec,1sec, 2sec, 3sec
TONE VOL
Set the volume of the auto tone
−12dB, −18dB, −24dB, −30dB, −36dB
AUTO REC
Set the auto-recording function
MODE: OFF, REC, MARK
LEVEL: −6dB, −12dB, −24dB, −48dB