Run a report – Wavetronix Command Collector (CMD-DCx) - Quick-reference Guide User Manual
Page 4
© 2014 Wavetronix LLC. All rights reserved. Protected by US Pat. Nos. 6,556,916; 6,693,557; 7,426,450; 7,427,930; 7,573,400; 7,889,097; 7,889,098; 7,924,170; 7,991,542; 8,248,272;
8,665,113; and Cdn. Pat. Nos. 2,461,411; 2,434,756; 2,512,689; and Euro. Pat. Nos. 1435036; 1438702; 1611458. Other US and international patents pending. Wavetronix, SmartSensor, Click,
Command and all associated logos are trademarks of Wavetronix LLC. All other product or brand names as they appear are trademarks or registered trademarks of their respective hold-
ers. Product specifications are subject to change without notice. This material is provided for informational purposes only; Wavetronix assumes no liability related to its use.
WX-500-0199
7
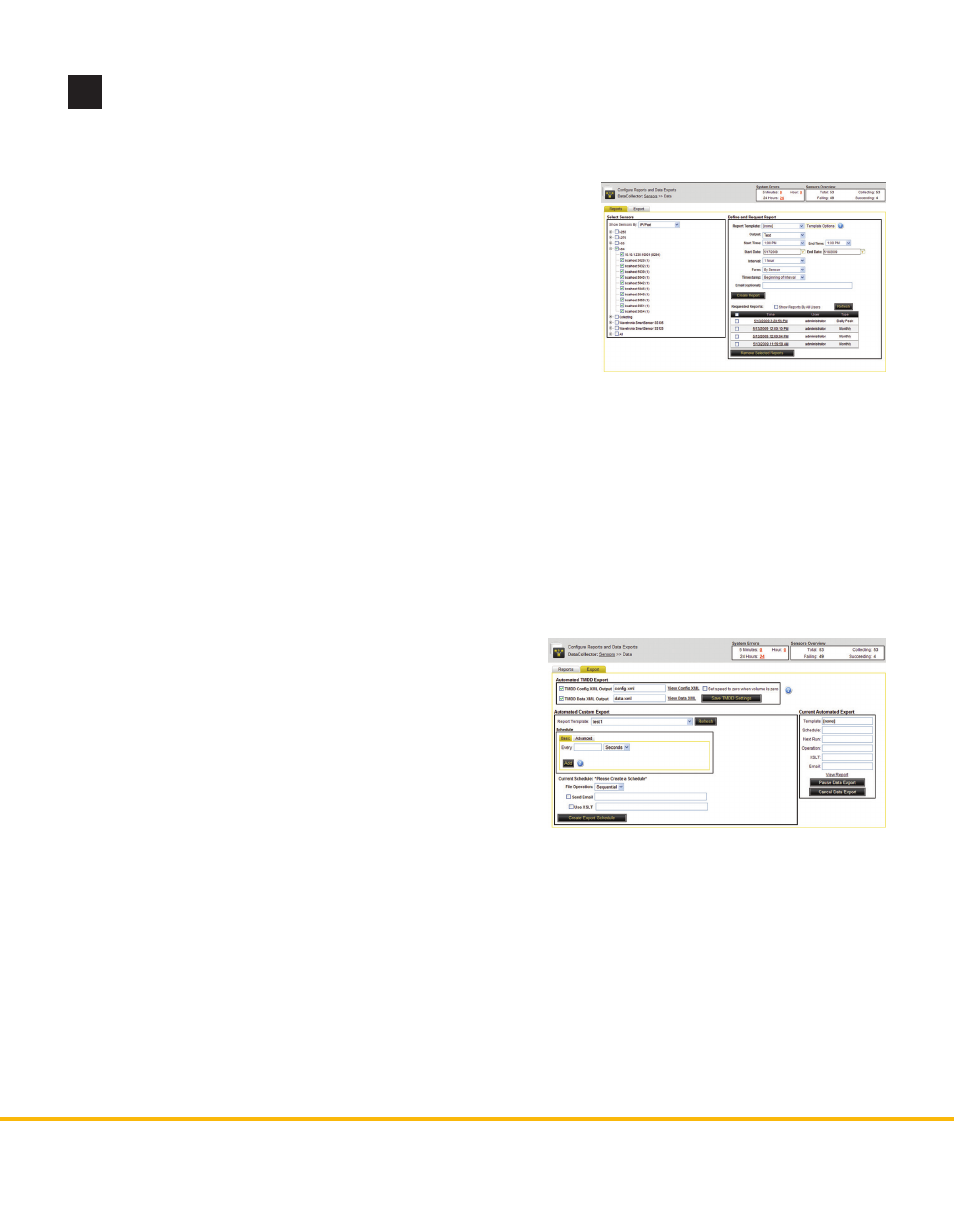
Run a report
Command Collector allows you to create a report containing data from one or more sensor. To run a report,
follow the steps below:
1 Click on Data in the menu bar and open the Reports tab.
2 In the Select Sensors box, check the sensor(s) you would like
included in the report.
3 If desired, select a template from the Report Template drop-
down list.
4 From the Output drop-down list, select the desired output
report type.
5 Set the Start and End Times, and use the calendars to select the
Start and End Dates.
6 From the Interval and Form drop-down lists, select what interval to use—the sensor’s interval, 5 min-
utes, 15 minutes, 1 hour or a custom interval—and how to group the data—by lane, approach or sensor.
Select whether you would like to use the timestamp from the beginning or the end of the interval.
7 If you would like the results of the report to be sent in an email, enter a valid email address.
8 Click Create Report. The Requested Reports table will contain a link to the new report.
9 Report settings can be saved as a template by using the Template Options menu. These report tem-
plates can be automated using the Export tab (see below).
To run an automatic report, follow the steps below:
1 Click on Data in the menu bar and open the Export tab.
2 In the Automated TMDD Export box, select the type
of automated report: TMDD Configuration Export,
TMDD Data Export, or Automated Custom Export.
3 In the Automated Custom Export Box, select a report
template (created on the Reports tab).
4 Assign a schedule using either the Basic or Advanced
tab in the Schedule box, then click Add.
5 Select Sequential or Overwrite as the file operation.
6 If you would like the report results to be sent in an email, enter a valid email address.
7 Click Create Export Schedule. Once a schedule is created, it will appear in the Current Automated
Export box.