Bang & Olufsen BeoLab Transmitter 1 User Guide User Manual
Page 9
Make a wireless stereo setup
If you want to connect two speakers and one
subwoofer, remember to set the SUB – 2.1 switch
to ON. Consequently, three speakers are found
and three PL status indicators should light up.
Connect cable …
> If you are connecting to a Bang & Olufsen
system, set the B&O INPUT switch to YES.
> If you are connecting to a non-Bang & Olufsen
system, set the B&O INPUT switch to NO.
> Make sure the audio system and transmitter are
disconnected from the mains.
> Connect one end of the appropriate cable to
either the PL1, INPUT (R-L) or TOSLINK input on
the transmitter and the other end to the
appropriate speaker outputs on the audio
system.
> Connect the audio system, the transmitter, and
the speakers to the mains. The transmitter’s
wireless status indicator starts flashing white,
the product status indicator on the front panel
becomes solid red for some seconds before
switching off, and the speakers’ wireless status
indicators start flashing green.
Make the wireless connections …
> Press the SELECT button shortly for the
transmitter to find the wireless speakers. The
transmitter’s wireless status indicator starts
flashing green. This takes several seconds.
When the search is done, the PL status indicator
lights up – red or white – for each speaker
found.*
1
> Press and hold the SELECT button on the
transmitter for more than 1.5 seconds to be able
to configure the speakers. The leftmost PL
status indicator is now flashing, the others are
switched off, and a sound is produced in one of
the speakers.
> First, you must set up the left front speaker. If
the sound does not come from the left front
speaker, press SELECT until the sound comes
from the left front speaker, then press the
STORE button on the transmitter. The leftmost
PL status indicator becomes solid and the next
PL status indicator starts flashing. A sound is
produced in another speaker.
> Repeat the previous step for the right front
speaker and then for the subwoofer. When the
last PL status indicator starts flashing, it will
automatically become solid after a while and
the wireless connection has now completed.
> When you have made a wireless connection to
all speakers, the PL status indicators for the
connected speakers changes to solid light and
then switches off.
Note: If, during setup, you inadvertently store a
wrong speaker on a given PL input, you can
reconfigure that PL input by shortly pressing the
SELECT and STORE buttons simultaneously.
1
*If all speakers are not found, make sure that they
are flashing green to be searchable. If this is not
the case, see the guide enclosed with your
speakers to reset them. Then press the SELECT
button to find the wireless speakers.
Wireless sound
When you switch on a source, it takes several
seconds before sound is heard in the speakers,
during which time a stable wireless connection is
established between the transmitter and speakers.
If you have both wired and wireless speakers in
one setup …
– Fill up the PL sockets on your transmitter from
the left (PL1) to the right with a subwoofer as
the last to connect.
– When you set up the speaker distance in the
television menu, we recommend that you add
3.5 metres (11 ft.) to the actual distance to each
wireless speaker due to a sound delay.
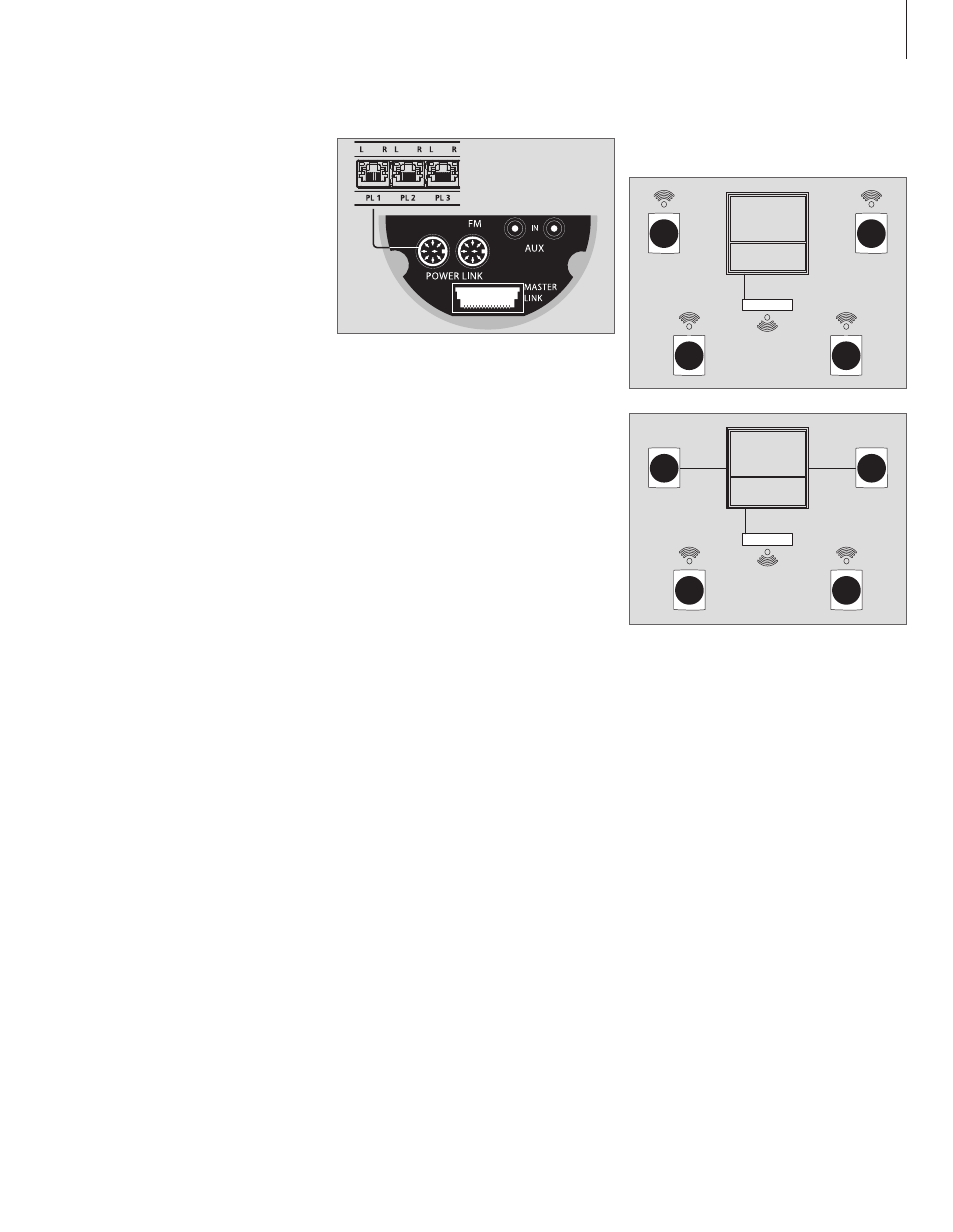
Left front
(PL1 left)
Right front
(PL1 right)
Left back
(PL2 left)
Right back
(PL2 right)
Left
front
Right
front
Left back
(PL1 left)
Right back
(PL1 right)
9
Example of cable connection between the
transmitter box and an audio system.
Examples comparing an all wireless setup and a
setup with wired front speakers