English – AEG AR 4021 BT User Manual
Page 83
83
ENGLISH
3. The connection of “Continuous +” (continuous cur-
rent connection) may differ depending on the vehicle
type. (However, this is required for storing of the radio
stations.)
In order to assure all functions, installation according
to these instructions is necessary. In case of doubt,
please contact an authorized car workshop.
Because of the different vehicle types and vehicle
manufacturers, correct wiring of the ISO connector
is no assured even when the ISO plug connectors fit
mechanically. Thus it may be necessary to change the
electric connection or to use a vehicle-specific adap-
tor.
NOTE
In case of correct connection, the radio can be
►
switched on and off with the ignition. In case of
possible loss of stored radio stations, the radio is
not provided with the “Continuous +” required
for station storage.
CAUTION
In case of connection to “Continuous +” without
►
ignition, an unnecessary load may be caused for
the car battery even when the radio is switched
off. In the worst case, this may lead to discharge
of the car battery.
4. Depending on the vehicle type, interferences may
occur during operation of the radio. These can be
eliminated with an additional noise filter. Your set is
already equipped with a noise filter as standard. In
spite of this, interferences may be caused depending
on the vehicle.
Noise filters are available from car accessory sellers
and/or your car workshop.
5. When installing your radio, take care that there is
sufficient free space at the rear of the radio to assure
sufficient cooling.
6. There are two different standards for the antenna
connection. The first one is the old one (50 Ohm) with
a long projecting round contact on the vehicle side
and a round socket on the radio side. The second one
is the ISO standard antenna plug (150 Ohm). Adapters
for both formats are offered by car accessory sellers
and/or your car workshop.
NOTE
To be strictly observed for VW/Audi: The antenna
►
of your vehicle may be an active antenna. This
requires a voltage supply only provided by the
original car radios. If this should be the case,
please use an antenna adapter for phantom feed.
Antenna adapters are available from car acces-
sory sellers and/or your car workshop.
Mounting Instruction
The correct tools are self-explanatory for a car hifi
installation.
Insert the unit into the ISO slot or select a location
where you can reach all controls and the unit is not in
the diver’s way.
Connect only to a properly installed 12 V battery.
Connect only via the ISO connectors.
Install the unit in such way that no overheating is pos-
sible and the unit is well ventilated.
If the installation angle exceeds 30° the unit might not
perform well.
Avoid installing the unit where it is subjected to high
temperature, such as from direct sunlight, hot air from
the heating ducts, or where subjected to dust, dirt or
excessive vibration.
Contact your car manufacturer or the local dealer if
vehicle modifications are necessary.
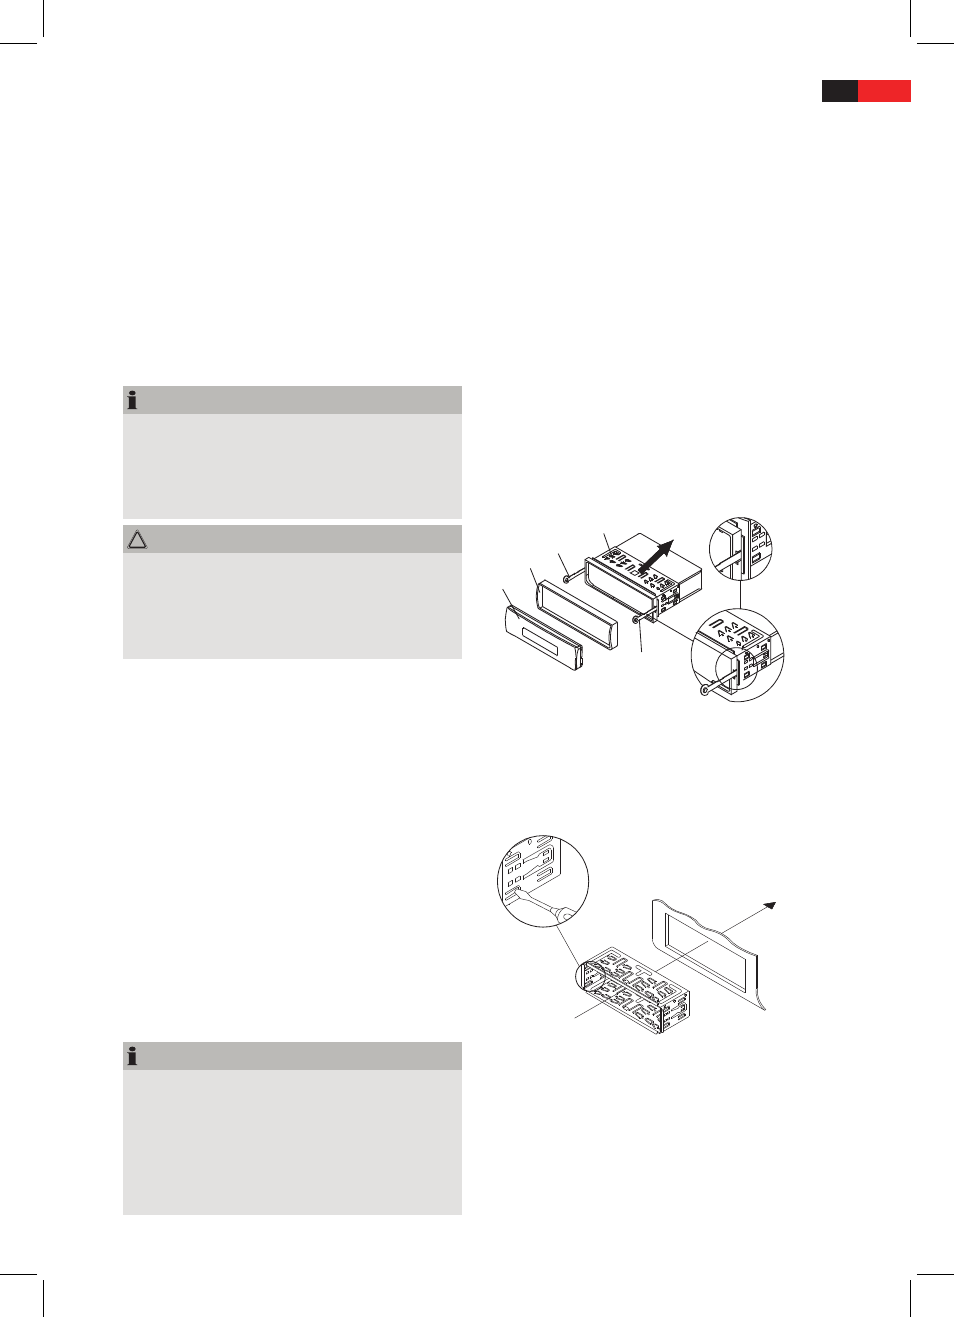
Installation in ISO Slot
A
B
C
D
C
Remove sleeve (D) and frame (B) from the unit. Use
installation keys (C), if necessary.
Place the sleeve in the ISO slot.
Bend the claws outward with a screwdriver for perfect
fit.
Check the sleeve for tight fit.
Connect the ISO female connectors of the unit with
the two ISO male connectors of the vehicle.
Connect the antenna to the antenna connector at the
rear of the unit.
Secure the unit against theft, if necessary. Attach bolt
and mounting strip with the fastening materials at the
firewall.