Casella CEL CEL-120 User Manual
Timeout, Operation, Preparation for use
a)
b)
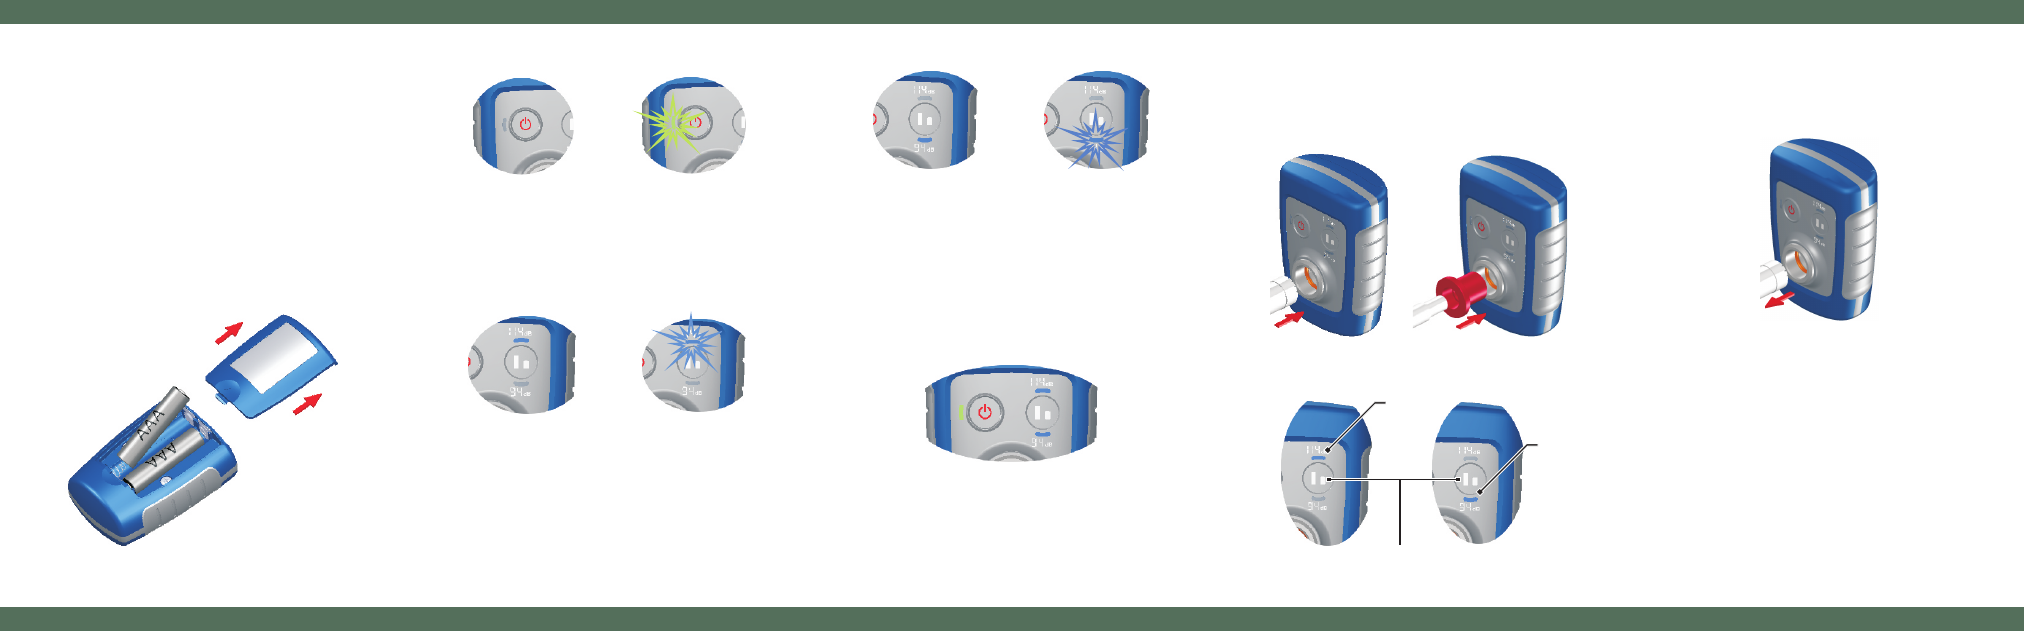
Green LED On
The calibrator is switched on
and is operating normally.
Green LED Flashing
Battery level is low (< 1.75 V)
Replace the batteries.
Upper Blue LED On
The calibrator is set to 114 dB and
the level is stable.
Upper Blue LED Flashing
The level is not stable.
Lower Blue LED On
The calibrator is set to 94 dB and
the level is stable.
Lower Blue LED Flashing
The level is not stable.
calibrate using a level at least 20 dB higher than the background noise level.
Lower Blue LED - 94 dB level indicator
Timeout
1. The calibrator will switch off after 1 minute or 10 seconds after the microphone is
removed.
2. If the calibrator is unstable (there is no microphone inserted), it will switch off after
10 seconds.
3. If a longer calibration period is required, when you switch the calibrator On, hold
the On/Off button until both Blue LEDs come on, and then release the On/Off
button. The calibration signal will now be continuous regardless of whether the
calibrator is stable or not.
Operation
Field Accuracy Check (Acoustic Calibration)
Follow the instructions below to perform a field accuracy check (acoustic calibration)
with the CEL-120/1 or CEL-120/2 immediately before and after measurements are
made with a sound level meter or a sound measuring system.
Caution – Make sure the microphone and the calibrator (plus the coupler when used)
are correctly aligned during insertion because the microphone could be damaged if
not inserted squarely, or if inserted at speed or if excessive force is used.
1.
Carefully insert either:-
a)
WS2 (half-inch) microphone up to the stop within the calibrator cavity.
Or
b)
CEL-4726 Coupler up to the stop within the calibrator cavity and then
carefully insert the WS3 (quarter-inch) microphone up to the stop within
the cavity of the coupler.
Note that the coupler flange does not fit flush against the calibrator rim.
2.
Press the On/Off button to switch the calibrator on.
(
Refer to the measuring instrument’s handbook and select a suitable
measuring range and frequency weighting for the calibration).
3.
Press the Level toggle button to toggle between the 114.0 dB and 94.0 dB
levels (this feature is available only on the CEL-120/1).
If necessary, adjust the calibration control of the measuring instrument until it
The CEL-120 provides a highly stable reference level across changes in all
environmental conditions. Corrections for variations in atmospheric pressure are not
required.
Both calibrators generate a highly stable sine wave excitation in the acoustic cavity,
with low harmonic distortion.
These calibrators offer a nominal pressure calibration level of 114.0 dB at a frequency
of 1 kHz. The CEL-120/1 can also supply a calibration level of 94.0 dB at a frequency
of 1 kHz.
A complete “Acoustic Calibrator” consists of the following items.
• CEL-120/1 Calibrator (Class 1) or CEL-120/2 Calibrator (Class 2)
• 016022 (2 off) AAA battery (LR03)
• FG40 Field Guide
Optional 1/2”-to-1/4” Microphone Coupler (CEL-4726)
Schedule of Parts
Preparation for Use
Ensure the battery polarities are correct. Replace the cover after battery installation.
The calibrator is now ready for use.
LEDs
Green LED - Power indicator
For the most reliable operation with longest life, the use of an alkaline battery is
recommended. Rechargeable batteries may also be used.
It is recommended to remove the batteries if the calibrator is to be out of service for
long periods.
Upper Blue LED - 114 dB level indicator
If a microphone is not inserted, or if it is not fully inserted, the Blue LED will continue to
flash and the calibrator will not be able to maintain control. When this condition
persists for 10 seconds, the calibrator automatically switches off
After a stable calibration signal has been achieved, the Blue LED will stop flashing
and will remain on.
CEL-120/1 only:
On the CEL-120/1 only, select the required calibration level.
In noisy environments the 114.0 dB level should be used. As a general rule, try to
shows the correct indication (114.0 dB or 94.0 dB).
4.
Wait 3 seconds for the output to stabilise.
5.
After use press the On/Off button to switch the calibrator off.
6.
Remove the microphone and any coupler from the calibrator.
The calibrator will also automatically switch itself off after 10 seconds when the
microphone is removed.
Product Care
Compliance
CEL-120 Calibrators are precision instruments and should be treated with care.
Avoid:
• Physical shocks or drops
• Ingress of dirt, dust and other foreign objects into the sound cavity
• Exposure to water droplets or condensation
The CEL-120/1 and CEL-120/2 Acoustic Calibrators comply with the EMC Directive
2004/108/EC of the European Union. They have been tested according to the
standard delivery schedule and comply with the following standards:
• EN 61000-4-2:2009 Testing and measuring techniques – electrostatic
discharge immunity tests
• EN 61000-4-3:A1+A2:2010 Electromagnetic field immunity tests
• EN 61000-6-3:2011 Emission standard for residential, commercial and light
industrial environments
114 dB
94 dB