Ptional, Quipment, Ontinued – Avalon Firestyles DVS Fireplace-1997 to 2000 User Manual
Page 42
P
AGE
42
O
PTIONAL
E
QUIPMENT
(C
ONTINUED
)
7
Replace the pilot assembly (follow the instructions in step 6 in reverse order). Make sure the pilot
assembly gasket is placed correctly.
8
Replace the rear log shelf (see step 2). Install the logs and embers. Replace the glass.
9
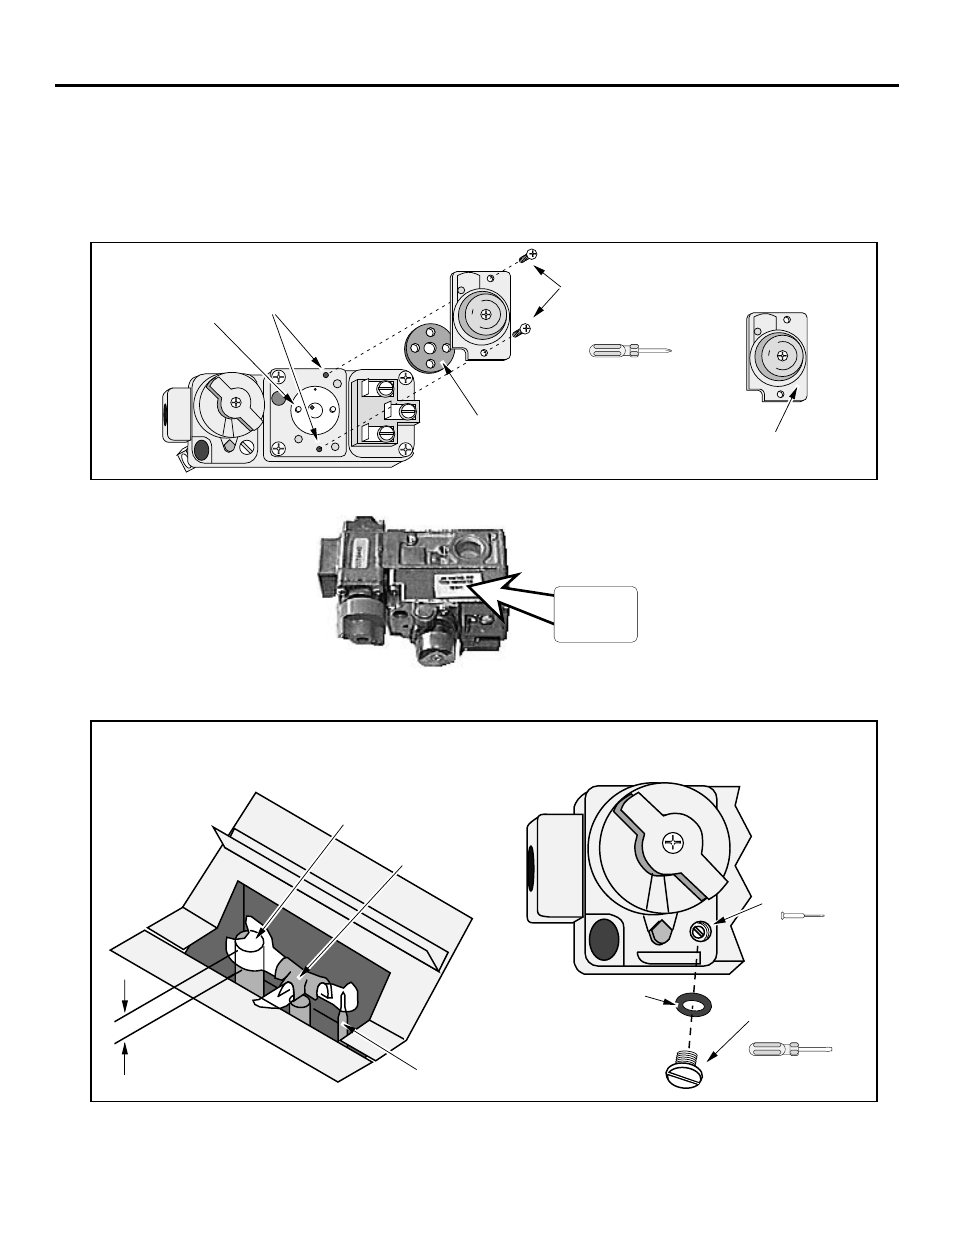
Remove the regulator from the front of the gas control valve. Replace with the propane regulator,
using the new gasket and screws included with the regulator. NOTE: Leak test this area after the
heater is installed, gas is connected, and the main burner is lit.
These screws hold the
regulator in place.
NOTE: use the new
screws included with
the regulator.
Phillips
Screwdriver
PILOT ADJ
T
O
L
PI
ON
OFF
VENT
HI
LO
VENT
HI
LO
Align the regulator
gasket so it is flat
and the two tabs fit
through the two
holes on the
gasket.
Regulator Gasket
NOTE: use the new gasket
included with the regulator.
LP (propane) regulators have a
11.0 2.8 stamped here.
NOTE: These holes strip
easily. Use a hand
screwdriver and tighten
each screw evenly.
10
Place the included propane label over the natural gas label on top of the gas control valve.
THIS CONTROL
HAS BEEN
CONVERTED TO
LP
11
Make the gas line connection, start the heater and thoroughly leak-test all gas connections
and the regulator. Check the pilot. Adjust if necessary.
The pilot flame should impinge the top 3/8Ó of the
thermopile. If it does not, you may need to turn
the pilot up.
3/8Ó
Thermopile
Pilot Hood
Thermocouple
To adjust the pilot flame, remove the cover screw (and
gasket) and turn the needle valve. Clockwise lowers
the flame while counter-clockwise raises it.
PILOT ADJ
T
O
L
PI
ON
OFF
Standard
Screwdriver
Micro (1/16Ó)
Standard
Screwdriver
The cover screw and
gasket must be
replaced to prevent gas
from leaking
Cover Screw
Cover Screw Gasket
Needle Valve