Installation, Finalizing the installation – Avalon Firestyles Salish EF-2000 to 2001 User Manual
Page 16
14
Installation
(for qualified installers only)
Travis Industries
9 3 5 0 8 1 2 2
1 4 1 1 0 0
Finalizing the Installation
!
Turn the gas control valve to “OFF” prior to conducting any service.
1
Open the door (see page 16).
2
Install the log set and coals (see page 17).
!
We recommend you purge the gas line at this time (with the door open). This allows gas to be
detected once it enters the firebox, ensuring gas does not build up.
3
Close and secure the door (see page 16).
4
Turn on gas to the heater. Leak test all gas joints prior to starting the appliance. Start the pilot. Start
the main burner. Leak test all gas joints again.
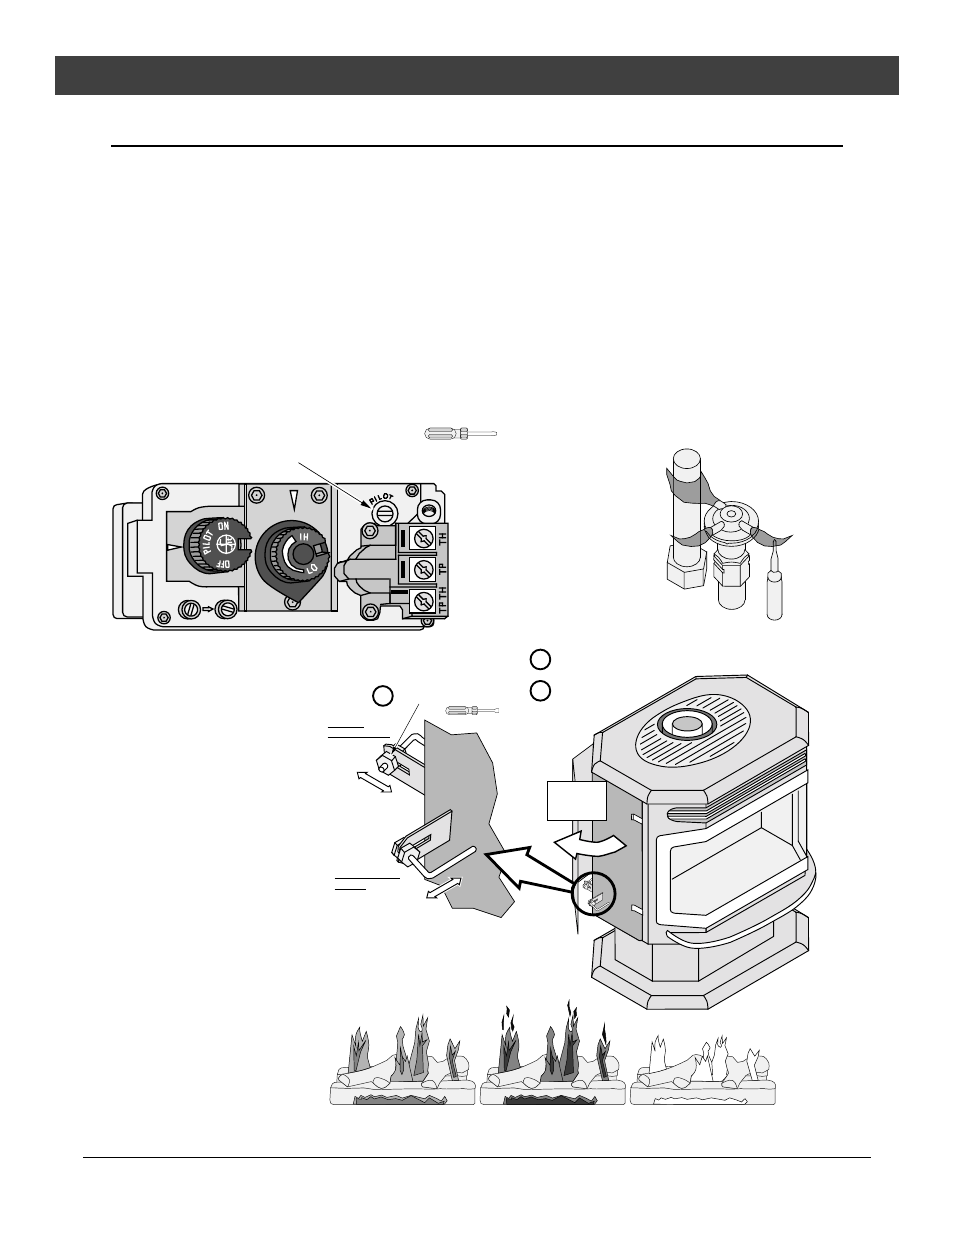
5
Check the pilot flame to make sure it looks like the illustration below. Adjust the pilot flame if
necessary.
Standard
Screwdriver
The pilot flame must contact the thermocouple and
thermopile (see the illustration below). Adjust the pilot up or
down as necessary.
To adjust the pilot flame, turn this screw (NOTE: if totally
unscrewed gas will come out of this port). Clockwise
lowers the flame while counter-clockwise raises it.
6
Let the heater burn
for fifteen minutes.
Adjust the air
shutters, if
necessary, to
achieve the correct
looking flame (see
the illustration
below).
•
The air shutter
adjusts the amount
of air that mixes with
the gas before it
exits the burner
holes.
ADJUSTING THE AIR SHUTTERS
Follow the directions below to adjust the front
and rear air shutter independently.
Swing the
left side
door open.
NOTE: If the air control is all the way in, yet the flames remain
sooty, shut off gas to the fireplace and contact a qualified gas
service technician.
Correct
Flames should be blue at the
base, yellow-orange on the top.
If the flames are over 12" tall or sooty
on the ends, push the air control in.
If the flames are all blue and
short, pull the air control out.
Not Enough Air
Too Much Air
NOTE: The logs must be installed correctly to
monitor the flame while adjusting the air shutter.
Loosen the nut two turns.
Slide the air shutter rod in or out.
Tighten the nut to
secure the shutter.
a
b
c
3/8" Nutdriver
Front Air
Shutter Control
Rear Air Shutter
Control
OPEN
(more air)
CLOSED
(less air)
OPEN
(more air)
CLOSED
(less air)