Section 2: framing, Installation – Montigo L38DF-ST User Manual
Page 7
L38DF-ST* Indoor Gas Fireplace
Page 7
XG0810 - 150204.2
Installation
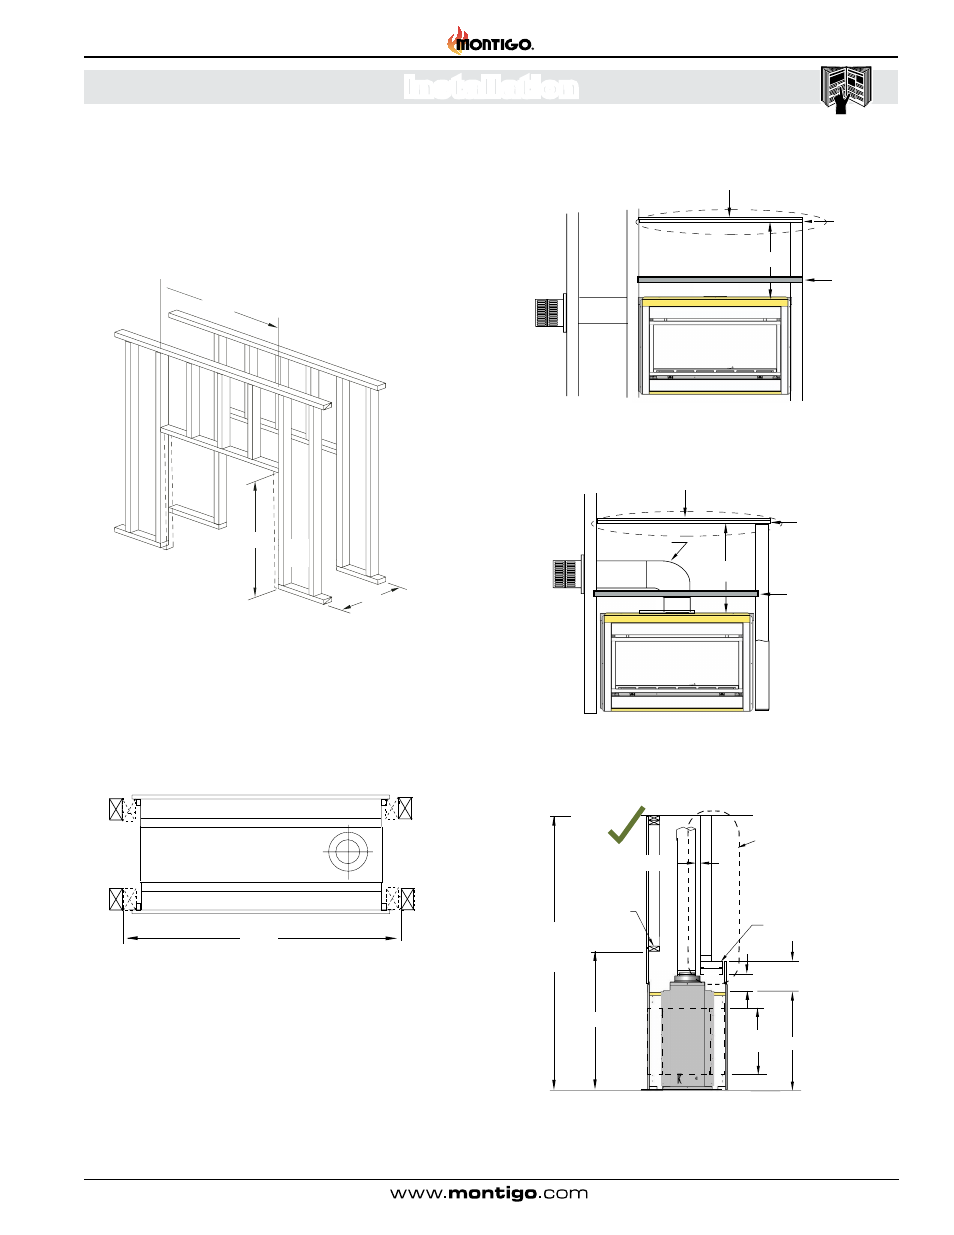
Section 2: Framing
Figure 2. Framing dimensions. Both walls typical.
Figure 3. Securing the fireplace to the framing cleats,
both walls typical.
Figure 5. Non Combustible Framing with alcove above fireplace, side
view shown.
Back-framing the unit
1). Slide the fireplace into the cavity.
2). Tack four studs in place, shown in Figure 2 and 3 as dashed lines.
3). Secure the fireplace in position by nailing into these cleats.
Non
Combustible
Header
7”
Floor
Alcove over
Fireplace Non-
Combustible
Materials Only
33 1/4”
door
opening
39”
Combustible
Header
Min. 1”
10”
Top vent
N.G. & L.P
84”
Min.
Ceiling
Frame in the enclosure for the unit with framing materials. The framed
opening for the assembled fireplace is 41" wide x 40" high x 23 3/4"
deep, see Figure 2.
NOTE: When constructing the framed opening, please ensure there is
access to install the gas line when the unit is installed. See Figure 19.
Figure 4a. Framing for shelves over the fireplace, Top Vent
(Combustible materials).
Figure 4. Framing for shelves over the fireplace, Side Vent
(Combustible materials).
41”
40”
41”
23 3/4”
40”
Cumbustible Shelf
Elbow
17 1/2”
Combustible
Header
Header
N.G. & L.P.
Supplied
Non combustible
Combustible Shelf
10”
Non combustible
Header
Combustible
Header
N.G. & L.P
Supplied
Note: Images are shown without screens for clarity purposes. How-
ever, your fireplace should not be operated without proper installation
of screens.