Original, E-21, Blocks and lines – Casio KL-8200 User Manual
Page 22
E-21
2. Use u and i to move the highlighting to “STORE” and
then press SET.
m
c
8
.
4
1
H
T
G
N
E
L
m
m
8
1
H
T
D
I
W
A
?
E
M
A
N
3. Input up to five characters for the name of the label, and
then press SET.
C
S
E
/
T
E
S
?
E
R
O
T
S
%
0
2
Y
R
O
M
E
M
D
E
S
U
–
–
–
–
T
U
O
Y
A
L
–
–
–
–
4. Press SET to store the label or ESC to abort the opera-
tion without storing anything.
5. Use u and i to move the highlighting to “EXIT” and
then press SET.
6. Press SET to end the operation.
To recall a preset layout label from memory
1. While the LAYOUT menu is on the display, use u and i
to move the highlighting to “RECALL” and then press SET.
2. Use u and i to display the name of the label you want,
and then press SET to recall it.
3. Now you can make any changes in the label contents
and then print it, or simply print the label without making
any changes.
• To make changes in the label contents, use the proce-
dures starting from step 8 under “To use a preset layout
to create a label and print it”.
• To print the label without making any changes, perform
the procedure starting from step 6 under “To use a preset
layout to create a label and print it”.
To delete a preset layout label from memory
1. While the LAYOUT menu is on the display, use u and i
to move the highlighting to “DELETE” and then press SET.
2
m
c
8
.
4
1
H
T
G
N
E
L
m
m
8
1
H
T
D
I
W
y
t
r
a
P
1
S
H
V
L
DEL
2. Use u and i to display the name of the label you want,
and then press SET to delete it.
3. Press SET to delete the label.
ORIGINAL
You can create your own original preset layouts to meet your
specific needs and store them in memory.
• Note that 6mm wide tape cannot be used for printing an
original preset layout.
Blocks and lines
A block is a layout element that indicates the location of text
and graphics. A block can contain one or more lines of text.
To create a new original layout
1. While the PRESETS menu is on the display, use u and
i to move the highlighting to “ORIGINAL” and then press
SET.
–
–
–
L
A
N
I
G
I
R
O
–
–
–
W
E
N
G
N
I
T
S
I
X
E
E
S
U
L
L
A
C
E
R
E
T
E
L
E
D
2. Use u and i to move the highlighting to “NEW” and
then press SET.
–
–
–
L
A
N
I
G
I
R
O
–
–
–
?
K
C
O
L
B
↓
+
–
↑
→
+
–
←
O
T
U
A
K
C
O
L
B
1
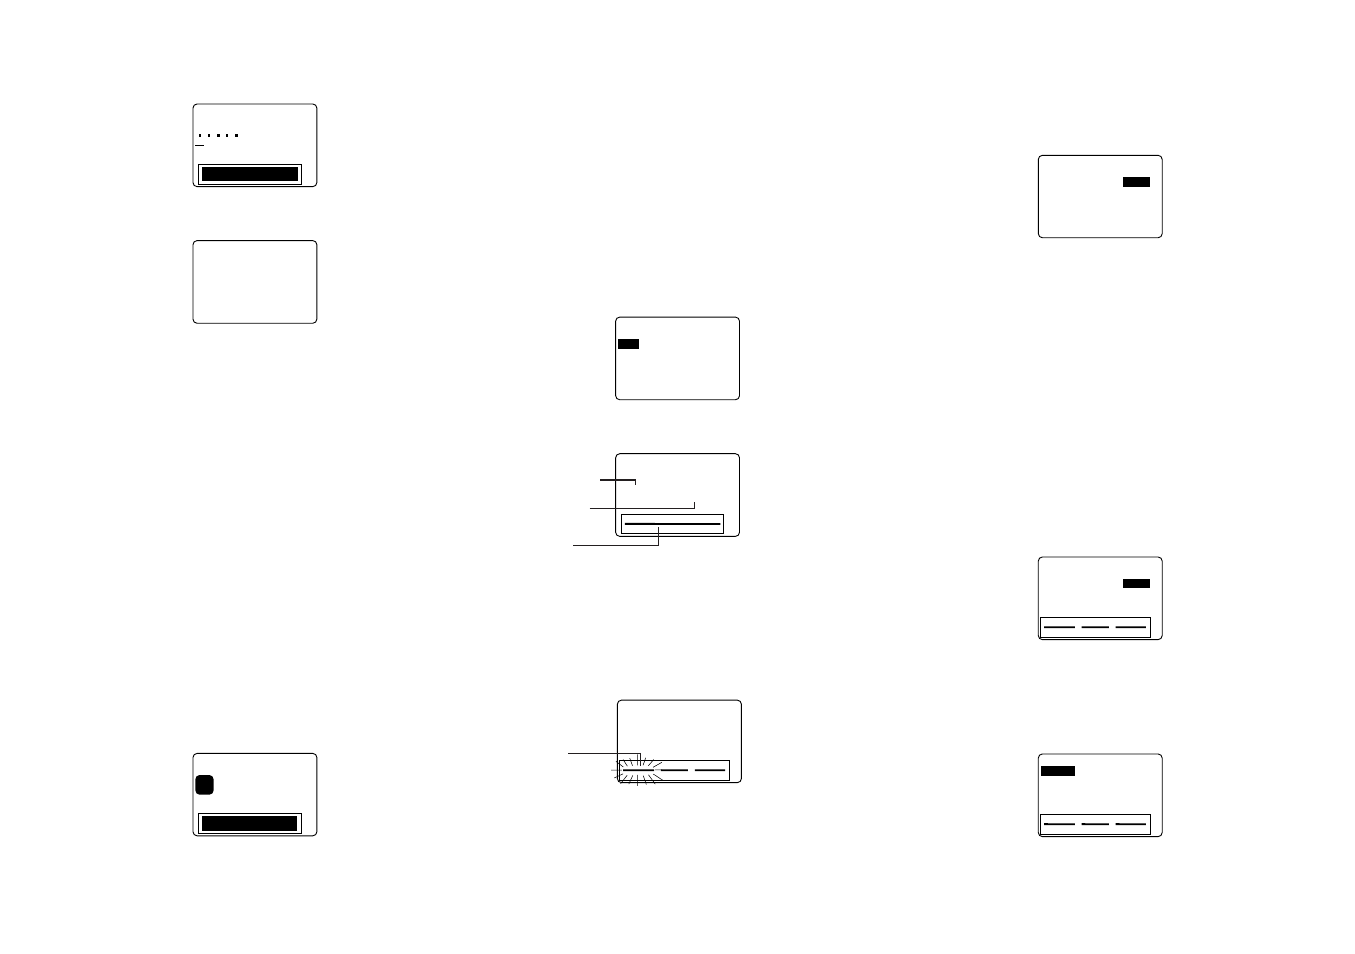
3. Use t and y to specify the number of blocks in your
layout, and u and i to specify the relative lengths of
each block.
• When specifying the relative length of each block, you
can select automatic sizing (AUTO) or one of fixed length
patterns.
4. After making your settings, press SET.
–
–
–
L
A
N
I
G
I
R
O
–
–
–
?
E
Z
I
S
?
E
N
I
L
↓
+
–
↑
→
+
–
←
1
–
1
K
C
O
L
B
1
5. Use t and y to select one of the blocks in the layout and
then use u and i to change the number of lines in the
block and the size of the text.
• Repeat step 5 for all the blocks in the label, and then
press SET.
6. If you specified fixed lengths for blocks (FIX) in step 3,
advance to step 7, below. If you specified automatic siz-
ing (AUTO) in step 3, you now should use t and y to
specify automatic sizing (AUTO) or a fixed sizing (FIX)
for the overall tape length.
–
–
–
L
A
N
I
G
I
R
O
–
–
–
O
T
U
A
H
T
G
N
E
L
–
T
m
c
O
T
U
A
• Select “FIX” in the above step if you want to specify a
fixed tape length. While “FIX” is shown on the display, press
i to move the highlighting to the tape length value. Next,
use t and y to change the fixed tape length value and
then press SET to advance to step 8.
• Specify “AUTO” above if you want the label printer to au-
tomatically adjust the length of the tape in accordance
with the text you input. Then press SET to advance to
step 8.
7. Use t and y to change the fixed tape length value, and
then press SET.
8. Input the text you want to appear in each block, pressing
SET to advance to the next block or line.
• To leave a block or line blank, press SET without inputting
anything.
• When you press SET after inputting the text for the last
block or line, the menu shown here appears.
–
–
–
L
A
N
I
G
I
R
O
–
–
–
Z
R
O
H
N
O
I
T
C
E
R
I
D
L
A
M
R
O
N
R
O
R
R
I
M
m
c
0
.
0
1
H
T
G
N
E
L
m
m
8
1
H
T
D
I
W
9. Specify the print direction (page E-17) and either mirror
or normal printing (page E-18).
• Use u and i to move the highlighting between items,
and t and y to change each setting.
10. After making the settings you want, press SET.
–
–
–
L
A
N
I
G
I
R
O
–
–
–
T
N
I
R
P
E
R
O
T
S
T
I
X
E
m
c
0
.
0
1
H
T
G
N
E
L
m
m
8
1
H
T
D
I
W
11. Use u and i to move the highlighting to “PRINT” and
then press SET to execute it.
Currently
selected block
Number of blocks
Pattern name
Layout