0 storage and freeze protection continued – Sandia 12-Gallon, 1200 PSI Hard Surface Extractor User Manual
Page 15
(26) 1200 PSI Hard Surface Extractor
1200 PSI Hard Surface Extractor (15)
4.5 Connection of Auto-Dump Hose Continued
If not using the auto-dump feature, the auto-dump hose does not need to be connected.
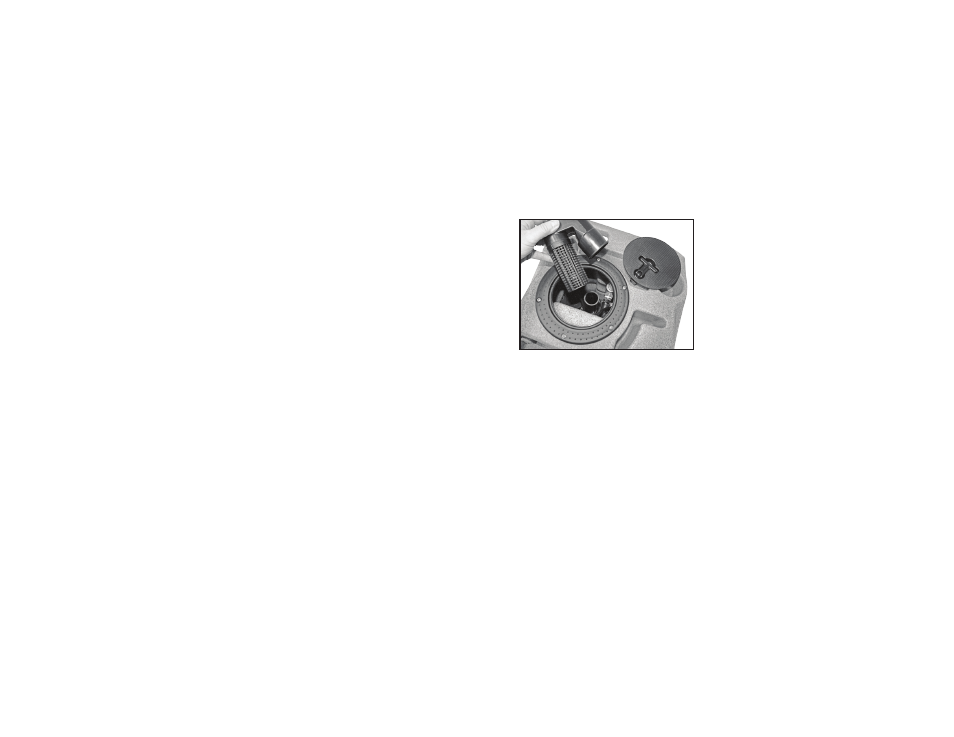
When the recovery tank fills during cleaning, the float ball assembly in the vacuum inlet
filter will rise and will automatically shut-off the vacuum air flow to prevent the recovery
tank from overfilling and waste from getting into the vacuums. When this occurs:
• Immediately turn OFF the vacuum switches.
• Drain the recovery tank. Turn OFF the pump switch while draining the tank. Turn
pump switch back ON upon resumption of cleaning.
• Close the dump valve and turn the vacuum switches back ON when ready to resume
cleaning.
If the auto-dump or vacuum shut-off is not working properly, refer to the “Trouble
Shooting Guide” section or contact your distributor for advice or assistance.
4.6 Adjusting the Pressure
When the high pressure solution pump is on and primed, pressure will show on the gauge
only while the tool is being sprayed. When the tool is sprayed, the gauge will display the
pressure being delivered to the tool. When the tool is not being sprayed, the gauge will
return to zero.
• To decrease the pressure, turn the black knob on the pressure regulator to the left
(counter-clockwise).
• To increase pressure, turn the black knob on the pressure regulator to the right
(clockwise).
• To adjust pressure to your tool and surface requirements: spray the tool; check the
pressure on the gauge; re-adjust as needed to set the machine at the desired pressure;
choose the pressure setting that best meets your type of cleaning.
Float Assembly
Part No. 80-0012
Drain Recovery Tank
7.0 Storage and Freeze Protection Continued
Recommended Procedure for Storage
• In a separate container, mix 1/2-gallon of water with 1/2-gallon of automotive radiator
antifreeze (ethylene glycol type). Mix well and pour into the solution tank.
• Connect the pressure hose to the female quick disconnect (QD) on the front of the
machine. Insert an open-ended male QD into the female QD on the end of the pressure
hose.
• When primed, turn down the pressure to 100 PSI.
• Disconnect the open-ended QD and connect the solution hose to the male QD at the
auto-fill/chemical feed connection. CAUTION: applying high pressure (over 100 PSI)
to the chemical feed system will damage the mechanism.
• With the chemical feed supply tube at the bottom of the solution tank, turn on the
pump and allow to circulate for 10 minutes. Check to make sure the chemical supply
tube is drawing the antifreeze solution. This will introduce antifreeze into the chemical
feed system.
• Disconnect the solution hose from the chemical feed and allow the system to bypass
for 10 minutes. This will work antifreeze into the pressure gauge.
• Attach and wands and hand tools that will also be stored with the Hard Surface
Extractor. Open the valve for 30 seconds, directing the spray to the solution tank.
Disconnect the hose and with the valve open and the jets pointing down, depress the
dimple on the male QD. This will drain the solution out of the tool. Drain thoroughly
before storing.
• Turn off the pump and disconnect all hoses and tools. Vacuum out the solution tank
and thoroughly drain the recovery tank and vacuum hose.
The auto-dump pump-out does not require freeze protection as long as the recovery
tank is completely drained and allowed to thoroughly dry.
To return to service, flush the pressure system by repeating the above steps, using
fresh water in place of antifreeze.