Sandia 12-Gallon, 1200 PSI Hard Surface Extractor User Manual
Page 20
(20) 1200 PSI Hard Surface Extractor
1200 PSI Hard Surface Extractor (21)
6.4 Clean Vacuum Shut-Off Float Assembly Screen
Continued
If debris builds up on this filter, it will reduce
the vacuum air flow and may cause a significant
decrease in the rate of water recovery. If debris
prevents the float ball from moving or seating inside
the assembly, it may not stop the airflow when the
tank fills with water and the water will be sucked in
the vacuums and blow out the exhaust.
To clean, twist off the float assembly from the stand
pipe and clean the screen. Pull fibers and lint off
and rinse with clean water. Push the assembly back
onto the stand pipe and replace the recovery tank lid.
This screen should be cleaned frequently if the Hard Surface Extractor is being operated
in an environment which has an abnormal build-up of lint and debris, such as cleaning
newly installed carpet. Loss of vacuum is most normally associated with lint build-up in
this filter at the top of the vacuum stand pipe.
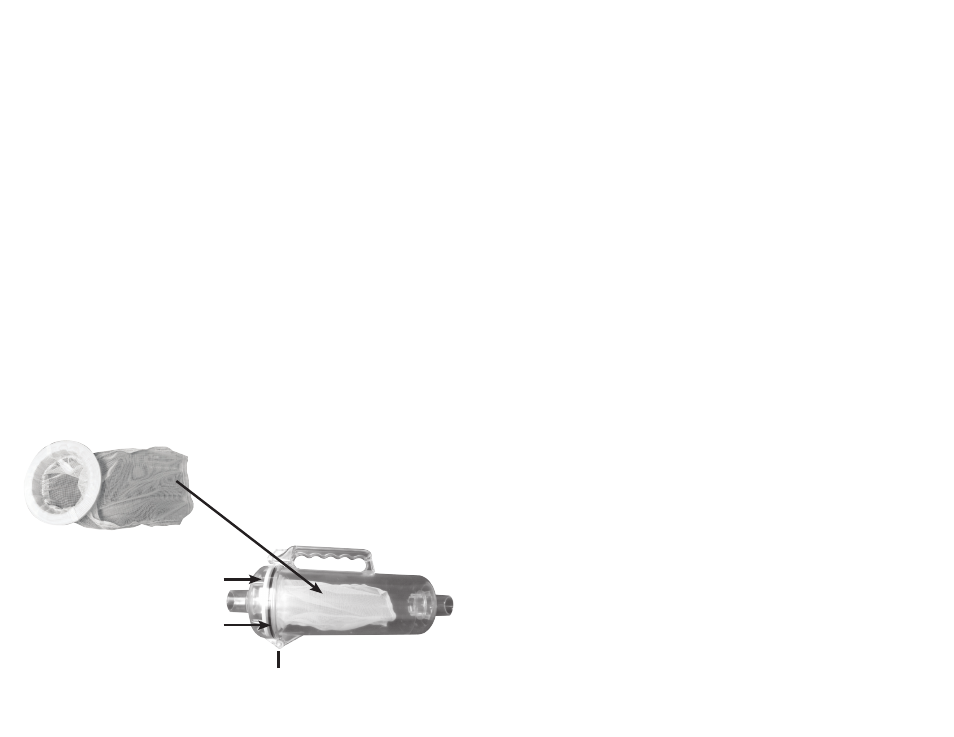
6.5 Clean Clear View In-Line Filter
Build-up of debris in the filter bag of the clear view in-line filter will reduce vacuum air
flow and may cause a significant decrease in water recovery. A torn bag will allow debris
past the filter and into the recovery tank. This debris can clog the waste pump and the
vacuum shut-off assembly. The clear view in-line filter must be examined and cleaned
regularly to keep the Hard Surface Extractor functioning properly.
To clean, push the latch lever and open the lid. Remove the filter bag. Examine the bag
and clean or replace as needed. Rinse the body of the hydro-filter with clean water.
Examine the o-ring seal and replace as needed. Re-install the new or cleaned bag. Close
lid and secure latch.
Filter Bag
Lid
O-Ring
Latch
Filter Body
Vacuum Shut-Off Assembly
6.6 Clean Auto-Dump Pump-Out
The auto-dump pump-out system is capable of handling most debris that passes through
the waste filter. However, for optimum performance, keep the recovery tank clean and
remove debris from the filter screen of the auto-dump pump-out. This should be done on
a daily basis or as needed, depending upon use and amount of debris.
Every two (2) weeks, run the auto-dump pump-out system with a full tank of clean water
to ensure that debris and lint are not accumulating in the base of the pump.
To service the auto-dump pump-out more thoroughly, unhook the vacuum cuff, cut the
zip tie around the looped electrical cord and lift it out of the recovery tank. Unsnap the
screen from the bottom, clean it and clean out the area inside.
6.7 Rinse Out Recovery Tank
Build-up of fine silt and debris can damage the auto-dump pump and dump valve. Clean
out the recovery tank on a regular basis to extend the life of these components as well as
keep the tank and machine smelling better.
To rinse out recovery tank, remove the recovery tank lid and open the dump valve. Place
a bucket under the dump valve. Use a hose to rinse the dirt and debris out of the recovery
tank. Close the dump valve and spray the tank with deodorizer or disinfectant. Proceed to
waste pump cleaning and replace the recovery tank lid. Dispose of dirty water and debris.
6.8 Clean Auto-Dump Pump-Out
Build-up of fine silt inside the waste pump can clog the pump even if the pump is not
used, so this maintenance procedure should be performed regardless of whether the waste
pump out has been used.
After cleaning the recovery tank, remove the cap and connect the green 3/4” x 50-foot
garden hose to the auto-dump pump-out port located on the back of the machine. Secure
the other end of the hose where you wish to direct the discharge of waste water, such as a
toilet or sink.
Fasten the discharge end of the hose tightly. With Cord 2 (right side) plugged in, turn the
recovery tank switch to the ON position. Use a hose to fill the recovery tank to a point
where the float switch turns the waste pump ON. The pump will turn on automatically
when water in the recovery tank is approximately 2/3rds full. The pump will discharge
the waste water down to a level of about 2 inches in the recovery tank. Let the pump run
until it pumps the level down to a point when the flat switch shuts OFF the auto-dump
pump.