0 shutdown procedures – Sandia 12-Gallon, 1200 PSI Hard Surface Extractor User Manual
Page 18
(18) 1200 PSI Hard Surface Extractor
1200 PSI Hard Surface Extractor (23)
5.0 Shutdown Procedures
• If using the auto-fill system, turn the water supply OFF before finishing each job.
This will allow use of the water and chemicals already in the tank and will reduce the
amount of excess water to be disposed of later.
• When finished cleaning, turn OFF all switches.
• If the auto-fill system was used and there is still water in the solution tank, push the
float down to release the water inlet hose pressure before disconnecting the hose from
the faucet. Disconnect the water inlet hose from the quick disconnect on the front of
the machine.
• Disconnect the solution hose and vacuum hose from the cleaning tool. Pull the valve
trigger to release pressure from the hose before disconnecting the solution hose from
the cleaning tool.
• Disconnect the clear view in-line filter from the vacuum hoses and clean the filter as
needed.
• Disconnect the vacuum hose and solution
hose from the machine.
• If water remains in the solution tank, use
the short vacuum hose and vacuum the
excess water from the tank.
• If the auto-fill system was utilized, place the
chemical feed hose back into the solution
tank.
• If the auto dump-out system was used: turn
the waste pump switch ON to pump out any
remaining water from the recovery tank;
turn switch OFF, remove the auto-dump
pump-out hose from the outlet fitting and
replace the cap; roll up the hose toward
drain to remove the remaining water from
the hose; connect ends of hose together to
prevent dirty water from dripping from hose
during transport.
• Disconnect the power cords from the outlets
and from the machine.
• Remove the float shut-off assembly from
the recovery tank and clean filter as needed.
Replace shut-off assembly and tank lid.
• Drain any remaining water from the recovery
tank and dispose of in a sanitary drain. DO
NOT use the same bucket to drain the tank
that you used to fill the tank.
• Roll up all hoses and tools. Collect and store
extractor, all tools and accessories.
6.9 Flush Solution Tank and Pump Continued
• Turn the vacuums OFF and disconnect the prime hose.
• Place a bucket under the dump valve and open the dump valve to drain the water out
of the recovery tank.
• Close the dump valve and dispose of the water.
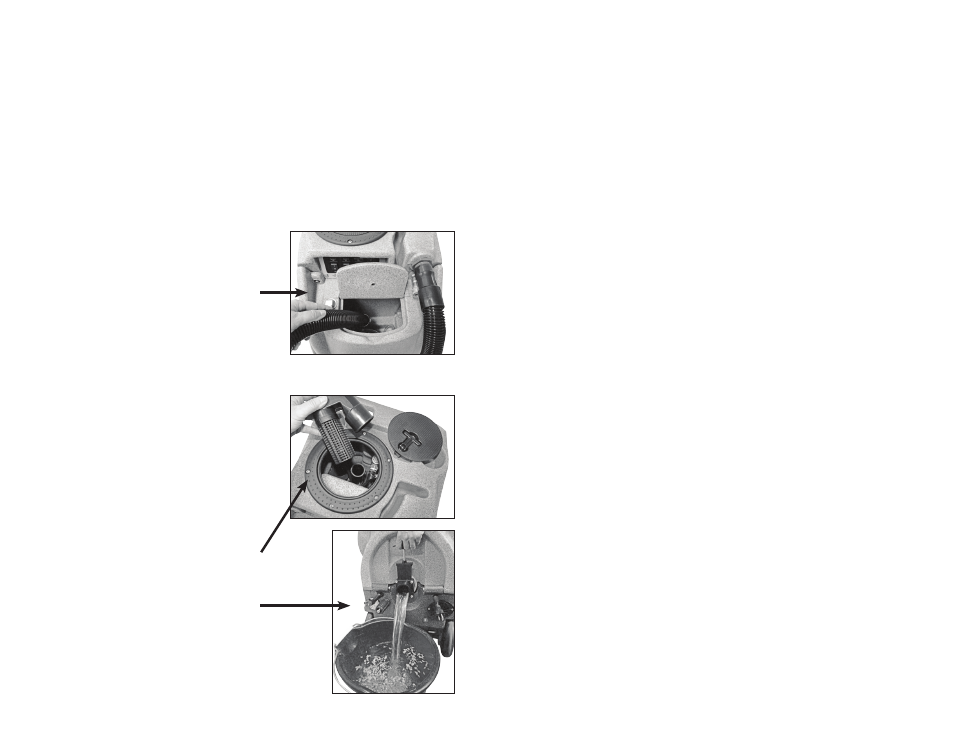
6.10 Clean Pump Inlet Filter
A restricted pump inlet filter can
prevent the solution pump from
providing adequate pressure for
cleaning. A restriction of air leak
on the pump inlet hose can also
damage the solution pump check
valves and plunger seals.
CAUTION: before proceeding
with this procedure, make
sure both the power cords are
disconnected.
• To examine the filter, open the solution tank lid on the front of the machine. The filter
is in the bottom of the solution tank.
• Grasp the filter cap and unscrew the filter from the brass nipple by turning counter-
clockwise. Clean or replace the filter as needed.
• To examine the pump inlet hose, release the latch on the front of the machine and tilt
the tanks off of the base assembly. Support the tanks with a chair, bucket or box while
working inside the base.
• Examine the hose for kinks, clogs or holes and repair or replace the hose as needed.
• Tilt the tanks back onto the base and secure the latch.
Direct the end of the prime hose
into the recovery tank vacuum
barb.
Vacuum solution out of solution
tank.
Solution Tank
Latch
Base