Step 1: prism 2 installation, Editing user names & passcodes – Auto-Zone Control Systems Prism 2 Graphical Interface Technical Guide (Version 01J) User Manual
Page 9
STEP 1: PRISM 2 INSTALLATION
Prism 2 Technical Guide
9
Edit User Names & Passcodes
WARNING: MAKE SURE YOU CHANGE THE
ADMINISTRATOR USER NAME AND PASSWORD
IMMEDIATELY IN ORDER TO SECURE THE SYSTEM!
NOTE:
Only the Administrator can edit User Names and
Passwords. You MUST press
<ENTER>
in each fi eld to have
the system accept the information.
From the Prism 2 Main Menu, click
< Edit Passcodes>
from the
File Menu
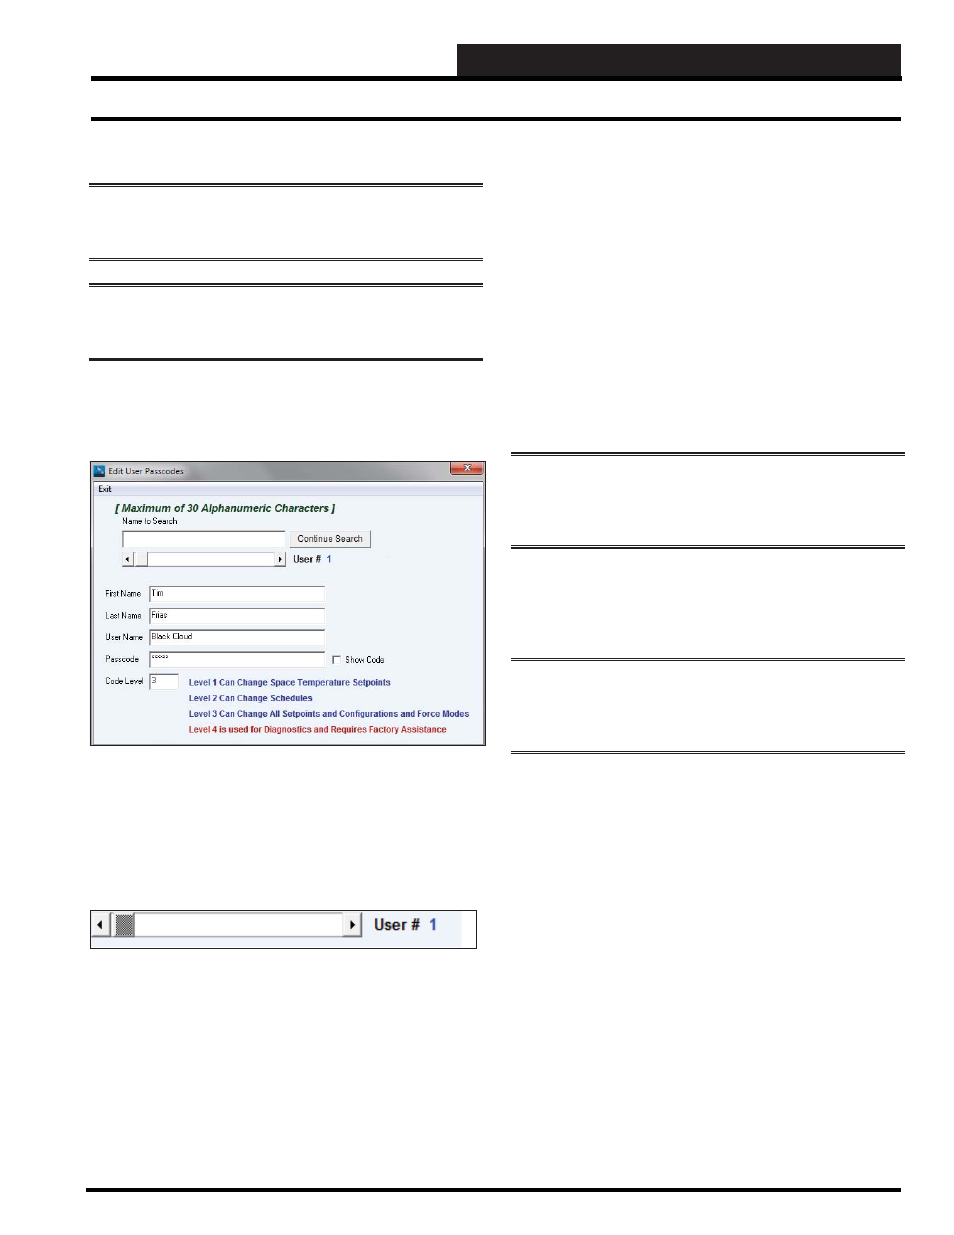
. The Edit User Passcodes Window will appear. See
below for an example of setting up information for a Level 3 User.
Editing User Names & Passcodes
Step 3:
Type the last name of the User in the Last Name fi eld
and press
<ENTER>
. In this example, the name is Frias. You can
enter up to 30 alphanumeric characters. The Last Name is used by
the History Log to identify who logged into the system and any
setpoint changes they may have made.
Step 4:
Type the user name of the User in the User Name fi eld
and press
<ENTER>
. The User Name could be a nickname or a
shortened version of the person’s name. You can enter up to 30
alphanumeric characters. In this example, the User Name is Black
Cloud.
Step 5:
Type a password in the Passcode fi eld and press
<ENTER>
.
Click the Show Code check box if you wish to see the characters
while you are typing. You can enter up to 30 alphanumeric
characters.
NOTE:
A strong password is defi ned as at least 14
characters long and containing characters from at least 3 of
the following 4 classes: upper case letters, lower case letters,
numbers, and special characters, except for an apostrophe ‘.
Step 6:
Type the passcode level of the User in the Code Level
fi eld. Valid entries are 0, 1, 2, 3, 4, and 9. Press
<ENTER>
. Refer
to defi nitions of Passcode Clearance Levels on page 8 for further
details.
NOTE:
Only the Administrator can be set for Level 9.
The maximum level for a normal user is 4, but that level
should only be reserved for maintenance personnel and
not used by anyone else.
Step 7:
When you are fi nished editing,
click
<Exit>
to close the
window.
Revised 5/1/13
Step 1:
Identify the User Number by using the scroll bar. Or, if
you already have the Users setup and are editing, you can type
their name in the Search Field. If changing your Administrator
User Name or Passcode, it will appear in the window ahead
of User #1. Click the right arrow in the scroll bar and the user
number will change sequentially. In the example above, you are
setting up the information for User # 1.
You can enter 100 different users. This may increase in future
versions.
Step 2:
Type the fi rst name of the User in the First Name fi eld
and press
<ENTER>
. In this example, the name is Tim. You can
enter up to 30 alphanumeric characters. The First Name is used by
the History Log to identify who logged into the system and any
setpoint changes they may have made.