Mounting kits, Lnb installation, 4 mounting kits – Comtech EF Data DST User Manual
Page 50: 5 lnb installation
Digital Satellite Terminal System
Revision 1
Low Noise Block Converter
MN/DST.IOM
4–8
4.4.4 Mounting
Kits
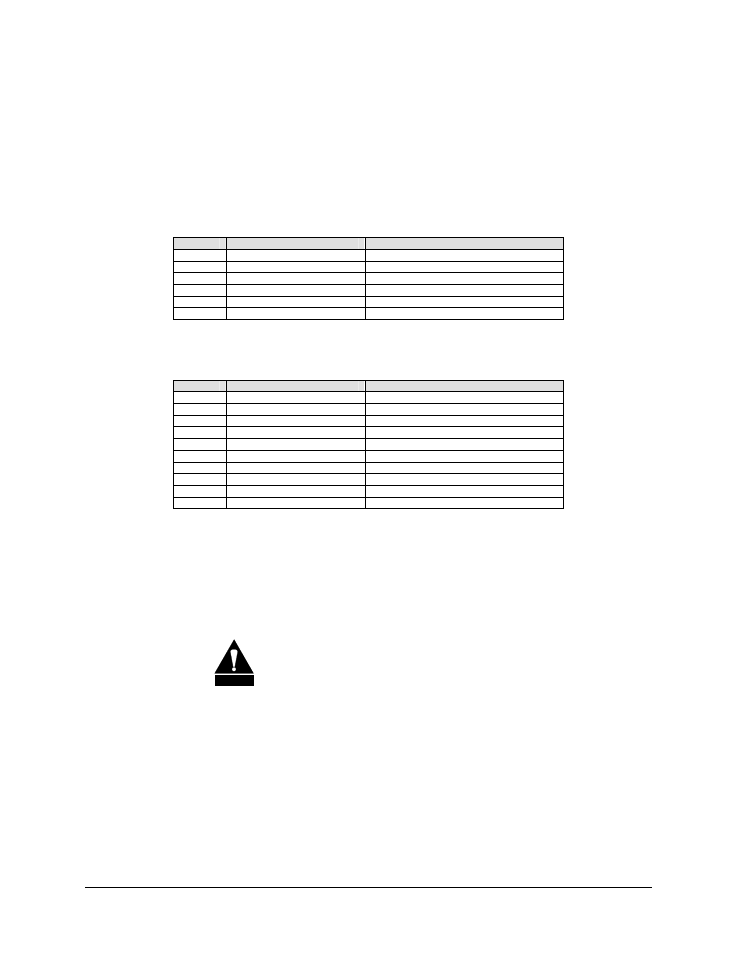
Table 4-5. Optional: C-Band Waveguide ASB Kit, KT/2721-1
QTY
Part Number
Description
10
03P1079
Bolt, Hex, 1/4-20X1, SS
1
32D1002
Gasket, Half, Waveguide CPR229
1
32P1040
Gasket, Full, Waveguide CPR229
20
HW/1/4-FLT
Washer, Flat, 1/4
10
HW/1/4-SPLIT
Washer, Split 1/4
10
HW/1/4HEXNUT
Nut, Hex 1/4
Table 4-6. Optional: Ku-Band Mounting Kit, KT/8924-1
(LNB to OMT)
QTY
Part Number
Description
3 32P1037
O-Ring
3 32P1039
O-Ring
4
HW/6-32 HEXNUT
#6 Nut
4
HW/6-32x7/8 SHCS
#6 Socket screw
8
HW/6-FLT
#6 Washer, Flat
4
HW/6-SPLIT
#6 Washer, Split
8
HW/8-FLT
#8 Washer, Flat
8
HW/8-SPLIT
#8 Washer, Split
4
HW/M4x12SHCS
M4 x 12 Socket Screw
4
HW/M4x25SHCS
M4 x 25 Socket Screw
4.4.5 LNB
Installation
To install a single LNB:
1. If installed: Remove the protective covers from the LNB and TRF.
CAUTION
After removing the protective covers, ensure that no foreign
material or moisture enters the antenna waveguide or TRF.
2. Install the appropriate o-ring on the LNB or TRF, as follows:
a. If only one of the mating flanges is grooved, the thin o-ring should be
installed.
b. If both of the mating flanges are grooved, the thick o-ring should be installed.
3. Position the LNB (with o-ring) in place on the antenna OMT and install with
provided M4x12 socket screws and No. 8 SAE washers (split and flat).