DR Power Scout 8.25 (January 2007 and Later) User Manual
Page 35
CALL
TOLL-FREE
1-800-DR-OWNER 31
Lock Washer
Bolt
Flat
Washer
Clutch
Tab
Stud
Mark
Installing a New Clutch Kit # 214001
Your Clutch Replacement Kit contains the parts for proper replacement of your DR
®
Scout Clutch
Assembly. Before starting work, please take a moment to familiarize yourself with the location of the
work, the tool requirements and inspect the contents of your kit to be certain all parts are included.
STOP THE ENGINE AND DISCONNECT THE SPARK PLUG WIRE BEFORE PERFORMING THIS
INSTALLATION. THIS PROCEDURE REQUIRES TIPPING YOUR MACHINE. REMOVE THE AIR FILTER,
PRECLEANER, OIL AND GAS BEFORE TIPPING. ALWAYS STABILIZE THE MACHINE WHEN IT IS IN A
TIPPED POSITION.
Kit Contents:
•
(1) Clutch, P/N 175401
•
(3) Washer, P/N 112381
Tools and Supplies Needed:
•
1/2" Wrench
•
9/16" Wrench
•
Gloves
•
Marking Pen
•
Block of wood to brace the Blade
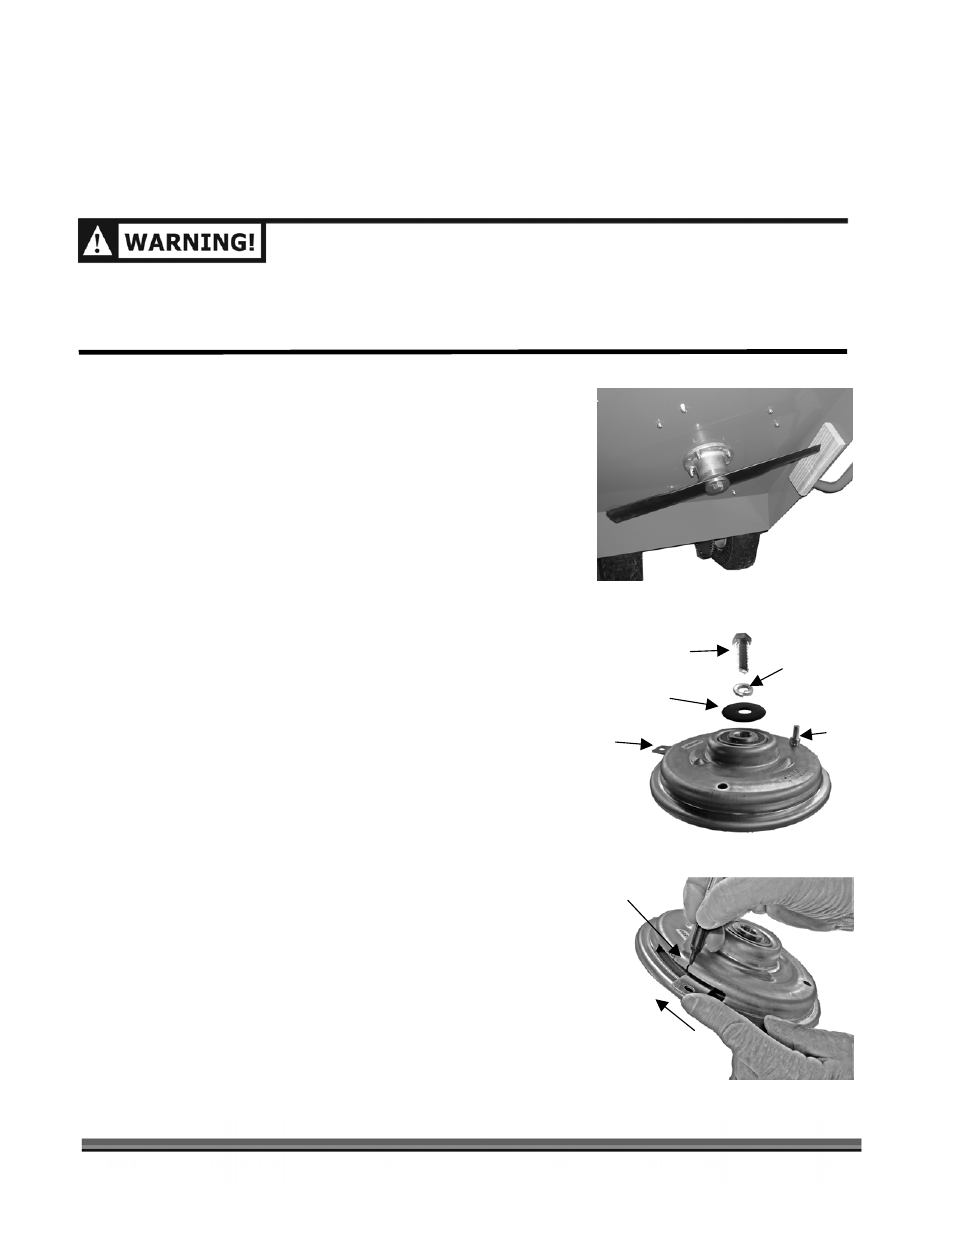
1. Remove the Blade Belt per steps 1 thru 6 on page 24.
2. Tip the machine toward the rear and stabilize it.
3. Wedge a block of wood between the Mower Frame and
the Blade (Figure 26) and then return the machine to
level ground.
4. Using a 9/16" Wrench, remove the Clutch Bolt, Lock
Washer, and Flat Washer (Figure 27).
5. Grasp the Clutch with both hands about 180º apart
and lift the Clutch from the shaft.
Tip: Rock the Clutch back and forth while lifting and then
change hand positions around the Clutch.
NOTE: Before installing the new Clutch on the Blade shaft, it
is necessary to locate the exact point where the
Clutch Tab engages the Clutch mechanism.
6. Hold the new Clutch with the Clutch Tab facing left
(Figure 28).
7. Move the Tab forward to where you first feel resistance
and mark the Clutch housing above the front edge of
the Tab at that point (Figure 28).
Figure 26
Figure 27
Figure 28