Wagner anti-wrap device – DR Power Sprint (1985 - 2000) User Manual
Page 23
DR
®
TRIMMER/MOWER
™
Assembly & Operating Instructions
17
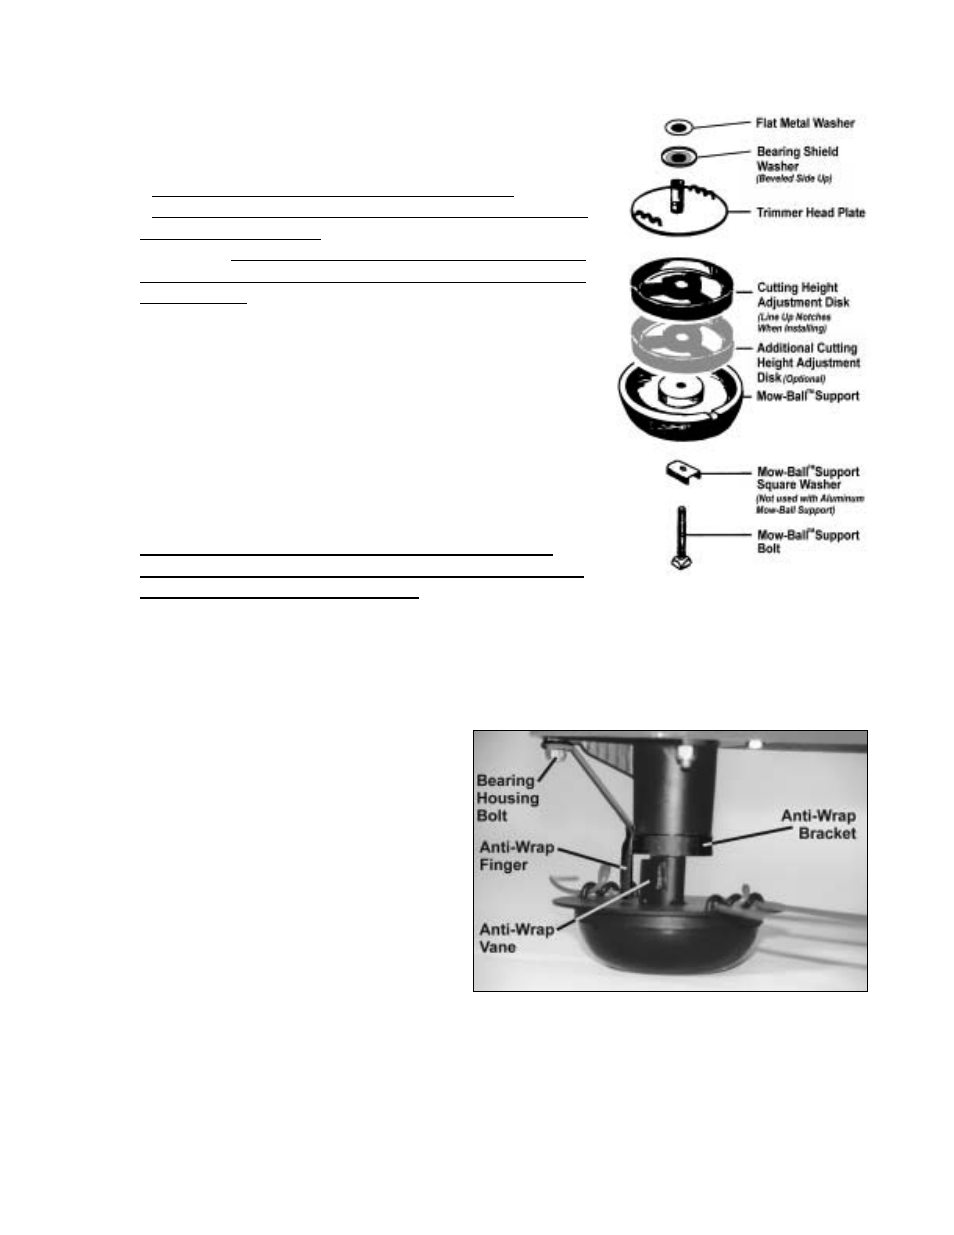
4. Reassemble the components in the order shown in Figure 22,
adding the additional cutting height disk above or below the
one already installed.
• Be sure bearing shield washer is beveled side up.
• Be sure to align the notches in the cutting height disks and
the Mow-Ball
™
Support before completing assembly.
• Check the head of the Mow-Ball
™
Support bolt. It should
sit in the groove (square washer) at the bottom of the Mow-
Ball
™
Support.
5. Keeping the bearing housing locked with the screwdriver,
mount the Mow-Ball
™
Support assembly. Hold the bolt in
place with one finger and turn the assembly clockwise onto
the bearing housing until it's finger tight.
6. Spin the Mow-Ball
™
Support to be sure the anti-wrap device
does not hit the trimmer head plate. There should be about
1/16" to 1/8" of clearance between the top of the flat plate and
the end of the anti-wrap bracket. There will be some
resistance as you turn the trimmer head because of the belt
and pulley.
7. IMPORTANT! Return the orange vinyl plug to the
bearing housing. This will keep out dirt and debris and
ensure the long life of the bearings. Do not put oil or
grease in the hole. The sealed bearings do not need lubricant.
It is possible to use up to three cutting height adjustment disks. Using a third disk will also require
purchase of a longer bolt (Part #114641).
Wagner Anti-Wrap Device
The Wagner Anti-Wrap Device was designed
to reduce the amount of grass wrapping
around the bearing housing shaft. It consists
of the trimmer head plate, which has a vane
welded to the shaft, and a bracket that fits
around the shaft (Figure 23).
To remove the Anti-Wrap Device bracket:
1. Follow the instructions for removing the
Mow-Ball
™
Support on page 22.
2. Remove the front bearing housing bolt
which mounts the upper part of the
bracket to the frame (Figure 23).
3. Slide the bracket off the bearing housing.
You may need to tap the bracket to get it off.
Note: When remounting the Anti-Wrap Device there should be about 1/8" clearance between the
finger and the vane. Bend the finger to adjust as needed.
Figure 22
Figure 23