Attaching the chipper hopper, Adding oil and gasoline – DR Power 8 FPT User Manual
Page 11
CONTACT US AT www.DRpower.com 11
Attaching the Chipper Hopper
Tool Needed:
1/2" Wrench
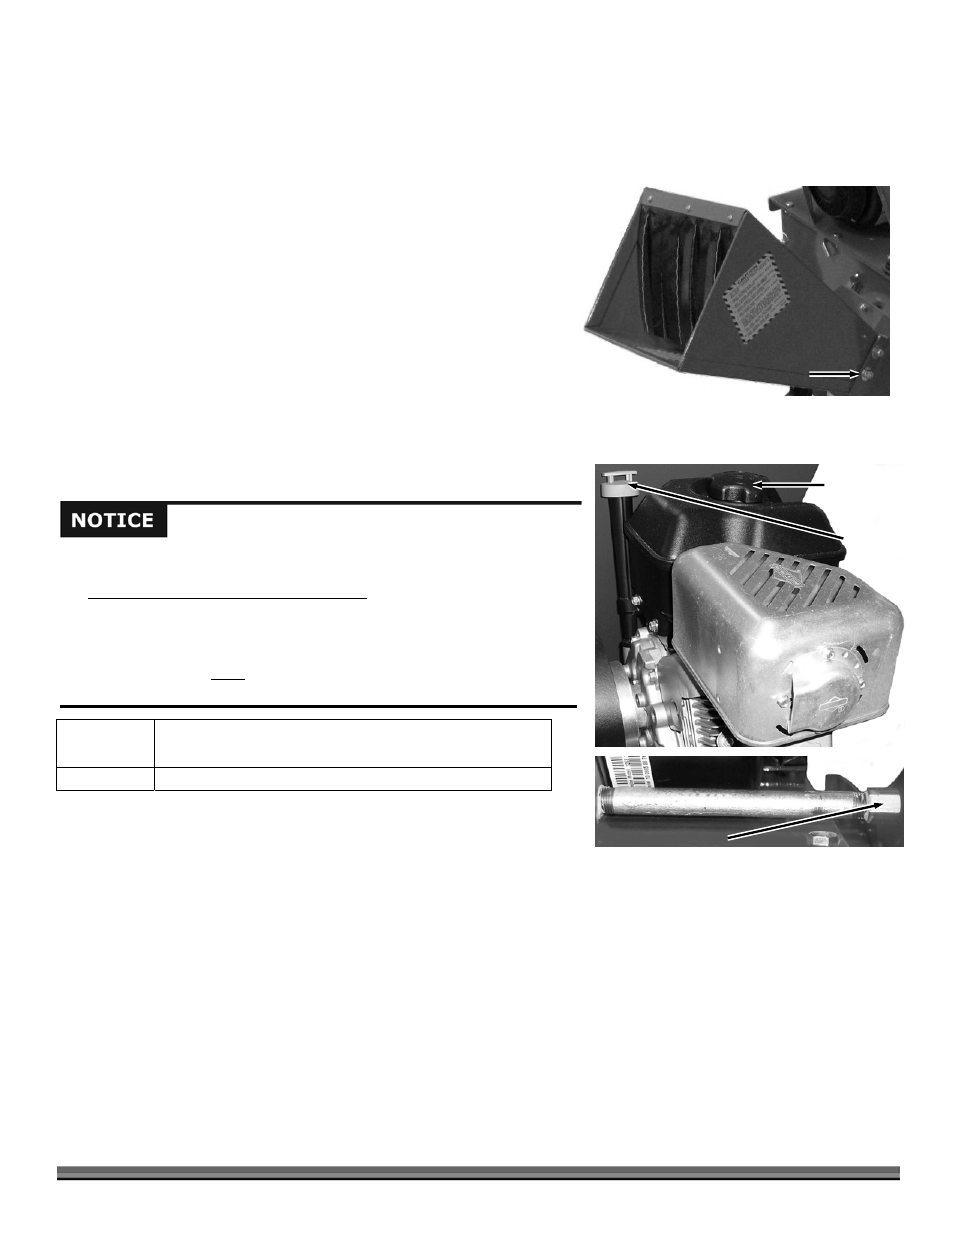
Tip: Insert a towel or large rag into the opening to keep the Bolts from falling
into the Chipper. Position the Hopper as shown in Figure 7 with the Debris
Guard hanging down
1. Attach the Chipper Hopper to the machine using four 5/16"-18 x 3/4"
Carriage Bolts, four 5/16" Flat Washers and four 5/16"-18 Nylon Lock Nuts.
NOTE: Be sure to insert the Bolts, from the inside of the Chipper Hopper so that
the threads are sticking out (Figure 7) and the heads are flush against the Hopper.
Install the Bolts, Washers and Nuts one at a time.
2. Install a Flat Washer, then a Lock Nut on each Bolt. Initially install the
Bolts and Nuts finger tight and then tighten the Nuts one (1) turn using a
1/2" Socket or Wrench (Figure 7). Check to see that the Hopper is
centered on the Inlet Chute and then tighten the Nuts securely.
3. If you used a towel or rag in the Chipper opening, remove it now.
Adding Oil and Gasoline
Engine Oil
SAE 30: above 50 degrees F; 10w-30: 10-90 degrees F; 5w-30:
30 degrees F or below
Fuel
Unleaded gasoline
NOTE: Use only the recommended high detergent Engine oil. Other types of oil
could cause problems operating your machine. Please refer to your Engine Owner’s
Manual for more detailed oil information.
1. Block the machine so the Engine is level. Remove the Oil Fill/Dipstick
(Figure 8) and clean the end of it with a rag.
2. Initially add 16 oz. of the oil recommended by the Engine Manufacturer. Wait one minute for the oil to settle.
3. Screw the Dipstick in and then remove it to check the oil level (clean the Dipstick with the rag after checking).
4. Continue adding a few ounces of oil at a time, rechecking the Dipstick until the oil reaches the fill mark. Be careful not to
overfill.
5. Replace the Dipstick and screw all the way in when full.
6. Remove the Fuel Fill Cap and fill the Fuel Tank with fresh, unleaded gas (with a minimum of 85 Octane) to approximately 1" to
1-1/2" below the top of the Fill Neck to allow for Fuel expansion (Figure 8). Be careful not to overfill and reinstall the Fuel Fill
Cap before starting the Engine. See your Engine Owner’s Manual for more detailed information.
NOTE: To refill the Fuel Tank, turn the Engine OFF, and let the Engine cool at least five minutes before removing the Fuel Fill Cap.
You must add oil before starting the Engine. This machine is shipped
without oil. Traces of oil may be in the reservoir from factory testing, but
you must add oil before starting the Engine. Fill the reservoir slowly,
checking the level frequently to avoid overfilling.
To get an accurate reading when checking the oil level:
- The Engine must be level.
- The Dipstick must be screwed all the way in to ensure an accurate oil
level reading on Briggs & Stratton Engines.
Fuel Fill
Fuel Fill
Oil Fill/
Dipstick
Figure 8
Oil Drain
5/16" Carriage
Bolt, Washer,
and Lock Nut 4-
places
Figure 7
Chipper
Hopper
Debris
Guard