Fieldpiece SOX3 - Combustion Checker with Auto Pump User Manual
Fieldpiece, Combustion check with autopump, Quick start
01
03
06
02
05
04
07
09
12
08
11
10
Quick Start
1. Press ON/OFF to power on the SOX3.
2. A 30 second warm up ensues.
3. Press FUEL to cycle through fuel
types.
4. Insert the barrel of the SOX3 into
flue.
5. Press MEASURE/HOLD to begin tak-
ing measurements.
6. Use the up arrow button to toggle
the upper display between %O
2
and
%CO
2
.
7. Use the down arrow button to
toggle the lower (right) display
between %EA and % (Efficiency of
condensing or non-condensing).
8. Make sure all holes in the flue are
sealed after testing is finished.
Description
The SOX3 is a portable hand
held automated combustion check
designed for the HVACR technician.
The SOX3 provides all the essential
measurements for checking and
tuning combustion equipment.
Measure flue temperature and %O
2
directly to view the calculated %CO
2
,
%Excess Air (%EA) and %Efficiency (%)
for condensing or non-condensing
equipment.
The ergonomic handle and 8ft hose
make for easy flue gas measurements.
Use the magnetic strap and the barrel
lock to go entirely hands free.
With three common fuel types as
well as a custom fuel input the SOX3
allows you to check %O
2
, %CO
2
, %EA
and % (efficiency) on any combustion
equipment you may encounter.
Keep your SOX3 up and running
longer with the field calibratable
thermocouple and replaceable
oxygen sensor.
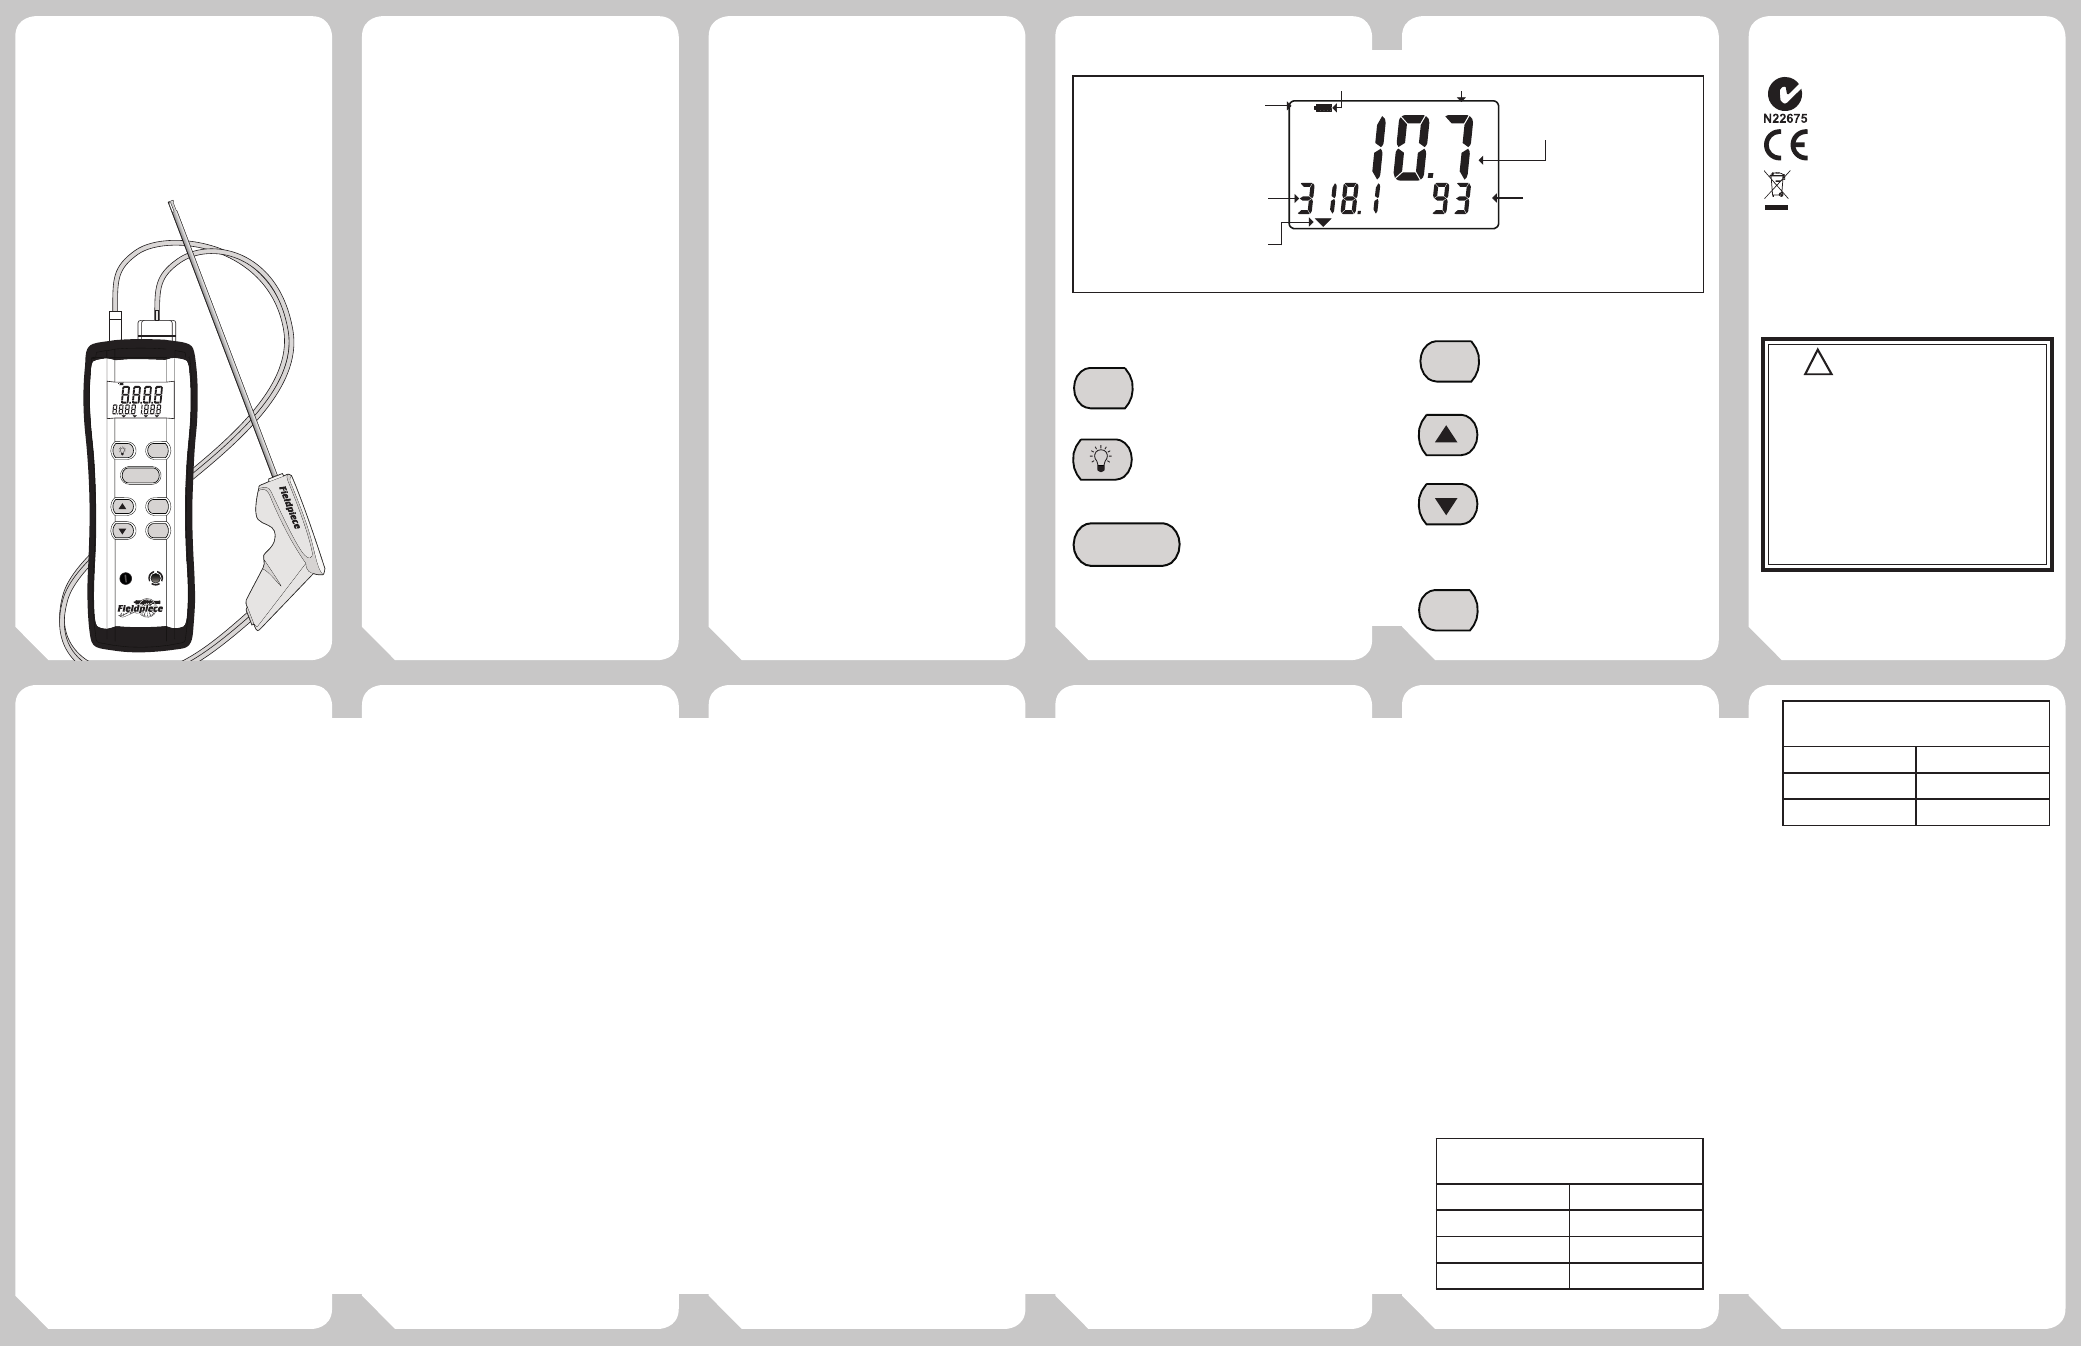
Display
Controls
Press for 1 Sec to Exit
PRESS FOR
1 SECOND
FUEL
ON/OFF
MAX/MIN
AUTO-OFF
°F
°C
MEASURE/HOLD
°C
°F
HOLD
APO
%
MAX MIN
%
CO
2
EA
MAX
SET
Hold for one second to toggle power.
Press for 1 Sec to Exit
PRESS FOR
1 SECOND
FUEL
ON/OFF
MAX/MIN
AUTO-OFF
°F
°C
MEASURE/HOLD
°C
°F
HOLD
APO
%
MAX MIN
%
CO
2
EA
MAX
SET
Toggle backlight on display.
(Hold while powering on the SOX3 to
disable the meter's APO.)
Press for 1 Sec to Exit
PRESS FOR
1 SECOND
FUEL
ON/OFF
MAX/MIN
AUTO-OFF
°F
°C
MEASURE/HOLD
°C
°F
HOLD
APO
%
MAX MIN
%
CO
2
EA
MAX
SET
Toggle between MEASURE
mode (pump on, live readings)
and HOLD mode (pump off,
frozen readings).
Fieldpiece
Combustion Check
with AutoPump
OPERATOR'S
MANUAL
Model
SOX3
Press for 1 Sec to Exit
PRESS FOR
1 SECOND
FUEL
ON/OFF
MAX/MIN
AUTO-OFF
°F
°C
MEASURE/HOLD
°C
°F
HOLD
APO
%
MAX MIN
%
CO
2
EA
MAX
SET
Cycle through fuel types. Fuel indication
arrow moves along lower display. (Hold
for one second to enter Custom Fuel
setup.)
Press for 1 Sec to Exit
PRESS FOR
1 SECOND
FUEL
ON/OFF
MAX/MIN
AUTO-OFF
°F
°C
MEASURE/HOLD
°C
°F
HOLD
APO
%
MAX MIN
%
CO
2
EA
MAX
SET
(UP)Toggle between %O
2
and %CO
2
.
(Down) Toggle between %EA and %.
Use during Custom Fuel setup to adjust
max %CO
2
. (Hold respective arrow button
while powering on to change
temperature units to °F or °C.)
Press for 1 Sec to Exit
PRESS FOR
1 SECOND
FUEL
ON/OFF
MAX/MIN
AUTO-OFF
°F
°C
MEASURE/HOLD
°C
°F
HOLD
APO
%
MAX MIN
%
CO
2
EA
MAX
SET
Press to cycle through maximum,
minimum, and real-time measurements.
(Hold for one second to clear saved values
and continue measuring.)
Certifications
C-Tick (N22675)
CE
WEEE
RoHS Compliant
How to Use
Pre-Testing
1. Power on the SOX3 and allow the
unit to warm up for 30 seconds.
2. Calibrate temperature if needed (see
Field Temp Calibration).
3. Check that SOX3 water and particle
filters are dry and properly sealed.
4. Thoroughly inspect combustion
equipment for damage.
5. Identify the fuel being combusted
and use the FUEL button on the
SOX3 to select that fuel. For fuel
other than Natural Gas, Oil #2, or
Propane see Custom Fuel setup.
6. Identify the flue and locate service
port for taking flue measurements
or, if necessary, drill a hole using a
1/2" bit (12.7mm) within 18" of the
breech.
7. Once your combustion equipment
has passed all of your preliminary
and visual inspections, turn on the
equipment to be tested.
Testing
1. Identify manufacturer's specifica-
tions for % efficiency, %EA (% Excess
Air), %CO
2
, or %O
2
in the flue. If
manufacturer’s specs are not avail-
able see Table 2 (on back).
2. Once combustion equipment has
stabilized, insert rifle into flue gas
at service port or drilled hole.
Note: Combustion samples should
be taken before dilution air enters
the system, before components like
draft hoods and barometric damp-
ers. Testing at least 6" upstream of
the breach is the typical location for
most equipment. As a general rule,
the sample hole should be more
than twice the flue diameter away
from any elbows.
3. Press MEASURE/HOLD to start the
internal pump and begin taking fuel
measurements.
4. Toggle between %CO
2
and %O
2
with the up arrow button. Toggle
between %EA and efficiency with
the down arrow button.
Note: Efficiency calculations displayed
toggle through % efficiency of
condensing "cond" and non-
condensing "nonc" equipment. The
condensing % efficiency uses the
high heating value (HHV) and the
non-condensing % efficiency uses
the low heating value (LHV) of the
fuel type selected. Identify what
equipment you are working on to
decide which % efficiency calcula-
tion to use.
Note: The correct fuel type must be
selected to properly display calcu-
lated values. Effieciency will not be
calculated when using the custom
fuel setting.
5. Wait for readings to stabilize, this
can take a couple minutes.
6. Press the MAX/MIN button to cycle
through maximum, minimum, and
real-time values. (Hold MAX/MIN to
clear saved values.)
7. Once stabilized, press MEASURE/
HOLD to hold measurements and
stop the pump.
8. Make necessary adjustments to
bring the equipment within manu-
facturer's specifications.
9. Retest.
Post-Testing
1. Remove the rifle from the flue and
allow time for the barrel to cool.
2. Plug any holes you may have put into
the flue, with heat resistant silicone
or comparable plug.
3. Power the meter off. The internal
pump will run for a short time to
purge the meter before completely
shutting off.
4. Open and empty water trap before
storing SOX3 in its case.
Custom Fuel Setup
The SOX3 can be setup to work with
various fuel types. In order to enter a
custom fuel, follow the steps below.
1. Hold the FUEL button, for one sec-
ond until “SET” starts blinking in the
upper right corner of the display and
APO
MAXMIN HOLD SET
CO2
EA
MAX
°F
%
%
°C
ENTER
AUTO-OFF
°F
°C
TEMP CAL
PRESS FOR
1 SECOND
SOX3
Combustion
Check
Excess Air,
%CO
2
and %O
2
Natural
Gas
Oil
#2
Propane Custom
EXHAUST
CLEAR
SET CUSTOM
ON/OFF
FUEL
MAX/MIN
MEASURE/HOLD
the units read “% CO
2
MAX”
2. Use the Arrow buttons to select the
appropriate CO
2
MAX for the fuel
you are working with.
Note: CO
2
Max is the theoretical maxi-
mum percentage of CO
2
produced
when a fuel goes through complete
combustion. Table 1 shows CO
2
max
values for some more common fuel
types.
3. Once you have selected the appro-
priate CO
2
max press the MEASURE/
HOLD button to lock in this value
and return the Hold display.
4. The fuel indication arrow on the
display will automatically be moved
to your newly entered custom fuel.
%CO
2
Max values
Fuel Oil #5
16.3
Kerosene
15.12
Bagasse
20.3
Dry Wood
20
%CO
2
Max values
Coal Anthracite
19.9
Coal Bituminous
18.5
Wood Pellets
20.1
Table 1
Field Temp Calibration
To calibrate the temperature
sensor, turn the Temp-Cal pot while
measuring a known temperature. Ice
water is very close to 32°F (0°C) and is
readily available.
1. Stabilize a large cup of ice water.
2. Dissconnect water trap in order to cut off suction to
the barrel. This will prevent sucking up water.
3. Plug in the k-type thermocouple and then immerse
the barrel tip of the SOX3 into the ice water.
4. Press the Measure/Hold button and read
temperature on the lower left display.
5. For optimum accuracy, adjust the calibration pot to
read 32°F or 0°C, depending on the scale selected.
°F
HOLD
APO
%
MAX MIN
%
CO
2
EA
MAX
SET
Auto Power Off
Battery Life
%CO2 or %O2
Temperature or Combustion Type
(Condensing ‘cond’ vs
Non-condensing ‘nonc’)
% Excess Air or % (Efficiency)
Fuel Type
Custom Fuel Setup
Natural
Gas
Oil
#2
Propane
Custom
!
WARNINGS
Combustion equipment is
extremely hot. Never touch the
SOX3 without knowing it is cool
to the touch.
Exhaust may be hot. Do not
put your skin directly in front of
exhaust port.