Air shutter adjustment, Warning – Fire Magic Regal I 34 series Drop In User Manual
Page 18
18
MAIN BURNER AIR SHUTTER ADJUSTMENT
Important:
The air shutters must be adjusted
after installation. If not, this appliance
may not light, heat evenly, or cook
properly.
Main burner air shutters are easily accessed by
removing the front panel (face). The air shutters are
located at the front of the burners behind the face
(see PARTS LIST). The air shutter has a small dimple
(see Fig.
18-1
) that allows it to lock into notches in
the burner face. This prevents the air shutter from
moving.
WARNING
USE PROPERLY INSULATED TOOLS TO MAKE
THESE ADJUSTMENTS. NEVER TOUCH A
H O T B A R B E C U E D I R E C T LY T O M A K E
ADJUSTMENTS.
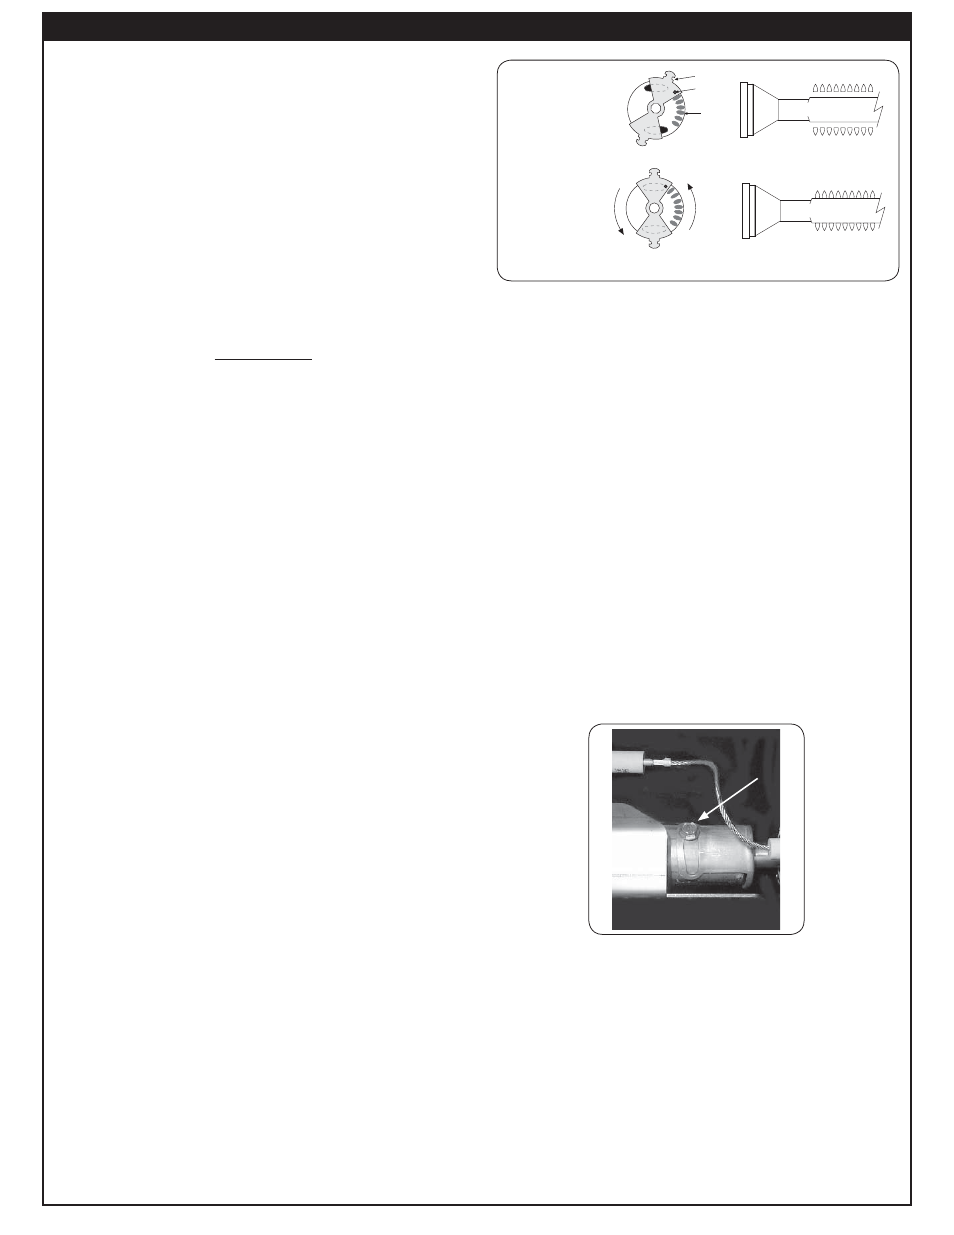
AIR SHUTTER ADJUSTMENT
Partially open
Fig.
18-1
Closed
Fig.
18-2
Fig.
18-1
& Fig.
18-2
- Air shutter adjustment diagram
Flame on ports
Flame off ports
Tab
(Turn tabs)
Dimple
Notch
1. Using the tip of a long screwdriver, close the air
shutters by turning the tabs to a vertical position
(Fig.
18-2
).
2. Light the barbecue in accordance with the
LIGHTING INSTRUCTIONS and burn for two
minutes with the knobs on HI LIGHT and the
oven open.
3. After burning for two minutes, open the air
shutters, using the tip of a screwdriver, until
the fl ames lift off, or appear not to be touching
the burners (Fig.
18-1
).
4. Begin closing the air shutters, with the tip of a
screwdriver, until the fl ames appear to burn while
touching the burner ports (Fig.
18-2
).
Note: You may then see short yellow tips on the
fl ames. If fl ames are a lazy yellow, open the
air shutters until the fl ame is blue with yellow
tipping.
Note: Barbecues, in some installations, achieve a
better air/gas mixture and will ignite more
quickly if the valve is fi rst turned beyond HI
LIGHT to LOW for lighting.
BACKBURNER AIR SHUTTER ADJUSTMENT
Important:
It is normal for the backburner to
smoke when it is burned for the fi rst
time. Burning your backburner on HI
LIGHT for approximately 15 minutes
will eliminate the smoking.
a. The air shutter on your backburner is preset at the
factory. However, due to atmospheric conditions
and different gas pressures, it may be necessary
to adjust the air shutter to obtain a proper burn.
b. First remove the backburner cover (if installed),
then loosen the air shutter screw (see Fig. 18-3).
It may be necessary to use pliers to turn the air
shutter. Light the backburner. With the control
knob on HI LIGHT adjust the air shutter to have
a blue fl ame that is not lifting off the burner (it
may also have slightly yellow tips).
c. Tighten the air shutter adjustment screw.
Fig. 18-3
A i r s h u t t e r
screw
Main burner air shutters are easily accessed by
removing (when cool) the top panel (face). The air
shutters are controlled by the wire levers at the front
of the burners (see PARTS LIST). The air shutter has
a small dimple (see Fig.
18-1
) that allows it to lock
into notches in the burner face. This prevents the air
shutter from moving.
WARNING
ONLY ADJUST 2 AIR SHUTTERS AND THEIR
CORRESPONDING BURNERS AT ONE TIME.
SHUT OFF THE BURNERS PRIOR TO MOVING ON
TO THE NEXT SET.
1. Using the wire levers, close the air shutters
by turning the tabs to a vertical position (Fig.
18-2
).
2. Light the corresponding burner pair in accordance
with the LIGHTING INSTRUCTIONS and burn for
two minutes with the knob on HI LIGHT and the
oven open.
3. After burning for two minutes, open the air shutters
using the wire levers until the fl ames lift off, or
appear not to be touching the burners (Fig.
18-
1
).
4. Begin closing the air shutters with the wire levers
until the fl ames appear to burn while touching the
burner ports (Fig.
18-2
).
Note: You may then see short yellow tips on the
fl ames. If fl ames are a lazy yellow, open the
air shutters until the fl ame is blue with yellow
tipping.
Note: Barbecues, in some installations, achieve
a better air/gas mixture and will ignite more
quickly if the valve is fi rst turned beyond HI
LIGHT to LOW for lighting.
5. Shut off the burners, then repeat for the next
set.