Flowserve BTV 2000 Lined Butterfly Valve User Manual
Page 7
NOTE: BEFORE REMOVING THE VALVE FROM THE PIPE-
LINE, THE VALVE DISC MUST BE IN THE CLOSED POSITION
SO AS NOT TO DAMAGE THE SEALING EDGE OF THE DISC.
1. Place the valve in a vice or other suitable support. Do
not clamp on the face of the liner. Leave the disc in the
closed position during disassembly.
2. Remove the wrench, gear or actuator assembly from
the mounting plate.
3. Remove the mounting plate from the top of the valve by
removing two socket head screws.
4. Loosen several turns but do not remove the retainer
plate screws on the top and bottom. CAUTION – Retainer
plates are under spring loading.
5. Loosen and remove the four bolts that hold the body
halves together.
6. Remove the top body half. Be careful not to lose the
body half bushings as they may drop out.
7. Remove the disc and liner assembly from the bottom
body half.
8. Complete the disassembly of top and bottom body
halves by removing the retainer plate screws, glands,
springs, bearings and stem seals.
9. CAREFULLY remove the disc from the liner. Use
extreme caution to avoid damaging the disc stem seal
convolutions or disc O.D. sealing surface. Once the liner
has been removed from the disc, it cannot be reused.
10. Clean and inspect all parts not contained in the repair kit
and replace if worn, damaged or heavily corroded.
11. If the disc is to be used again, carefully polish the
sealing edge of the disc to remove any scratches. Use
only 400 grit or finer sandpaper.
SECTION III
DISASSEMBLY PROCEDURE
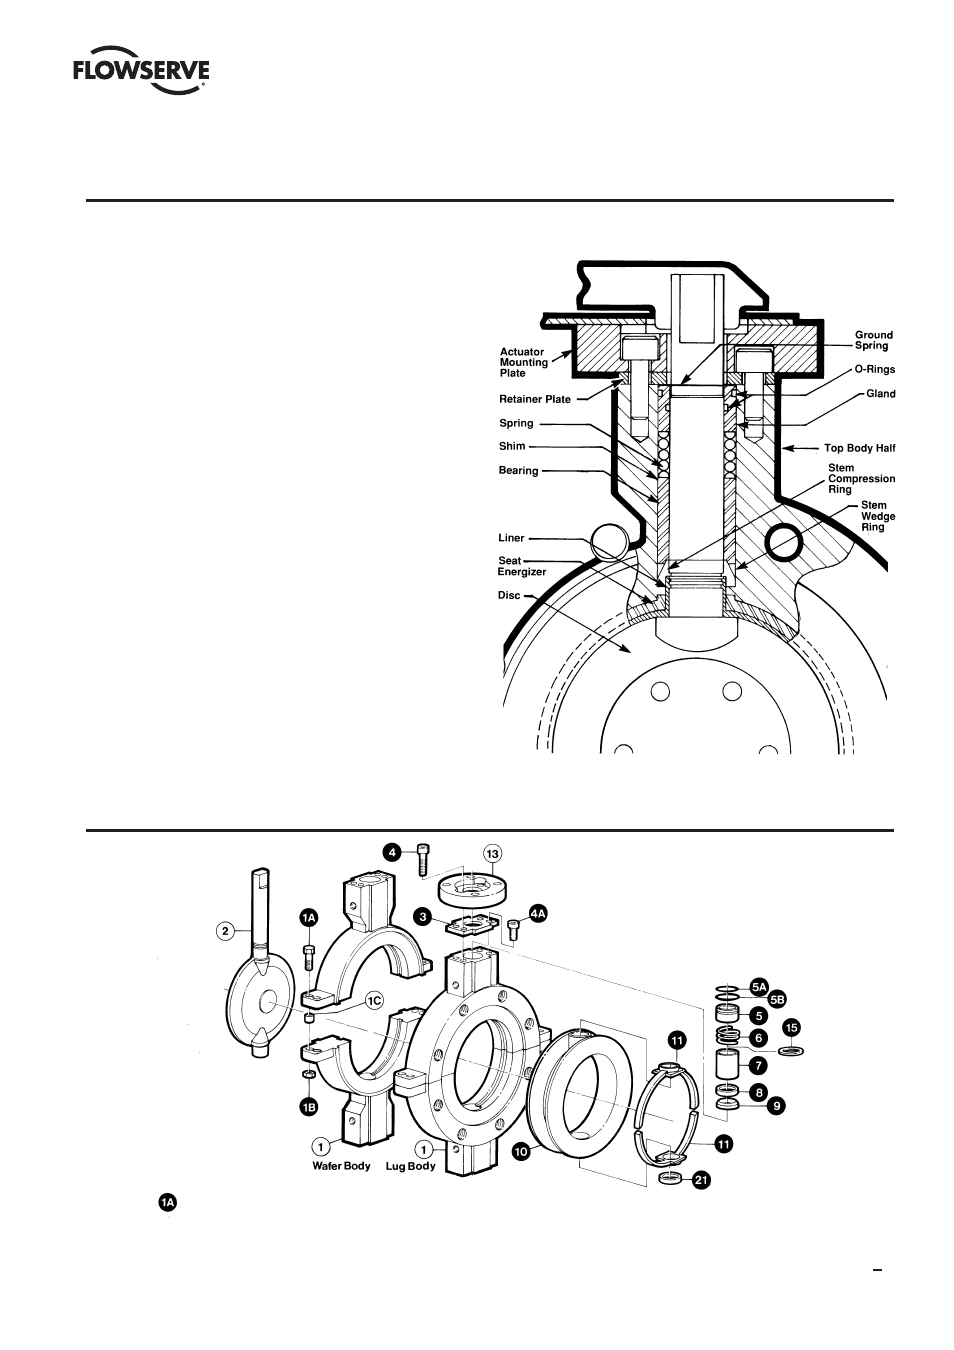
SECTION IV
PARTS LIST
Figure 3 - Exploded View of 2” and 3” Valves
Indicates Repair Kit Parts
For 3” Only
7
BTV/BUV 2000
- BUV 2000 Lined Butterfly Valve McCANNA General Purpose Threaded MARPAC General Purpose Threaded Cartridge Seals 582 Mixerpac 2561 Mixerpac 2562 Mixerpac 579 Mixerpac 2563 Mixerpac 2564 Mixerpac 591 Mixerpac 581 Mixerpac 587 Mixerpac ML-200 Mixerpac 2577 Mixerpac 2554 Mixerpac 588 Mixerpac 585 Mixerpac Seal Gard Circpac MD Nordstrom Dynamic Balance Plug Valve and Double DB Plug Valve Serck Audco Super-H Plug Valve Serck Audco Twin Isolation Plug Valve Serck Audco Double Isolation Plug Valve Serck Audco Standard Type Plug Valves 51 Series 52 Series