Kreg PRS7850 Precision Router Table Stop User Manual
Precision router table stop, Instructions, Assembly instructions
R
Precision Router
Table Stop
Instructions
Thank you for purchasing this Kreg Precision Routing Accessory. The Router
Table Stop provides an easy and effi cient method for making incredibly
precise cuts, one after another.
#PRS7850
Assembly Instructions
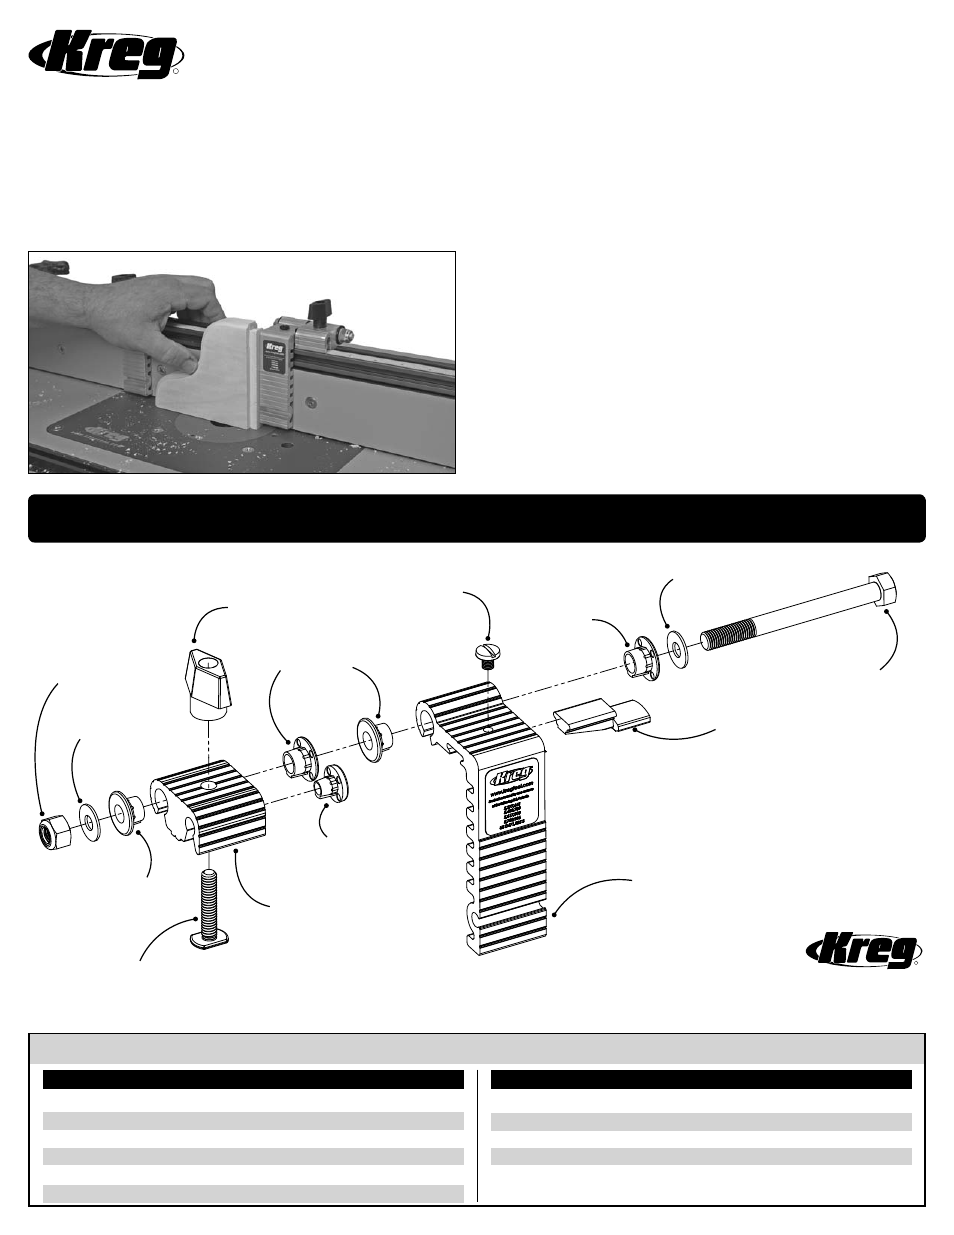
Hex Head Bolt
Brass Washer
Stop Base
T-Bolt
Router Table Stop
Arm
Precision Lens
Cursor
Nyloc Nut
Plastic Stop
Bushing
Plastic Stop
Bushing
Plastic Support
Button
Plastic Stop
Bushing
Nylon Screw
Brass Washer
Won’t work loose
during use
Position on side of stop
base nearest blade
Slides in T-Slot of
aluminum trak
Anchors assembly to
aluminum trak
Allows for
smooth operation
Allows for
smooth operation
Allows for
smooth operation
Allows for
smooth operation
Secures Router Table
Stop assembly
Tightens Router Table Stop
assembly in position
Allows precise adjustment
of Router Table Stop
Used to calibrate
lens zero position
Black T-Knob
KREG TOOL COMPANY
201 Campus Drive
Huxley, IA 50124
Precision Router Table Stop
Parts Identifi cation
Name
Dimensions
Qty
Part#
Name
Dimensions
Qty
Part#
Router Table Stop Arm
1
FT4263
Precision Lens Cursor
1
FT4063
Nyloc Nut
5/16” - 24
1
FT4061
Brass Washer
5/16”
2
FT4137
Nylon Screw
10-32 x 1/4”
1
FT4064
Black T-Knob
1
DK1313
Hex Head Bolt
5/16” - 24 x 3 - 1/4”
1
FT4060
Stop Base
1
FT4262
T-Bolt
1/4” - 20 x 1-1/4”
1
FT4212
Plastic Stop Bushing
4
FT4257
Plastic Support Button
1
FT4258
About the Stop
This stop was specifi cally designed for use with the Kreg Precision
Router Table. It can also be used with our Precision Benchtop Router
Table with the addition of select accessories. Call 1.800.447.8638 for
more information.
Stop Positioning
Before assembly, determine which side of the blade you will be placing the
stop. If you will be placing it on the left side, you will need to put the Stop
Arm on the right side of the Stop Base (as shown below). If you will be
placing it on the right side, you will need to reverse the stop arm positioning
so that you can see how the stop aligns with the measuring tape.
Stop Tension
Depending on whether you want the stop to swing freely or stay
wherever you place it, you’ll need to adjust the tension of the Stop Arm.
To do this, simply tighten or loosen the nyloc nut until your desired
tension is met.
Lens Cursor
Because the tape on your Kreg Precision Router Table is not offset, and
the zero is precisely centered with your router bit, it is not necessary in
most situations to utilize the Precision Lens Cursor included with this
stop. However, if you plan on using this stop on another fence with an
offset tape, the Precision Lens Cursor will allow you to compensate for
the offset and will also magnify the tape for improved clarity.
R
*Blade Guard in image removed for clarity.
WARNING: This product contains one or more chemicals known to the State
of California to cause cancer and birth defects or other reproductive harm.
Wash hands after handling.
5/2010 FT4267
Rev D