Legrand inQuire 1000 User Manual
Page 15
301 Fulling Mill Road, Suite G
© Copyright 2006 by On-Q/Legrand Inc.
Page 14
Middletown, PA 17057
All Rights Reserved
(800)
321-2343
www.onqlegrand.com
•
Insert the Room Unit and the Cat 5e cable into the 2 gang box and
secure the unit to the box using the 4 included screws. Attach a 2
gang decor plate to the unit to complete the installation.
•
Repeat these instructions for all the Room Units in your inQuire™
1000 Intercom System.
3. Desktop
Unit(s)
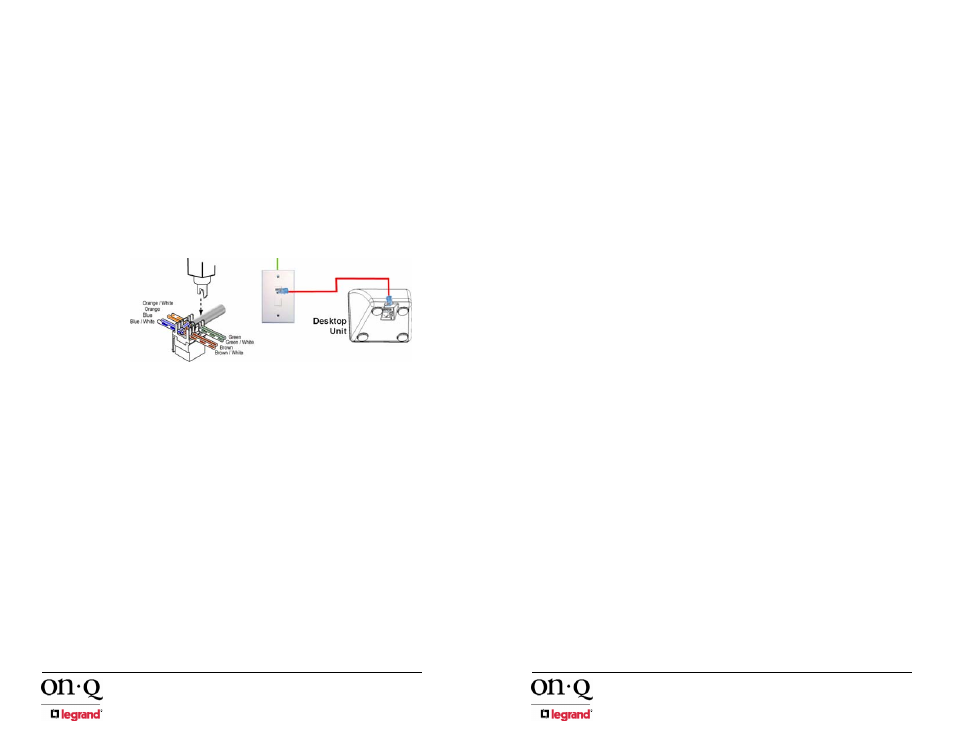
The procedure to trim-out the Desktop Unit(s) is as follows:
•
Locate a Cat 5e cable in a roughed in 1 gang box labeled as
"Desktop Unit X" (X is the Desktop Unit number).
•
Strip approximately 2" of insulation from the Cat 5e cable.
•
Untwist cable pairs but be sure to leave 1/2" twist in the pairs
between the punchdown insert and the start of the cable insulation
(see Figure 7).
•
Following T568A wiring color code, place the pairs firmly into their
appropriate positions on the punchdown insert. Ensure that the
individual conductors are seated tightly enough to allow you to
punch them down without having to hold them in place.
•
Using a punchdown tool with a 110 style cutting blade, punch down
each conductor firmly enough to allow any excess conductor to be
cut away by the blade.
•
Snap the insert into the wallplate or strap and secure them in the 1
gang box using the included screws. Attach a 1 gang plate (if
necessary) to complete the installation.
•
Plug the Desktop Unit into the installed Cat 5e outlet.
•
Repeat these instructions for all the Desktop Units in your inQuire™
1000 Intercom System.
4. Patio
Unit(s)
The procedure to trim-out the Patio Unit(s) is as follows:
•
Locate the Cat 5e cable in the roughed in 2 gang box that you
labeled as "Patio Unit".
•
Strip back approximately 2" of insulation from the Cat 5e cable.
Figure 7 - Trim-Out Desktop Unit(s)
301 Fulling Mill Road, Suite G
© Copyright 2006 by On-Q/Legrand Inc.
Page 11
Middletown, PA 17057
All Rights Reserved
(800)
321-2343
www.onqlegrand.com
• Run
ONE Cat 5e cable from the 2 gang box directly to the
enclosure where the Intercom Module will be installed. Label both
ends of your cable run to indicate Door Unit number (ex: "Door Unit
1). Follow the wiring guidelines listed in this manual to ensure a
quality cable installation.
•
Repeat these instructions for each and every Door Unit that will be
installed in the system (maximum of 3).
NOTE: Up to three Door Units can be installed. The installation of a
third Door Unit requires that you use the RJ45 jack that is labeled
12/DOOR 3. This will reduce the maximum number of Room Units
that can be installed from 12 to 11.
6.
Intercom Module and Door Chime
0.
The rough-in of the On-Q Enclosure that will house the Intercom Module
and Door Chime will need to be completed per the enclosure's
installation instructions. There is no further rough-in work required for the
Intercom Module and the Door Chime since these components will
mount directly in the On-Q Enclosure during trim-out.
NOTE: The Door Chime mounts onto the back of the Intercom
Module and does not require its own, separate enclosure space.