Legrand inQuire 1000 User Manual
Page 9
301 Fulling Mill Road, Suite G
© Copyright 2006 by On-Q/Legrand Inc.
Page 20
Middletown, PA 17057
All Rights Reserved
(800)
321-2343
www.onqlegrand.com
B. Room
Unit
Please refer to Figure 13 to familiarize yourself with the operation of the
inQuire™ 1000 Room Unit.
Figure 13 - inQuire™ 1000
Room Unit Operation
TALK: Depressing this button will allow you to
communicate with all other active units. Hold in the
TALK button while speaking, and let it go when you are
done. Your voice will be heard on the Main Console
Unit, as well as any active Room, Patio, or Desktop
Unit within the system.
ANSWER LED: This LED is located at the top of the
keypad of the Room Unit. When lit, the LED indicates
that the microphone in the unit is active and anything
you say will be communicated through the system.
This LED will light when you are depressing the
TALK or DOOR buttons. The LED will be constantly
lit when the unit is in MONITOR mode.
DOOR: Depressing this button will allow you to
communicate with all Door Units that are part of your
system. Hold in the DOOR button while speaking
and let it go when you are done. Your voice will be
heard on any active Room, Patio, or Desktop Units
and all Door Units within the system.
MONITOR: Press this button once to put the Unit in
MONITOR mode. Press the button again to return
the Unit back to normal mode. While in MONITOR
mode, the microphone is constantly active, the
speaker is disabled and any voice or noise within the
room will be heard throughout the system. The LED
to the right of the MONITOR button will glow green
when in MONITOR mode. Multiple Units can be in
MONITOR mode at the same time. This function is
useful for baby monitoring or other types of situations
which require any voice or noise in a room to be
heard throughout the system.
NOTE: When in MONITOR mode, a door bell
button push at a Door Unit will not result in a
door chime ring at the Room Unit.
VOLUME: There are two volume control buttons
with an associated volume level LED bar. There are
20 different volume levels which are adjusted up and
down using these two buttons. Pressing the volume
up button once will increase the volume one level
higher. You may not see the LEDs change until you
press the volume up or down multiple times
(approximately every sixth button press). You can
also hold in the volume up or down button until you
have reached the desired volume level. It is
recommended that you keep the volume level in the
middle position (3 LEDs lit) for optimum sound
quality.
KEYPAD BRIGHTNESS:
If the default Dim level of the backlit buttons is not
adequate for the user, then press both Volume
buttons at the same time and release them. Use the
Up or Down Volume button to brighten or dim the
default backlight level. When the desired level is
reached, either push both buttons at the same time
again to resume normal operation, or just let the Unit
time out (after about 10 seconds) to return to normal
operation.
NOTE: When in use, the Unit’s backlight level is
at full brightness and returns to the set backlight
Dim level upon timeout (about 10 seconds).
DOOR RELEASE: There is no specific button on the
Room Unit for the DOOR RELEASE function. However,
by depressing both the TALK and the DOOR buttons at
the same time, the Unit will engage the door release
device (not included with the Intercom System) if a door
release device is installed in conjunction with the Intercom
System. Once you let go of the TALK and DOOR buttons,
the door release device will be disengaged, which will lock
the door again.
MUTE: Press this button once to put the Unit in MUTE
mode. Press the button again to return the Unit back to
normal mode. While in MUTE mode, both the speaker
and microphone of the unit will be inactive and the LED
to the right of the MUTE button will glow red. MUTE
mode is useful for maintaining privacy in a particular
room. Multiple rooms can be in MUTE mode at the same
time.
301 Fulling Mill Road, Suite G
© Copyright 2006 by On-Q/Legrand Inc.
Page 5
Middletown, PA 17057
All Rights Reserved
(800)
321-2343
www.onqlegrand.com
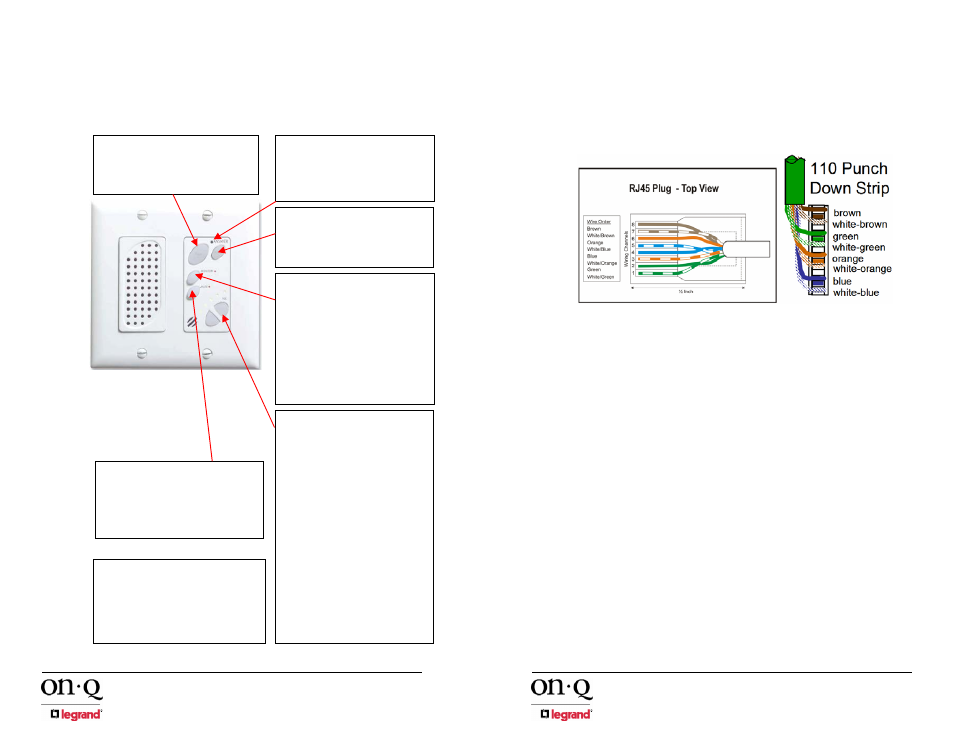
locations. There are two different types of terminations you will encounter
when installing the inQuire™ 1000 Intercom System: RJ45 plugs and 110
punchdown blocks.
Refer to the diagrams below (see Figure 2) which show the correct T568A
termination for both RJ45 plugs and 110 punchdown blocks.
Figure 2 - T568A Termination Color Code Reference