Legrand inQuire 1000 User Manual
Page 8
301 Fulling Mill Road, Suite G
© Copyright 2006 by On-Q/Legrand Inc.
Page 4
Middletown, PA 17057
All Rights Reserved
(800)
321-2343
www.onqlegrand.com
III. Wiring
Specifications
A. Specifications
•
Minimum cable rating: Category 5 UTP, 4 pair solid conductors (24
AWG),
•
100 ohm, 100 Mhz, General Purpose (CM), UL listed Maximum length
per run: 325 feet
•
Termination standard: T568A
•
Terminating plug type (where necessary): Solid Conductor RJ45
•
Terminating block type (where available): 110-style IDC
B. Guidelines
•
Do not exceed 25 lbs. of force when pulling cable.
•
Do not splice cables.
•
Do not staple cables. Use wire ties with screw mounts to loosely secure
cabling.
•
Avoid running Cat 5 cable parallel to 120V/240V AC wiring or fixtures
within 12 inches.
•
Avoid "ganging" any intercom unit with a lighting dimmer switch. Maintain
at least 12 inches of separation from dimmer switches.
•
If you must cross AC wiring, do so at a 90 degree angle with at least 2
inches of separation.
•
Maintain a minimum 1" bend radius.
•
Do not untwist Cat 5 conductors more than 1/2" at any termination point.
•
Keep cables away from HVAC ducts, or anything with sharp edges that
could cause damage.
•
Clearly label all cabling runs at both ends. Use the distance between
your hand and your elbow as a guide to determine how far from the end
of the cable to place the label.
C. Unit
Placement
Tips
Carefully plan the placement of Room Units and the Main Console Unit before
rough-in to avoid any feedback issues that are associated with audio devices.
•
To minimize the likelihood of any feedback issues avoid placing units
back to back on a common wall. If units must be placed on both sides of
a common wall, then do so in a manner which avoids feedback
problems.
•
Do not place intercom units within the same room in the home.
•
Avoid any situations where the speaker of a unit points to and has a
clear line of sight to another unit's microphone.
D. Termination
Instructions
.
All termination can be correctly completed by following the T568A pin
assignments. It is important that you accurately terminate using T568A at all
301 Fulling Mill Road, Suite G
© Copyright 2006 by On-Q/Legrand Inc.
Page 21
Middletown, PA 17057
All Rights Reserved
(800)
321-2343
www.onqlegrand.com
C. Desktop
Unit
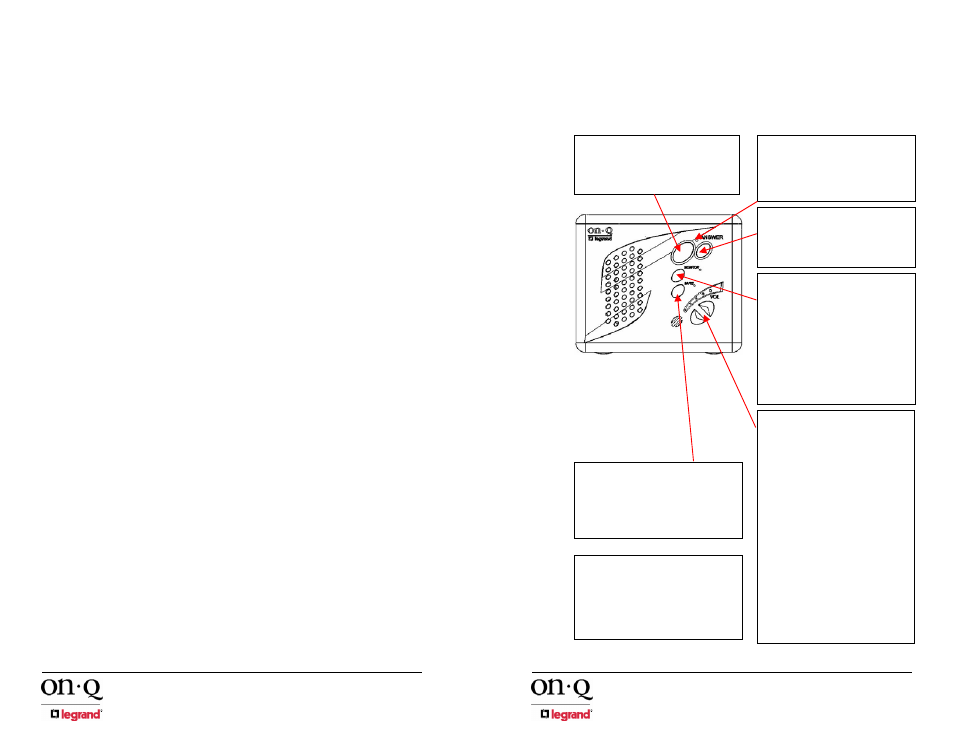
Please refer to Figure 14 to familiarize yourself with the operation of the
inQuire™ 1000 Desktop Unit.
Figure 14 - inQuire™ 1000
Desktop Unit Operation
TALK: Depressing this button will allow you to
communicate with all other active units. Hold in the
TALK button while speaking, and let it go when you are
done. Your voice will be heard on the Main Console
Unit, as well as any active Room, Patio, or Desktop
Unit within the system.
ANSWER LED: This LED is located at the top of the
keypad of the Room Unit. When lit, the LED indicates
that the microphone in the unit is active and anything
you say will be communicated through the system.
This LED will light when you are depressing the
TALK or DOOR buttons. The LED will be constantly
lit when the unit is in MONITOR mode.
DOOR: Depressing this button will allow you to
communicate with all Door Units that are part of your
system. Hold in the DOOR button while speaking
and let it go when you are done. Your voice will be
heard on any active Room, Patio, or Desktop Units
and all Door Units within the system.
MONITOR: Press this button once to put the Unit in
MONITOR mode. Press the button again to return
the Unit back to normal mode. While in MONITOR
mode, the microphone is constantly active, the
speaker is disabled and any voice or noise within the
room will be heard throughout the system. The LED
to the right of the MONITOR button will glow green
when in MONITOR mode. Multiple Units can be in
MONITOR mode at the same time. This function is
useful for baby monitoring or other types of situations
which require any voice or noise in a room to be
heard throughout the system.
NOTE: When in MONITOR mode, a door bell
button push at a Door Unit will not result in a
door chime ring at the Room Unit.
VOLUME: There are two volume control buttons
with an associated volume level LED bar. There are
20 different volume levels which are adjusted up and
down using these two buttons. Pressing the volume
up button once will increase the volume one level
higher. You may not see the LEDs change until you
press the volume up or down multiple times
(approximately every sixth button press). You can
also hold in the volume up or down button until you
have reached the desired volume level. It is
recommended that you keep the volume level in the
middle position (3 LEDs lit) for optimum sound
quality.
KEYPAD BRIGHTNESS:
If the default Dim level of the backlit buttons is not
adequate for the user, then press both Volume
buttons at the same time and release them. Use the
Up or Down Volume button to brighten or dim the
default backlight level. When the desired level is
reached, either push both buttons at the same time
again to resume normal operation, or just let the Unit
time out (after about 10 seconds) to return to normal
operation.
NOTE: When in use, the Unit’s backlight level is
at full brightness and returns to the set backlight
Dim level upon timeout (about 10 seconds).
DOOR RELEASE: There is no specific button on the
Desktop Unit for the DOOR RELEASE function.
However, by depressing both the TALK and the DOOR
buttons at the same time, the Unit will engage the door
release device (not included with the Intercom System) if
a door release device is installed in conjunction with the
Intercom System. Once you let go of the TALK and
DOOR buttons, the door release device will be
disengaged, which will lock the door again.
MUTE: Press this button once to put the Unit in MUTE
mode. Press the button again to return the Unit back to
normal mode. While in MUTE mode, both the speaker
and microphone of the unit will be inactive and the LED
to the right of the MUTE button will glow red. MUTE
mode is useful for maintaining privacy in a particular
room. Multiple rooms can be in MUTE mode at the same
time.