Troubleshooting – Marantz PM8004 User Manual
Page 14
11
Getting
started
Basic connections
Basic operation
Troubleshooting
Specifications
Index
Advanced connections
Advanced
operation
Explanation terms
ENGLISH
Advanced connections
Advanced
operation
If a problem occurs, first check the following:
1. Are the connections correct?
2. Is the unit being operated as described in the owner’s manual?
3. Are the other components operating properly?
If this unit does not operate properly, check the items listed in the table below. If the problem persist there may be a malfunction.
In that case, disconnect the power immediately and contact your retail outlet.
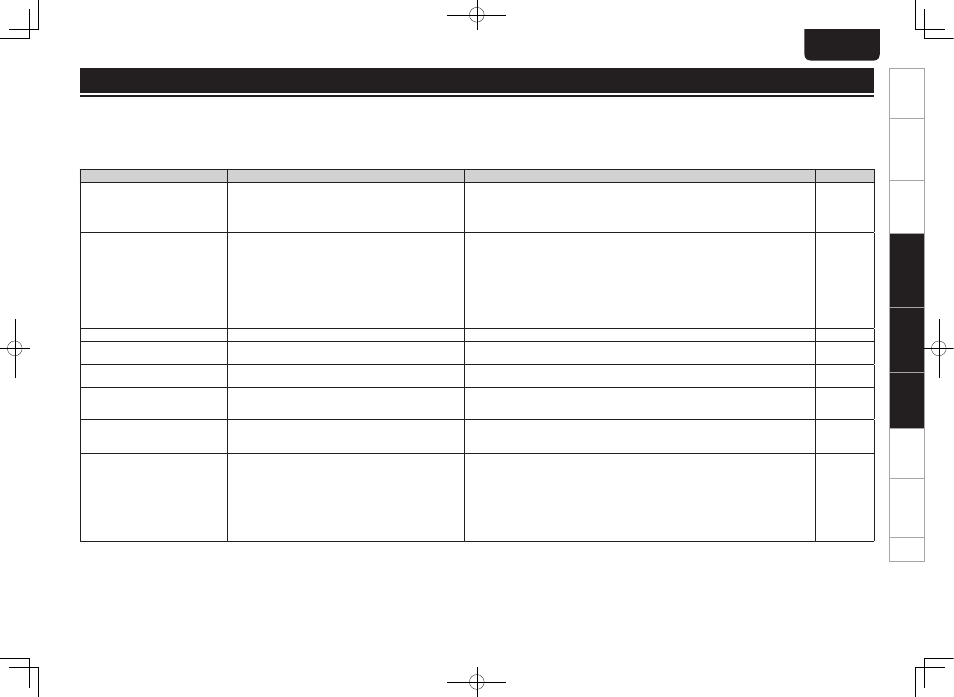
Troubleshooting
Symptom
Cause
Countermeasure
Page
Power is not turned on.
• The power cord’s plug is not plugged in firmly.
• The unit is in standby mode.
• The protection circuit is activated.
• Make sure that the power cord is plugged in properly.
• Either turn the INPUT SELECTOR knob of this unit or press POWER ON of the remote
control.
• If the STANDBY indicator is blinking, turn off power, wait 1 minute or longer, and turn on
power again.
8
8
6
When power is turned on but there is
no sound.
• The speaker cables are not properly connected.
• The input cable is not properly connected.
• The INPUT SELECTOR knob setting position is incorrect.
• The VOLUME control knob is set to minimum.
• The SPEAKERS A/B switches are turned off.
• The incorrect SPEAKERS A/B switch is turned on.
• The mute function activated.
• Make sure the speakers are connected properly.
• Make sure the input cables are connected properly.
• Set the INPUT SELECTOR knob at the correct setting position.
• Use the VOLUME control knob to turn volume up to an appropriate level.
• Turn on the SPEAKERS A/B switch corresponding to the speaker system terminals (SYSTEM
A or SYSTEM B) to which the speakers are connected.
• Turn on the SPEAKERS A/B switch corresponding to the speaker system terminals (SYSTEM
A or SYSTEM B) to which the speakers are connected.
• If the MUTE indicator is lit, press MUTE on the remote control to cancel muting.
7
7
9
9
9
9
9
The volume drops automatically.
• The protection circuit is activated.
• Turn off power, wait 1 minute or longer, and turn on power again.
6
Sound is produced from either one
speaker only.
• The speaker cables are not properly connected.
• The BALANCE control knob setting position is inappropriate.
• Make sure that the speakers are connected properly.
• Set the BALANCE control knob at the appropriate position.
7
9
The left and right channels are
reversed.
• Either the left/right speaker or left/right input cable
connections are reversed.
• Make sure that the speakers are connected correctly.
7
Noise is produced during a record
playback.
• The ground wire from the turntable is disconnected.
• The PHONO input terminals are not properly connected.
• A TV set near the turntable is causing the noise.
• Make sure that the PHONO GND terminal is connected properly.
• Make sure that the PHONO input terminal is connected properly.
• Relocate the TV set or turntable in another place.
7
7
–
An audio feedback occurs when you
turn up the volume during a record
playback.
• The turntable and speakers are too close to each other.
• The turntable is placed on a rack or floor that vibrates easily.
• Install the speakers as far away from the turntable as possible.
• If the turntable is not supplied with an insulating pad, use insulating pad available in the
market.
–
–
The unit does not function when a
remote control button is pressed.
• Batteries are low.
• You are operating the remote control outside of the specified
range.
• There is an obstacle between the main unit and remote
control.
• You have pressed the wrong button.
• Batteries are not inserted in the proper direction as indicated
by polarity markers (
q
and
w
)
in the battery compartment.
• Replace with new batteries.
• Operate within the specified range.
• Remote the obstacle.
• Press the correct button.
• Insert the batteries in the proper direction in accordance with the polarity markers in the
battery compartment.
3
3
3
5
3
Troubleshooting
1.PM8004U_ENG_0701.indd 11
2010/07/01 17:46:15