Remote control – Marantz UD7006 User Manual
Page 50
46
ENGLISH
Remote control
For buttons not explained here, see the page indicated in parentheses ( ).
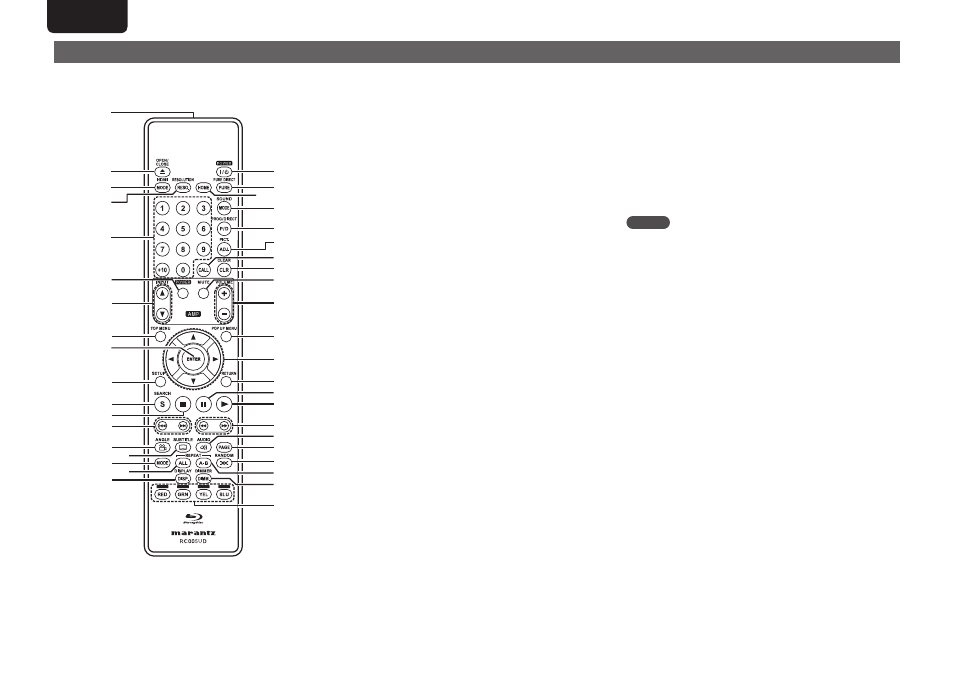
q
Remote control signal transmitter ········································ (47)
w
Disc tray OPEN/CLOSE button (
5) ·····························(7, 17 – 19)
e
HDMI MODE button
······························································· (25)
r
RESOLUTION button ························································ (13, 25)
t
Number buttons (0 – 9, +10) ············································· (21, 23)
y
AMP POWER button
u
AMP INPUT buttons (
d f)
i
TOP MENU button ·································································· (17)
o
ENTER button ······························································ (21, 23, 36)
Q0
SETUP button ·········································································· (36)
Q1
SEARCH mode button ···························································· (21)
Q2
Stop button (
2) ······································································· (20)
Q3
Revers-skip, Forward-skip buttons (
8 9) ···················· (20)
Q4
ANGLE button ········································································· (23)
Q5
SUBTITLE button ····································································· (23)
Q6
MODE button ······································································· (7, 27)
Q7
REPEAT ALL button ································································ (22)
Q8
DISPLAY button ······································································· (16)
Q9
POWER button ··········································································· (6)
W0
PURE DIRECT button ······························································ (24)
W1
HOME button ··········································································· (31)
W2
SOUND MODE button ·····················································(17 – 19)
W3
PROG/DIRECT button ····························································· (23)
W4
Picture adjust button (PICT. ADJ.) ········································· (26)
W5
CALL button ············································································· (23)
W6
CLEAR button ···································································· (21, 23)
W7
AMP MUTE button
W8
AMP VOLUME buttons (+ –)
W9
POP UP MENU button ···························································· (17)
E0
Cursor buttons (
uio
p
) ················································· (17, 36)
E1
RETURN button ································································· (32, 33)
E2
Pause/Still button (
3) ····························································· (20)
E3
Play button (
1) ·····························································(7, 17 – 19)
E4
Fast-reversing, Fast-forwarding buttons (
6 7) ············ (20)
E5
AUDIO button ·········································································· (22)
E6
PAGE button ············································································ (19)
E7
RANDOM button ····································································· (23)
E8
REPEAT A-B button ································································· (22)
E9
Dimmer button (DIMM.) ························································· (24)
R0
RED/GRN/YEL/BLU buttons
NOTE
• When power is in standby, press
w
and
E3
to turn the power on.
• You can use
R0
when operating the BD pop up menu screen, etc.
• y, u, W7, W8
: These are used to operate the corresponding
functions of a Marantz integrated amplifier. For each function, refer
to User Guide supplied with the Integrated Amplifier.
Q9
W0
W2
W3
W4
W6
W5
W9
E1
E3
E4
E6
E7
E5
R0
E9
E8
E2
E0
W8
W7
W1
w
t
u
y
i
Q0
Q1
Q3
Q4
Q8
Q5
Q6
Q7
Q2
o
r
q
e