Projector layout and functional overview – Marantz VP-12S4 User Manual
Page 10
4
ENGLISH
3
2
1
13
9
7
6
5 10 4 11 12 8
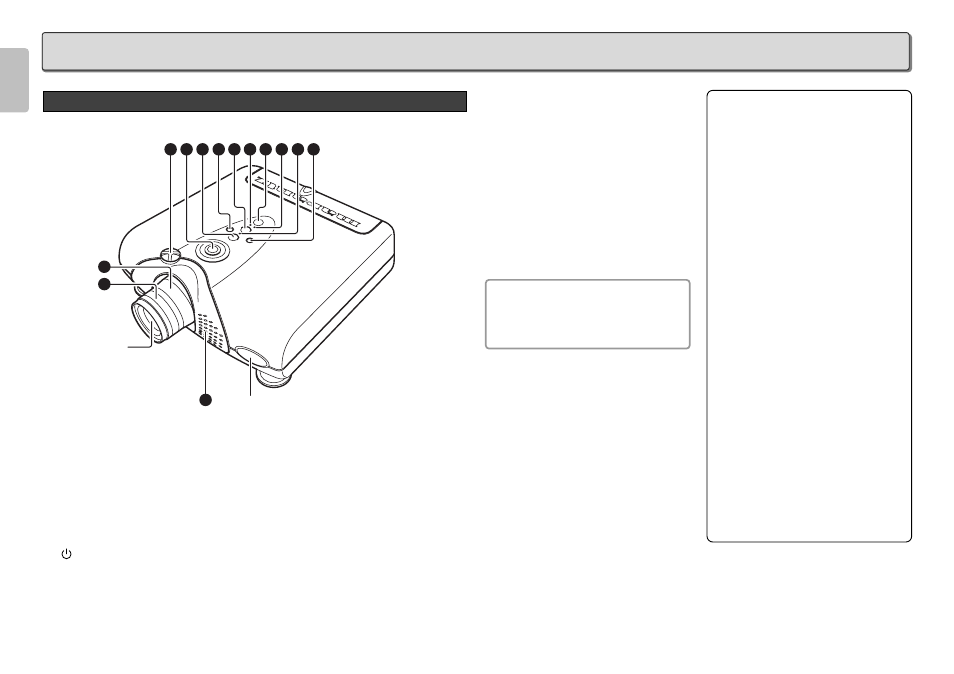
IR sensor
Projection
Lens
q
Focus ring (
☞
P.10)
Adjust the picture focus.
w
Zoom ring (
☞
P.10)
Adjust the size of the projected image.
e
Lens Shift knob (
☞
P.11)
Manually adjust the position of the image vertically.
r
/ I button (
☞
P.15)
Press to turn the projector ON or STANDBY mode.
t
MENU button (
☞
P.18)
Display the on-screen menu.
Front and Top View
PROJECTOR LAYOUT AND FUNCTIONAL OVERVIEW
y
ENTER button
Press to enter the selected menu item.
u
INPUT SELECT button (
☞
P.15)
Selects the input signal (COMPONENT 1,
COMPONENT 2, S-VIDEO, VIDEO, RGB, HDMI 1
and HDMI 2).
i
PATTERN button (
☞
P.10)
Projects a focus pattern on the screen.
o
The
3
/
4
/
1
/
2
buttons
Control the MENU cursor.
Note: Pixel defects
DMD (Digital Micromirror Device) is one of the
most advanced technologies for consumer
products. The DMD made by high precision
technology, however some pixel defects may
be found on the projected image. We are
trying our best to control the quality in order to
reduce the number of defective pixels. It is
almost impossible to have zero pixel defects,
even using the most advanced technology.
This is not a problem only for Marantz, but all
DLP
TM
projector manufactures. Therefore we
have to note that the warranty does not cover
the DMD for pixel defects. We appreciate your
understandings.
Note: Lamp
SHP lamp is one of the most advanced
technologies for consumer products. The
lamp made by high precision technology,
however some lamps might be failing before it
reaches its life. And projector’s brightness is
getting darker along with accumulated lamp
usage hours. We are trying our best to control
the quality in order to reduce lamp failures. It
is almost impossible to have zero failure, even
using the most advanced technology. This is
not a problem only for Marantz, but all
projector manufactures. Therefore we have to
note that the warranty does not cover the SHP
lamp for lamp failures: explosion, and non-
lighting except initial use. And also we have to
note that the warranty does not cover the SHP
lamp for lamp failures: flickering, and getting
darker along with accumulated lamp usage
hours. We appreciate your understandings.
!0
ON indicator
Lights up blue when power is ON. When power is
shut OFF, the lamp flashes for about 1 minute
before going out.
!1
STANDBY indicator
Lights up when the power is turned off.
!2
WARNING/LAMP indicator
Flashes or lights up when something is wrong with
the lamp cover, lamp, fan, or temperature inside
the projector.
For more information on the error mode, see the
“Error Mode List” (
☞
P.28)
!3
Ventilation holes
Notes:
• Do not place anything near the ventilation
holes to avoid overheat inside the unit.
• Do not place your hand or objects near the
ventilation holes; the air is coming out.