Marantz VP-12S4 User Manual
Page 32
26
ENGLISH
8.
Press the ENTER button to return to the menu
and disconnect the cable of the color
temperature sensor from the projector.
Note:
If color temperature adjustment is not
correctly processed or if adjustment
processing is interrupted in course by
pressing the MENU button or for some other
reason, the below message appears on the
screen.
Also, adjustment processing can be
interrupted by pressing the MENU button.
9.
Turn the lens shift knob until returning the lens
to the screen position you want to use.
❖
Color Temperature Sensor
Protection
If no operations are performed for approximately 10
minutes from the moment color temperature
adjustment processing ends, power to the projector
shuts OFF automatically in order to protect the color
temperature sensor. If power is shut OFF to protect
the color temperature sensor, do the following.
•
If the WARNING indicator does not light
When color temperature adjustment ends
successfully and the sensor protection feature
trips, the projector goes on standby. As usual,
activate power by pressing either the ON
button on the remote control or the
/ I
button on the projector.
•
If the WARNING indicator lights
If color temperature adjustment does not end
successfully and the sensor protection feature
trips, the projector's WARNING and STANDBY
indicators light simultaneously to indicate the
error mode. Unplug the power cable and then
plug it back in. Then, press either the ON
button on the remote control or the
/ I
button on the projector to reactivate power.
Press "Enter" to exit
Quit
Before pressing the ENTER button, turn the
color temperature sensor over on its dark side
as shown in the below figure, to prevent
outside light from penetrating to the sensor’s
condenser.
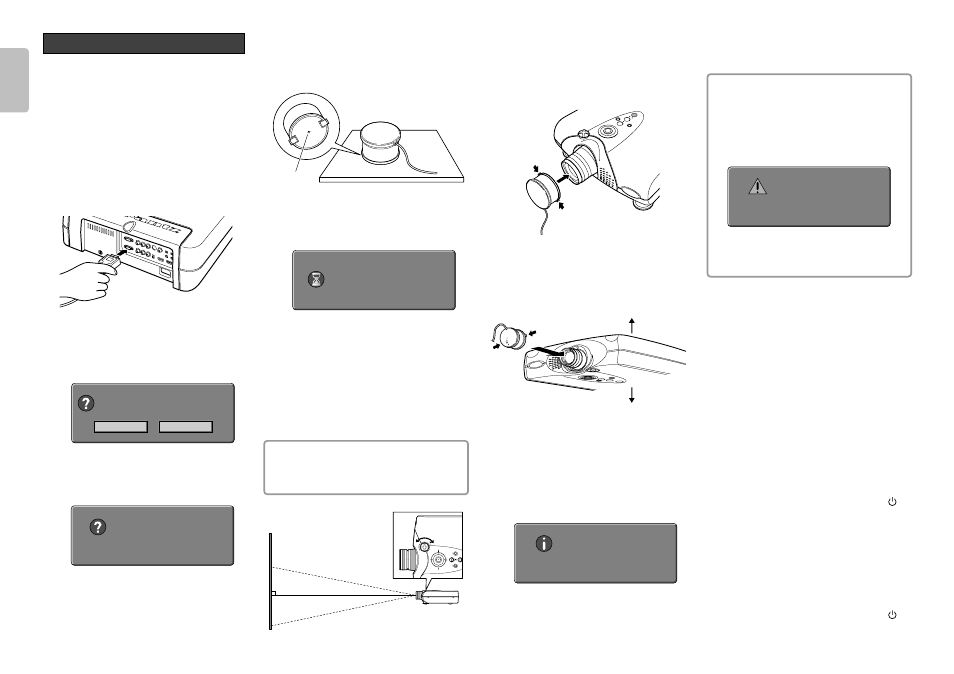
4.
Press the ENTER button. The below message
appears on the screen for a few seconds as
the sensor is being calibrated.
5.
Position the lamp so that its light passes
through the center of the lens. This is
necessary in order to calibrate color
temperature correctly. First, turn the lens shift
knob all the way to the left so that the lens
lowers to the lowest position. Then, turn it five
and a half turns to the right to raise the lens.
In this position, the light of the lamp passes
almost through the center of the lens.
Note:
Color temperature cannot be correctly
calibrated unless the lens is properly
positioned.
Initializing...
6.
Fit the color temperature sensor onto the lens
and press the ENTER button. Color
temperature adjustment starts and the
projector’s WARNING and STANDBY
indicators begin flashing simultaneously.
When installed on a tabletop
When installed on a ceiling
7.
When the WARNING and STANDBY
indicators go out, color temperature
adjustment is complete. Adjustment takes
about 2 to 3 minutes. When the color
temperature sensor is detached from the lens,
the below message appears on the screen.
Press "Enter" to exit
Complete
Bottom
Top
Attach the color temperature
sensor so that the cable is to the
bottom side of the projector.
Attach the color temperature sensor so that the
cable is to the bottom side of the projector.
After replacing the lamp or in other cases where
the lighting changes, color temperature can be
adjusted using the color temperature sensor. In the
adjustment procedure, you must first initialize the
sensor itself before adjusting color temperature. It
takes about 10 minutes from when the power to
the projector is activated for the lamp’s brightness
to stabilize. Wait for lamp brightness to stabilize
before adjusting color temperature.
1.
Connect the cable of the color temperature
sensor to the RS-232C port.
2.
Press the MENU button and select “Color
Temp. Calibration” from the MENU screen.
Press the
2
button. The below message
appears on the screen.
3.
Use the
1
and
2
buttons to select “Yes” and
press the ENTER button. The below message
appears on the screen.
Press "Enter" to start
Initialize
Color Temp. Calibration?
Yes
No
Color Temperature Adjustment
Condenser