Configuring maestro for eas-net – ZeeVee EAS - Emergency Alert System (QAM & DVB-T/C) User Manual
Page 2
2
w w w . z e e v e e . c o m
G E N E R A T I N G E A S A L E R T S
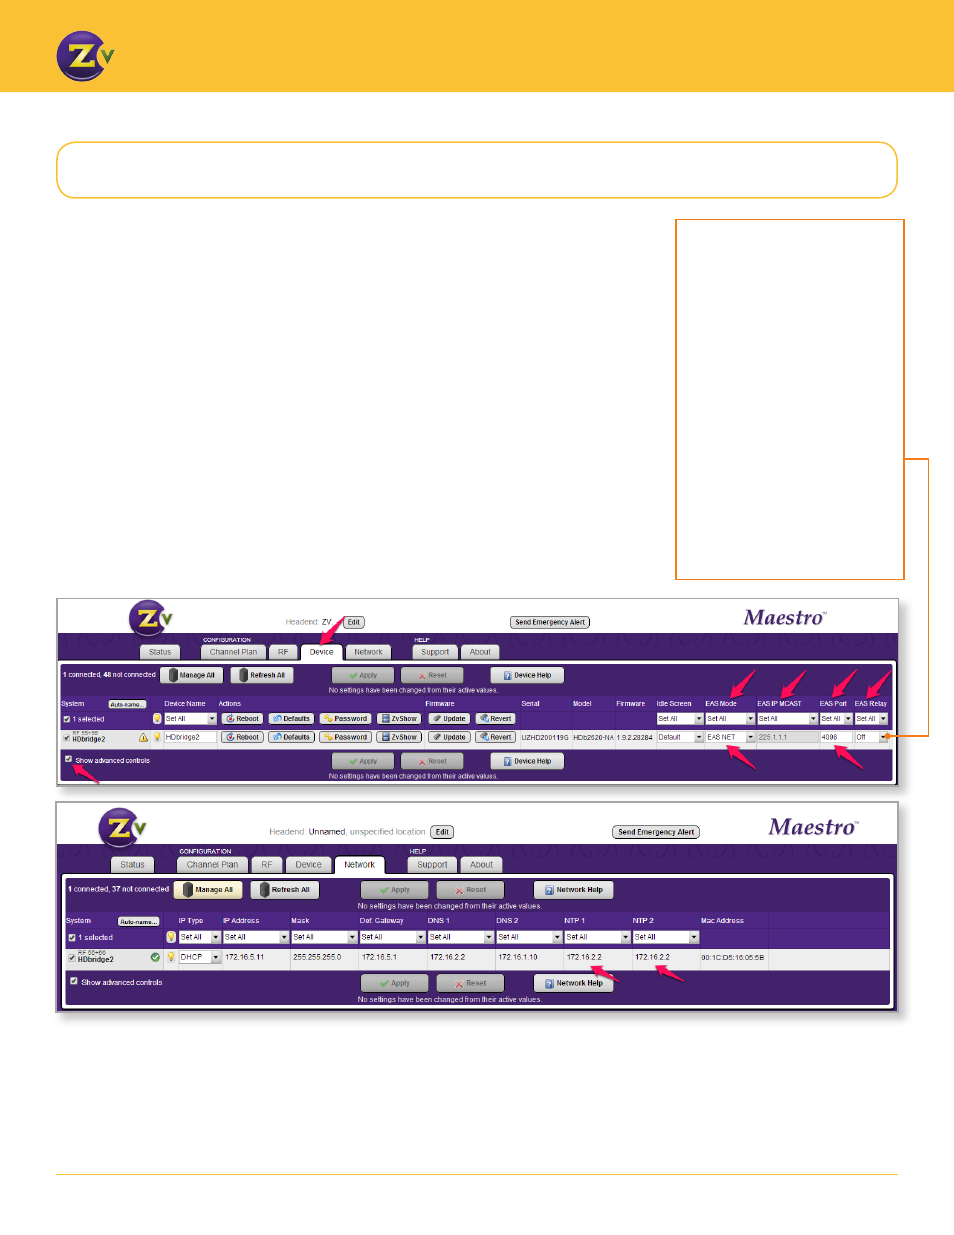
For EAS-NET, configure using Maestro as follows:
1. Open Maestro.
2. Click on the Device tab and enable Show advanced controls.
3. Change the “Disabled” status below the EAS Mode field to specify the type of EAS mode
(EAS Net).
4. Specify a port value in the EAS Port field. EAS Port has an allowable range of 0-65534. Note
that port values between 1 and 1023 are well known ports and should be avoided. ZeeVee
recommends using a port value of 4096 or greater. In the case that a port value is specified
that results in a system conflict (e.g. 80), Maestro will display an error once the configuration
is applied. The EAS port should be identical on all devices in a multi-unit deployment.
5. (Optional — For use of EAS Relay only) Change the EAS Relay to “On”. The EAS Relay
configuration is required only for installations where more than eight EAS-Net devices are
installed. Monroe R189 allows only eight devices to be configured, so the relay feature
provides a way to use more than eight devices. This number includes both ZeeVee and
non-ZeeVee devices.
Only one ZeeVee unit should be set up as a relay per installation or headend.
By default the EAS Relay is
off. When the EAS Relay is
set to “On”, the system will
forward the alert sent by the
Monroe R189 to all other known
ZeeVee devices. The alert is
forwarded sequentially so a large
installation might see a delay
before all modulators begin
processing the alert.
The ZeeVee EAS Relay feature
allows you to configure one
ZeeVee unit in the Monroe R189.
That one device communicates
with the Monroe box and its
information cascades down to
the other ZeeVee units.
6. Connect ZeeVee units to one or more NTP servers. This connection ensures that all
system clocks are in sync so when the Monroe sends an alert to the ZeeVee device, the
alert processes at the appropriate time.
To connect, click on the Device tab and enable Show advanced controls. Then fill in the
fully qualified domain name as appropriate in the NTP server fields.
Configuring Maestro for EAS-NET