Iqpumpmicro ac drive simplex quick start procedure, Page 5 of 12 – Yaskawa iQpump Micro AC Drive User Manual
Page 5
Yaskawa America, Inc., 2121 Norman Drive South, Waukegan, IL 60085, (800) YASKAWA (927-5292) Fax (847) 887-7310, [email protected], www.yaskawa.com, Document Number: TOEPYAIQPM01 11/2014 © Yaskawa America, Inc.
Step
8
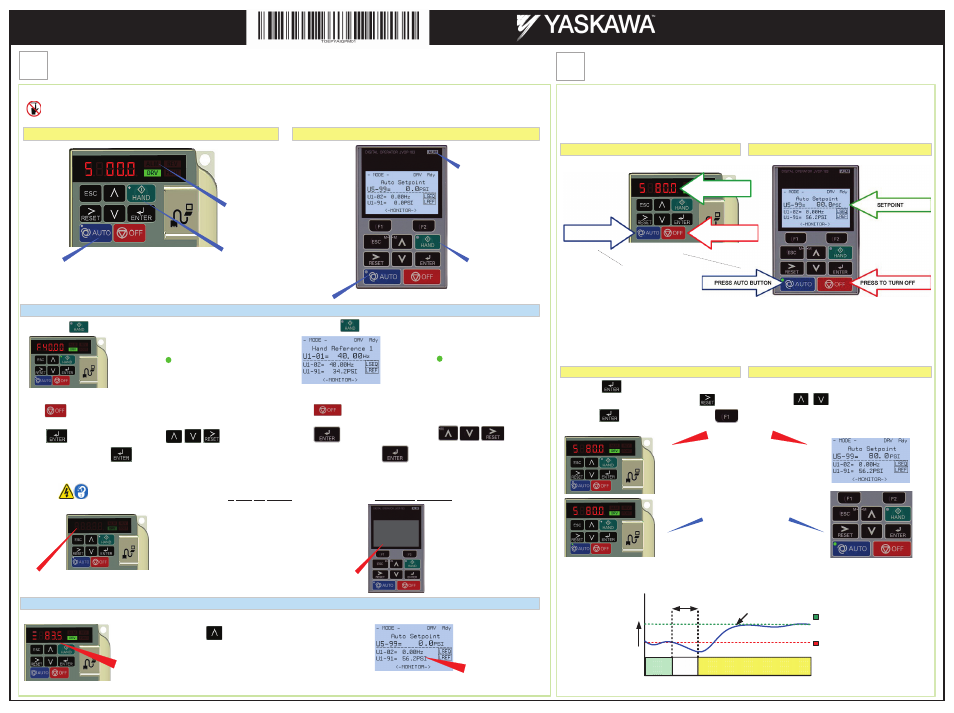
Verify Pump Rotation and Transducer Feedback Signal
Page 5 of 12
iQpumpMicro AC Drive
Simplex Quick Start Procedure
15. Motor Rotation Test
14. This step checks the motor for proper direction and operation. This test is performed solely from the digital operator.
Apply power to the iQpump Micro after electrical connections are terminated and protective covers are installed.
At this point, D
DO NOT RUN THE MOTOR, The digital operator should display as shown in
Figure 3
.
Figure 3: Digital Operator
Refer to
Figure 1 or 2,
swap any ttwo
of the tthree output leads to the motor
(U/T1, V/T2 and W/T3). Repeat S
Step 8
and recheck motor direction after the
wiring change.
WARNING! Hazardous Voltage. Contact may cause electric shock or burn. Turn-off and lock-out system and facility power before servicing.
After the power has been turned OFF, wait at least five minutes until the charge indicator extinguishes completely before touching any wiring,
circuit boards or components.
Verify the transducer feedback signal level on the digital operator display matches a mechanical pressure gauge.
FEEDBACK SIGNAL LEVEL
Refer to parameter P1-02
and P1-03, if the feedback
device scaling or system
units are incorrect.
Press
and the HAND
LED should be
ON
.
The motor should be operating in the correct direction of pump.
Press
on the digital operator; the display should read
on the digital operator; the display should read as in Figure 3.
Auto Mode Off
Press to access Hand Speed. Use to change
HAND Speed value. Press to save value.
No alarm active
Hand Mode Off
Digital operator
turned off.
Figure 3: Digital Operator
Digital operator
turned off.
FEEDBACK SIGNAL LEVEL
Press
and the HAND
LED should be
ON
.
The motor should now be operating at in the correct direction of pump.
Press
on the Digital Operator; the display should read
on the Digital Operator; the display should read as in Figure 3.
No alarm active
Auto Mode Off
Hand Mode Off
NOTE: If the motor direction is not correct, de-energize the iQpump Micro and follow instructions below.
Press to access HAND Speed. Use to change
HAND Speed value. Press to save value.
LED Digital Operator (Standard)
LCD Digital Operator (Optional)
16. Feedback Signal Check
Refer to
Figure 1 or 2,
swap any
two of the tthree output leads to
the motor (U/T1, V/T2 and W/T3).
Repeat S
Step 8 and recheck motor
direction after the wiring change.
From HOME screen, press to access “
FEEdb
” screen.
“
FEEdb
” will display for 2 seconds, then automatically change to display the
feedback signal level.
17. AUTO MODE
Press the A
AUTO button to place the iQpump Micro into AUTO mode.
The AUTO mode will start and stop based on the Run Source Selection setting parameter b1-02. (Refer to Step 3) The
Reference Source Selection parameter b1-01 setting configures the AUTO mode reference source.
Press
to access or modify the system setpoint entered in parameter Q1-01 within the
18. SET SYSTEM SETPOINT
The iQpump Micro starts in AUTO Mode when the feedback signal level falls below the level programmed in parameter
P1-04 for the specified time in P1-05.
Use
to select the digit and
Next press
Press the A
AUTO button to
start the iQpump Micro.
Start Pump System
Start
Delay
145 PSI
Start / Draw Down
Level P1-04
System Setpoint
(Example 80 PSI)
Feedback signal from
pressure transducer
(4 – 20 mA)
0
Pressure
Start Level Delay (P1-05)
(Example 5.0 sec.)
WAIT
to store setpoint.
Refer to Page 3, parameter P1-04 for details on the Start Level Function.
iQpump Micro Quick Setup Menu.
Example: 80 PSI
Figure 4: Digital Operator
LED is blinking
when AUTO mode
is active but AUTO
Run Command is
not active.
The iQpump Micro is operated in AUTO mode by performing the following tasks:
·
Program all parameters
·
Verify motor rotation direction
·
Auto Mode: Select the R
Reference source setting in parameter b1-01
·
Auto Mode: Select the R
Run source setting in parameter b1-02 (Refer to Step 3)
Next, press
to return to the main menu (LCD Digital Operator)
LED Digital Operator (Standard)
LCD Digital Operator (Optional)
LED Digital Operator (Standard)
LCD Digital Operator (Optional)
SETPOINT
PRESS AUTO BUTTON
PRESS TO TURN OFF
Step
9
Auto Mode Operation