General setup/input select/input setup – JBL Synthesis SDP-25 User Manual
Page 11
-
11
-
JBL SYNTHESIS SDP-25
Global Lip Sync: This setting adds delay of 10ms to 500ms (in 10ms increments) to the
program audio on all inputs so that it is delayed to correctly sync with the video. This
compensates for the “rubber lips” effect of video lagging behind audio that is caused by devices
such as external switchers or processers between the output of the SDP and your display. Note
that this delay will be added to ALL inputs. If additional delay is required for a specific input
source to compensate for cable or satellite set top boxes or similar sources, you may add it
using the Lip Sync setting in the Input Setup Menu (see Page 12).
Auto Power Down: To conserve energy, the SDP-25 is shipped with a default setting of “On”
that automatically places the unit in the Standby mode when there is no use of any button or
knob on the front panel or remote for over four hours. Select “Off” to disable the Auto Power
Down feature which will leave the SDP on until you turn it off from the front panel, remote, or via
CEC Control commands.
FW Version: This line of the menu shows the current versions of the software that powers your
SDP. The information on this menu line may not be changed manually; it will only change when
the software is updated. Instructions on software upgrades will accompany new software, when
available.
Factory Settings: If you wish to restore the unit to its factory default settings you may do that
here. To perform the reset, highlight Factory Settings and press Enter. When Reset All to Factory
Settings appears, press Enter again and then highlight “Yes”. Press Enter one more time to
begin the rest process. Your SDP will turn off and when you turn it on again all factory settings
will be restored. Note that resetting the unit erases any settings that you or your installer have
made to all menu items such as Input Setup, Speaker Setup and the Zone 2 settings. To simplify
the configuration process after a rest you may wish to write down any items you wish to re-enter
identically to their setting before the reset.
INPUT SELECT
The Input Select menu shows a list of the available inputs. By highlighting an input source and
pressing the Enter button you will select it as the source for the SDP-25.
Once any input has been renamed in the Input Setup Menu (see Page 11) the new name will
show in a column to the right of the default input names list. This will allow you to compare the
input names as they are show on the remote to the names that appear in the on-screen menus
and the front panel Information Display.
This menu is informational only. No changes may be made here.
INPUT SETUP
The Input Setting menu allows you to change the default settings for each Source.
We recommend that you check each setting on this menu to be sure that the selections properly
reflect the components in your system for items such as the Source name, Lip Sync and Trigger
On/Off. The settings available in the Audio Adjustment sub-menu are best made after you have
spent some time listening to the source so that you may custom tailor them to your taste and
listening preferences.
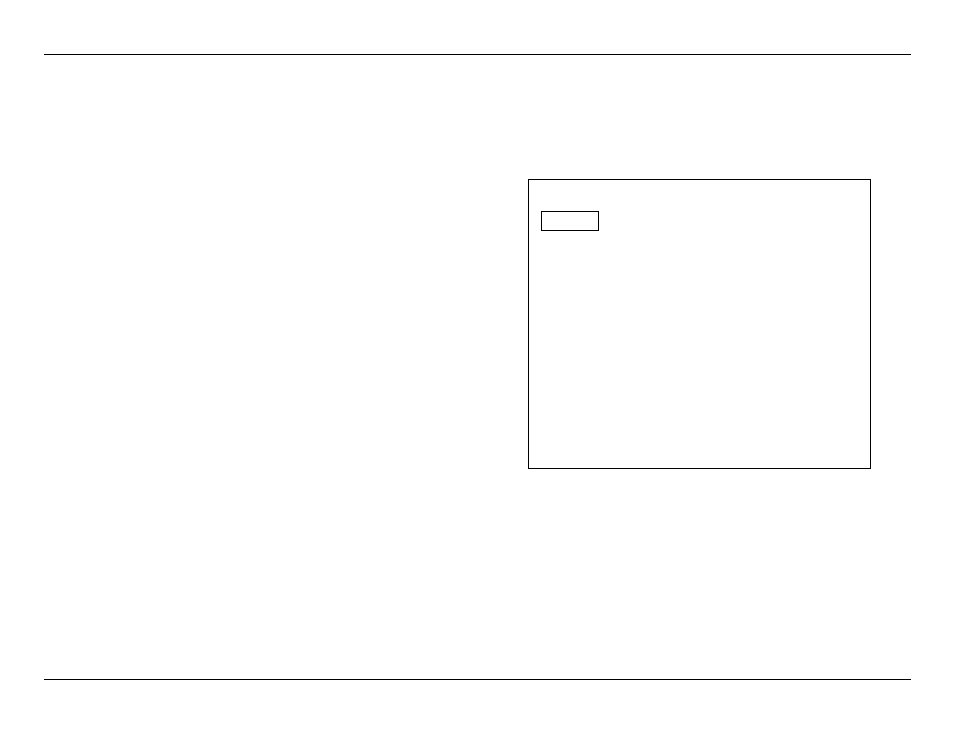
Input Setup
Source
Blu-ray
Rename
Blu-ray
Video Input
HDMI 1
Audio Source
HDMI 1
Secondary
Digital Audio
Coax 1
Analog Audio
Audio 1
Surround Mode
PLII(x) Movie
Lip Sync
0ms
Audio Adjustment
Trigger B
Off
Back
The items in the Input Setup Menu are specific to each input, allowing you to custom tailor how
any source performs in your specific system and in a way that meets your personal preferences.
However, that means that you will need to repeat the setup for each Source.
Source: When Source is highlighted, press enter to call up a list of available input sources. Use
the Up/Down Navigation Buttons to select the source to be customized and then press Enter.
Rename: You may give an input a personalized name that helps you to describe the specific
component attached to the input being programmed. With Rename highlighted press Enter. That
will call up a box towards the bottom of your screen that shows the factory default (or current)
name for the input on the top line with three lines of letters and characters below it.
Use the Navigation buttons to select the letters corresponding to the name you wish to enter
and when the outline box is over the desired letter press Enter again. The white cursor block will
move to the next space so that you may complete the name entry. To enter a space between
words position the outline box over “SPC” and press Enter. To move back and correct an error,
position the outline box over “DEL” and press Enter.
General Setup/Input Select/Input Setup