Whelen SK01AA User Manual
Automotive: lightheads
Page 1
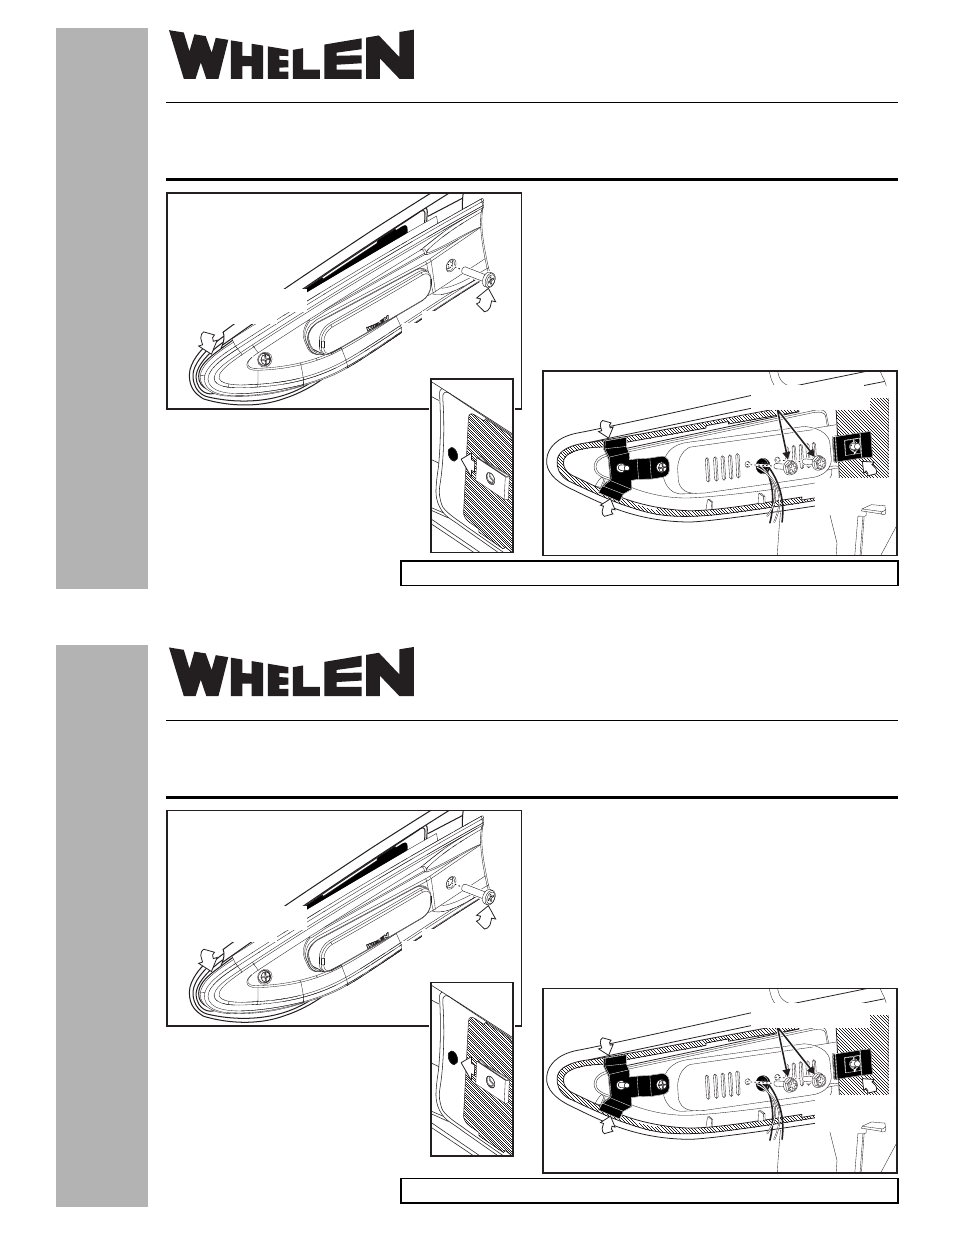
View from Outside of the Fender
8 - 32 X 1/2" PHILLIPS
PAN HEAD METAL SCREW
Fig. 1
INSERT FRONT OF HOUSING.
MOUNTING CLIP MUST CATCH
INSIDE EDGE OF BODY.
©2012 Whelen Engineering Company Inc.
Form No.14577 (033012)
Automotive:
Lightheads
Installation Guide:
SideKick™ Super-LED® Fender Lights
2012 - 2013 Ford Police Interceptor Sedan
®
ENGINEERING COMPANY INC.
51 Winthrop Road,
Chester, Connecticut 06412-0684
Phone: (860) 526-9504
Fax: (860) 526-4078
Internet: www.whelen.com
Sales e-mail: [email protected]
Canadian Sales e-mail: [email protected]
Customer Service e-mail: [email protected]
For warranty information regarding this product, visi85ww.whelen.com/warranty
Installation:
1. Remove the vent panel from the vehicle per
manufacturers instructions and install the
supplied clip nut onto the fender on the vent rear
mounting hole.
2. Install the ION™ lighthead into the SideKick™
panel using the 2 supplied washer head screws
(Fig. 2).
3. Extend the lighthead wires into the fender to the power source and
install the SideKick™ panel by first inserting the front into the fender
opening so that the 2 mounting clips on the SideKick™ grab the
inside of the fender (Figs. 1 & 2).
4. Next swing the rear of the SideKick™ toward the fender so that the
rear mounting hole lines up with the clip nut you installed and secure
it with the supplied 8 - 32 X 1/2” Phillips Pan Head Metal Screw.
IMPORTANT: It is the responsibility of the installation
technician to make sure that the installation and operation of
this product will not interfere with or compromise the operation
or efficiency of any vehicle equipment!
INSTALL
CLIP NUT
View from the Inside of the Fender
Fig. 2
MOUNTING CLIP MUST REST
ON INSIDE EDGE OF BODY
OPENING
6 - 32 X 5/16 WASHER HD SCREW
(LIGHTHEAD TO BRACKET)
SECURE REAR OF
HOUSING TO CLIP
NUT
View from the Inside of the Fender
Fig. 2
MOUNTING CLIP MUST REST
ON INSIDE EDGE OF BODY
OPENING
6 - 32 X 5/16 WASHER HD SCREW
(LIGHTHEAD TO BRACKET)
SECURE REAR OF
HOUSING TO CLIP
NUT
- SK01JJ SK01WAA SK01WJJ RSA02ZCR RSA03ZCR RVA03ZCR RSC02ZCR RSC03ZCR RVC03ZCR RSG02ZCR RSG03ZCR IONSMJ IONSMD IONSMM IONSMWJ IONSMWD IONSMWM WIONSMJ WIONSMD WIONSMM WIONSMWJ WIONSMWD WIONSMWM WIONSMCD IONJ IOND IONM IONWJ IONWD IONWM WIONJ WIOND WIONM WIONWJ WIONWD IONA IONWA WIONA WIONWA IONG IONV3A IONV3AW 3SC0CDCR 3SA00FAR 3SBCCDCR 3SRCCDCR 3SR0CDRR IONV1A IONV1AW PAR28DA PAR28DJ UFM8 20C0CDCR 20C0CDCD SFIOND SFIONJ SFIONE SFP1A SFP1G SFP1J SFP1E SFP1D LINZ6K LINZ6J LINZ6D LINZ61 LINZ62 LINZ65 LINZ6A LINZ6A24 LINZ6G IONSMA IONSMWA IONSMCA WIONSMA WIONSMWA WIONSMCA MBFX11AA MBFX11JJ VMFX11AA MBFT11AA MBFT11JJ MBCC11JJ MBFF12AA MBFF12JJ VMFF12AA SK02JJ SK02WJJ