PLANET GSD-1002M User Manual
Package contents, Starting web management, Saving configuration
- 1 -
- 2 -
- 3 -
- 4 -
- 5 -
- 6 -
- 7 -
- 8 -
1. Package Contents
Thank you for purchasing 8-Port 10/100/1000Mbps +
2-Port 100/1000X SFP Managed Desktop Switch (PoE
PD, External PWR), GSD-1002M. “Managed Switch”
mentioned in this Guide refers to the GSD-1002M.
Open the box of the Managed Switch and carefully
unpack it. The box should contain the following items:
The Managed Switch x 1
Quick Installation Guide x 1
Rubber Feet x 4
Power Adapter x 1
SFP Dust Cap x 2
If any item is found missing or damaged, please contact
your local reseller for replacement.
3. Starting Web Management
The following shows how to start up the Web
Management of the Managed Switch. Note the
Managed Switch is configured through an Ethernet
connection. Please make sure the manager PC must be
set on the same IP subnet address.
For example, the default IP address of the Managed
Switch is 192.168.0.100, then the manager PC should
be set at 192.168.0.x (where x is a number between
1 and 254, except 100), and the default subnet mask is
255.255.255.0.
PC / Workstation
with Web Browser
192.168.0.x
Managed Switch
RJ-45/UTP Cable
IP Address:
192.168.0.100
Figure 3-1: IP Management Diagram
4. Saving Configuration
In the Managed Switch, the running configuration file
stores in the RAM. In the current version, the running
configuration sequence of running-config can be saved
from the RAM to FLASH by “Save Configurations to
FLASH” function, so that the running configuration
sequence becomes the startup configuration file, which
is called configuration save.
To save all applied changes and set the current
configuration as a startup configuration. The startup-
configuration file will be loaded automatically across a
system reboot.
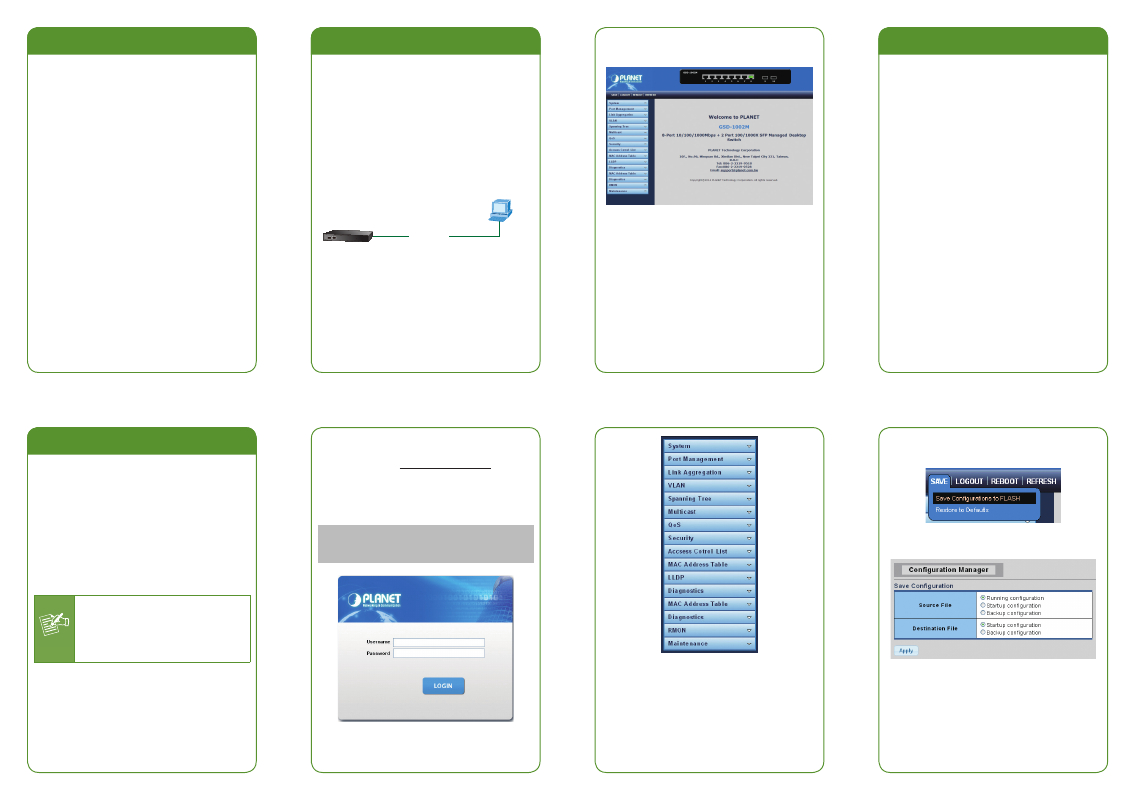
3. After entering the password, the main screen appears
as Figure 3-3 shows.
Figure 3-3: Web Main Screen of Managed Switch
The Switch Menu on the left of the Web page lets you
access all the commands and statistics the Managed
Switch provides.
2. Requirements
Workstations running Windows XP/2003/Vista/7/8/2008,
MAC OS X or later, Linux, UNIX, or other platforms
are compatible with TCP/IP protocols.
Workstations are installed with Ethernet NIC (Network
Interface Card)
Ethernet Port Connection
Network cables -- Use standard network (UTP)
cables with RJ-45 connectors.
The above PC is installed with Web Browser and
JAVA runtime environment plug-in.
Note
It is recommended to use Internet
Explore 8.0 or above to access the
Managed Switch. If the Web interface of
the Managed Switch is not accessible,
please turn off the anti-virus software or
firewall and then try it again.
Logging in the Managed Switch
1. Use Internet Explorer 8.0 or above Web browser and
enter IP address
the Web interface.
2. When the following dialog box appears, please enter
the default user name and password “admin”. The
login screen in Figure 3-2 appears.
Default IP Address: 192.168.0.100
Default Username: admin
Default Password: admin
Figure 3-2: Login Screen
1.
Click “Save > Save Configurations to FLASH” to
save running configuration to startup configuration.
2. Press the “Apply” button.
Figure 3-4: Switch Menu
Now, you can use the Web management interface to
continue the Switch management.
Please refer to the user’s manual for more.