Troubleshooting, Appendix a networking connection – PLANET HPOE-460 User Manual
Page 2
- 9 -
- 10 -
- 11 -
- 12 -
- 13 -
- 14 -
2.2 HPOE-460 and POE-161S, the IEEE
802.3at Injector / Splitter and Equipment
Installation
For the places hard to find the power inlet, the
HPOE-460 and IEEE 802.3at High Power over Ethernet
Splitter (POE-161S) provides the easiest way to power
your Ethernet devices such as IP Camera on the ceiling
and the Wireless Access Point installed on the top of the
building. With 4 10/100/1000Base-T Gigabit Ethernet
ports, the HPOE-460 supports full 52V DC power for any
remote IEEE 802.3af / 802.3at powered device (PD).
To control the power system of your networking devices,
the HPOE-460 can directly co-work with PoE IP phone to
build VoIP telephony network in the office. Furthermore,
the HPOE-460 can be directly connected to any third
party IEEE 802.3af / 802.3at compliant devices installed
100 meters away.
3. Troubleshooting
This chapter contains information to help you solve
issue. If the High Power over Ethernet Injector Hub
is not functioning properly, make sure the High Power
over Ethernet Injector Hub was set up according to
instructions in this manual.
How to let my non IEEE 802.3af / 802.3at network
devices can work with HPOE-460?
Solution:
You can use PLANET Power over Ethernet Splitter, such
as PLANET POE-152S / POE-161S to work as a power
transformer between HPOE-460 and non IEEE 802.3af /
802.3at devices. The POE-152S and POE-161S provide
5V DC and 12V DC voltage output through DIP switch.
The HPOE-460 PoE LED is not lit
Solution:
Check the cable connection between HPOE-460 and IEEE
802.3af / 802.3at devices.
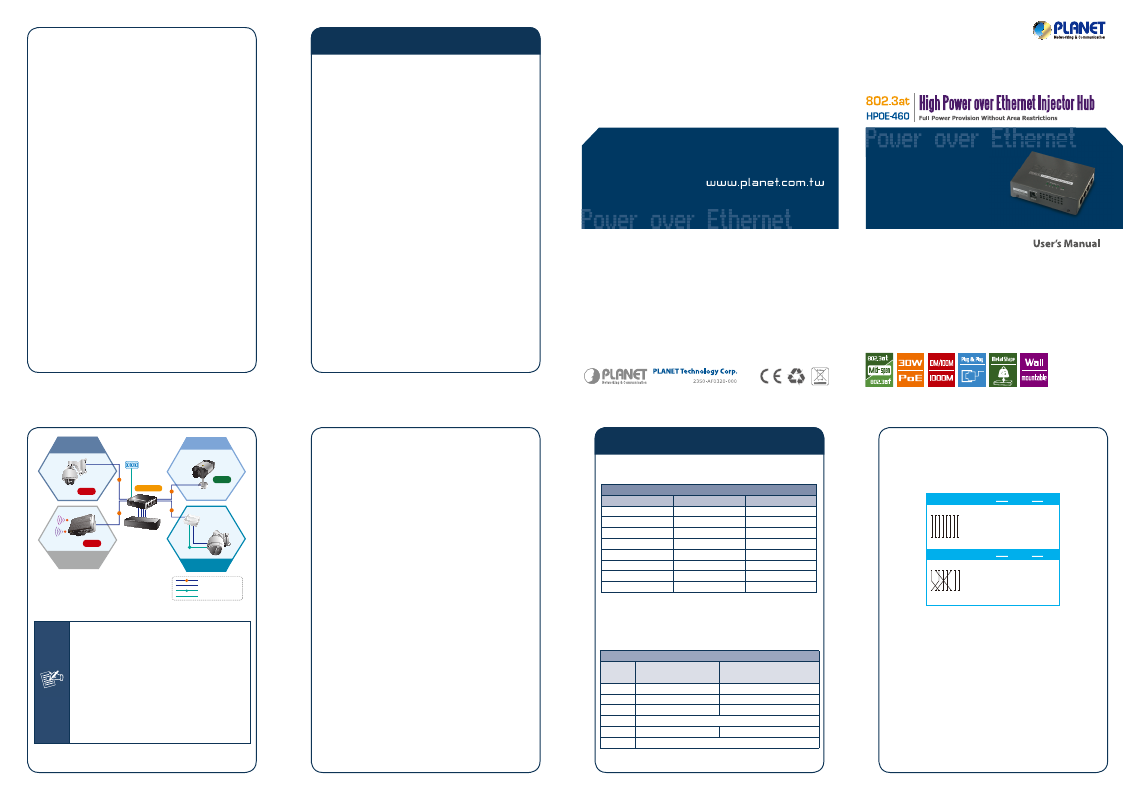
DC
Power Line (DC)
Power Line
1000Base-T UTP
PoE
1000Base-T UTP with PoE
8-Port Gigabit Switch
HPOE-460
802.3at PoE
PTZ / Speed Dome
IP Camera
30W
802.3af PoE
IP Camera
15W
802.3at PoE Splitter+
Non-PoE Device
802.3at
PoE Splitter
DC
802.3at PoE Multi-Channel
/ High Power
Wireless AP
30W
a
N
PoE
PoE
PoE
PoE
Power
Figure 2-1: HPOE-460 Application Topology
Note
1. According to IEEE 802.3af standard and
IEEE 802.3at pre-standard, the
HPOE-460 will not inject power to the
cable if not connecting to IEEE 802.3af
and IEEE 802.3at pre-standard devices.
2. Due to the capability of IEEE 802.3af
standard and IEEE 802.3at pre-standard,
the HPOE-460 can directly connect with
any IEEE 802.3af standard or IEEE
802.3at pre-standard compliant
end-nodes.
Why I connect my PoE device to HPOE-460 and it
cannot power on?
Solution:
1. Please check the cable type of the connection from
HPOE-460 to the other end. The cable should be an
8-wire UTP, Category 5/5e/6, EIA568 cable within 100
meters. A cable with only 4-wire, short loop or over
100 meters, all will affect the power supply.
2. Please check and assure the device that fully complied
with IEEE 802.3af standard and IEEE 802.3at
pre-standard.
Appendix A Networking Connection
RJ-45 Pin Assignments
1000Mbps, 1000Base T
RJ-45 Connector pin assignment
Contact
MDI
MDI-X
1
BI_DA+
BI_DB+
2
BI_DA-
BI_DB-
3
BI_DB+
BI_DA+
4
BI_DC+
BI_DD+
5
BI_DC-
BI_DD-
6
BI_DB-
BI_DA-
7
BI_DD+
BI_DC+
8
BI_DD-
BI_DC-
Implicit implementation of the crossover function
within a twisted-pair cable, or at a wiring panel, while
not expressly forbidden, is beyond the scope of this
standard.
10/100Mbps, 10/100Base-TX
RJ-45 Connector pin assignment
Contact
MDI MDI-X Media
Dependant Interface
MDI-X Media Dependant
Interface -Cross
1
Tx + (transmit)
Rx + (receive)
2
Tx - (transmit)
Rx - (receive)
3
Rx + (receive)
Tx + (transmit)
4, 5
IEEE 802.3af / 802.3at DC 48V / 52V
6
Rx - (receive)
Tx - (transmit)
7, 8
IEEE 802.3af / 802.3at DC 0V
The standard RJ-45 receptacle / connector
There are 8 wires on a standard UTP/STP cable and
each wire is color-coded. The following shows the pin
allocation and color of straight cable and crossover cable
connection:
Straight Cable
SIDE 1
SIDE 1
SIDE 2
SIDE 1
SIDE 2
1
1
2
2
3
3
4
4
5
5
6
6
7
7
8
8
1 2 3 4 5 6 7 8
1 2 3 4 5 6 7 8
SIDE 2
Crossover Cable
SIDE 1
SIDE 2
1 = White/Orange
2 = Orange
3 = White/Green
4 = Blue
5 = White/Blue
6 = Green
7 = White/Brown
8 = Brown
1 = White/Orange
2 = Orange
3 = White/Green
4 = Blue
5 = White/Blue
6 = Green
7 = White/Brown
8 = Brown
1 = White/Orange
2 = Orange
3 = White/Green
4 = Blue
5 = White/Blue
6 = Green
7 = White/Brown
8 = Brown
1 = White/Green
2 = Green
3 = White/Orange
4 = Blue
5 = White/Blue
6 = Orange
7 = White/Brown
8 = Brown
Figure A-1: Straight-Through and Crossover Cable
Please make sure your connected cables are with
same pin assignment and color as above picture before
deploying the cables into your network.
Energy Saving Note of the Device
This power required device does not support Standby mode operation.
For energy saving, please remove the power cable to disconnect the device
from the power circuit.
Without removing power cable, the device wills still consuming power
from the power source. In the view of Saving the Energy and reduce the
unnecessary power consuming, it is strongly suggested to remove the
power connection for the device if this device is not intended to be active.