PLANET ICA-W8100 User Manual
PLANET Routers
Germany / Portuguese
CHECK THE CONTENTS INSIDE THE PACKAGE BOX
The package should contain the items (shown below) plus ICA-W8100 / ICA-W8100-CLD. If any item is
missing or damaged, please contact the vendor immediately.
CONTROLLARE IL CONTENUTO DELLA CONFEZIONE
La confezione dovrebbe contenere i componenti illustrati di seguito ICA-W8100/ICA-W8100-CLD. Se uno
dei componenti manca oppure è danneggiato contattare il rivenditore.
• Quick Guide • CD-ROM • Camera Stand • Power Adapter • Screw Kit
• QR Code Card
(for ICA-W8100-CLD only)
• Manuale rapido • CD-ROM • Supporto • Alimentatore • Kit viti
• QR Code Card
(solo per ICA-W8100-CLD)
INHALTE DES LIEFERKARTONS PRÜFEN
Der Karton sollte die nachstehend gezeigten Artikel plus ICA-W8100 / ICA-W8100-CLD enthalten. Falls
etwas fehlen oder beschädigt sein sollte, wenden Sie sich bitte umgehend an Ihren Händler.
VERIFIQUE O CONTEÚDO DENTRO DA CAIXA DA EMBALAGEM
A embalagem deve conter os itens (exibidos abaixo) mais ICA-W8100 / ICA-W8100-CLD. Se qualquer
item estiver faltando ou danificado, entre em contato com o fornecedor imediatamente
• Schnellinstallationsanleitung • CD-ROM • Kameraständer • Netzteil • Schraubenset
• QR-Codekarte
(nur beim ICA-W8100-CLD)
• Guia de Instalação Rápida • CD-ROM • Suporte da câmera • Adaptador de energia
• Kit de Parafuso • Cartão de Código QR
(para ICA-W8100-CLD apenas)
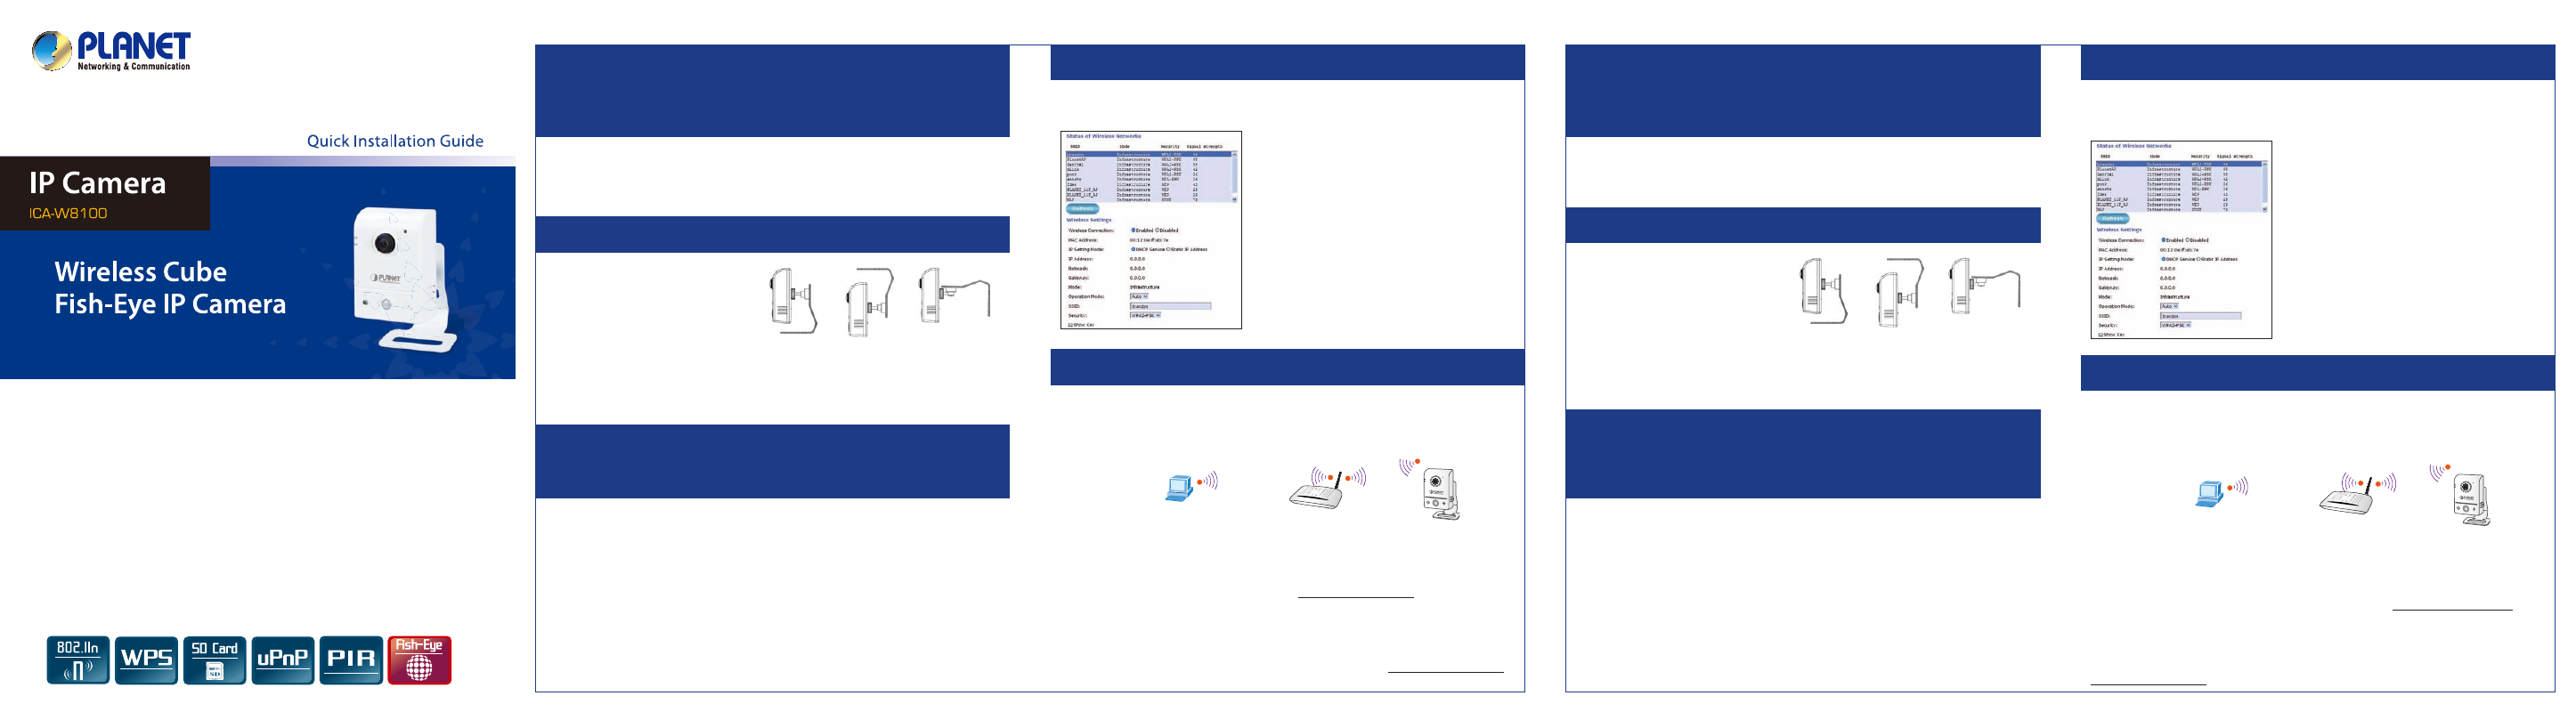
Step 4 : Wireless Setup for ICA-W8100 (optional)
Passo 4 : Configurazione Wireless solo per ICA-W8100 (opzionale)
Go to the network of website Wireless setting page for wireless configuration.
Andare sulla pagina network of website Wireless setting per la configurazione wireless.
Schritt 4 : Drahtloseinrichtung für ICA-W8100 (optional)
Passo 4 : Configuração Wireless para ICA-W8100 (opcional)
Rufen Sie zur WLAN-Konfiguration die Seite Network of Website (Netzwerk der Webseite) Wireless
setting (WLAN-Einstellung) auf.
Vб а rede do website Wireless configurando a página para configuração sem fio.
1. Press "Refresh" to search Access Point nearby.
2. Select the Access Point you would like to connect.
3. Enter your authentication key into the fields if required.
4. Press "Connect" to make settings effective.
1. Premere "Refresh" per ricercare gli Access Point nelle
vicinanze.
2. Selezionare l’ Access Point a cui bisogna connettere la IP
Camera e fornire l’autenticazione della rete wireless nei
campi indicati.
3. Premere il tasto "Connect" per rendere effettive le
modifiche.
1. Klicken Sie zur Suche nach einem Zugangspunkt in der
Nähe auf "Aktualisieren".
2. Wählen Sie den Zugangspunkt, mit dem Sie sich
verbinden möchten.
3. Geben Sie erforderlichenfalls den
Authentifizierungsschlüssel in die Felder ein.
4. Klicken Sie zum Übernehmen der Einstellungen auf
"Verbinden".
1. Pressione "Atualizar" para procurar o Ponto de Acesso
próximo.
2. Selecione o Ponto de Acesso a que vovê deseja se
conectar.
3. Informe sua chave de autenticação nos campos se
necessário.
4. Pressione "Conectar" para efetivar as configurações.
Step 1 : Wall, Ceiling and Table Mount Installation
Passo 1 : modalità di installazione Muro, soffitto e montaggio da Tavolo
1. Use the 2 supplied screws to fix the base
plate to a flat surface.
2. Loosen the lock ring to adjust the desired
angle of the camera.
3. Tighten the lock ring.
1. Usare le viti a corredo per fissare la base.
2. Svitare la ghiera per regolare l’angolo
desiderato per la telecamera.
3. Bloccare l’anello.
Table Mounting
Ceiling mounting
Wall Mounting
Montaggio da
tavolo
Montaggio a
soffitto
Montaggio a muro
Schritt 1 : Wand-, Decken- und Tischhalterung installieren
Passo 1 : Instalação de Montagem de Parede, Teto e Mesa
1. Befestigen Sie die Basisplatte mit den 2
mitgelieferten Schrauben an einem flachen
Untergrund.
2. Lösen Sie den Verschlussring zum Einstellen
des gewünschten Kamerawinkels.
3. Ziehen Sie den Verschlussring fest.
1. Use os 2 parafusos fornecidos para fixar a
placa de base a uma superfície plana.
2. Solte o anel de trava para ajustar o ângulo
desejado da câmera.
3. Aperte o anel de treava.
Tischmontage
Deckenmontage
Wandmontage
Montagem de
Mesa
Montagem no
Teto
Montagem na
Parede
Step 5 : Wireless Connection for ICA-W8100 (optional)
Passo 5 : Connessione Wireless per ICA-W8100 (opzionale)
Schritt 5 : Drahtlosverbindung für ICA-W8100 (optional)
Passo 5 : Conexão Wireless para ICA-W8100 (opcional)
Step 2 : Connecting Network and AC Adapter Power
Step 3 : Utility Installs and Runs to Locate the IP Camera (optional)
Passo 2 : Connessione alla rete ed all’impianto elettrico
Passo 3 : Programma per la ricerca della IP Camera (opzionale)
Please insert the CD-ROM supplied in the product package, and the CD will automatically run the
installation; if not, please click the Utility Hyperlink to install.
The IP installer Utility description.
After the camera utility is launched, all cameras found in your local area network will be displayed.
You will connect to IP Camera via web browser automatically; the IP Camera will prompt for a
username and password. Please enter admin as the default username and password.
Inserire il CD-ROM fornito nella confezione, e automaticamente si avvierà il programma di installazione,
nel caso in cui non si avvia il programma cliccare su Utility Hyperlink per avviare l’ installazione.
Descrizione del programma IP installer.
Dopo aver avviato il programma, tutte le IP camera presenti nella rete saranno visualizzate.
E’ possibile connettere automaticamente la IP Camera utilizzando il web browser; quando la IP Camera
viene individuata con l’indirizzo IP verrà richiesto la username e la password. Digitare admin sia per la
username che per la password.
Schritt 2 : Netzwerkverbindung herstellen und Netzteil anschließen
Schritt 3 : Dienstprogramm zum Lokalisieren der IP-Kamera installieren und
ausführen (optional)
Passo 2 : Conectando Rede e Adaptador de Energia AC
Passo 3 : Utilitário Instala e Executa para Localizar Câmera de IP (opcional)
Bitte legen Sie die beim Produkt mitgelieferte CD-ROM in das CD-Laufwerk, die Installation wird
automatisch ausgeführt; falls nicht, klicken Sie zum Installieren bitte auf das Dienstprogramm.
Beschreibung des IP-Installationsdienstprogrammes.
Nachdem das Kameradienstprogramm gestartet ist, werden alle in Ihrem lokalen Netzwerk gefundenen
Kameras angezeigt.
Sie stellen automatisch eine IP-Kamera über den Webbrowser her; die IP-Kamera fragt Benutzernamen
und Kennwort ab. Bitte geben Sie admin als Standardbenutzernamen und -kennwort ein.
Por favor, insira o CD-ROM fornecido na embalagem do produto, e o CD irá operar automaticamente a
instalação; caso contrário, clique no Hiperlink Utilitário para instalar.
Descrição do instaladador Utilitário de IP.
Depois do utilitário da câmera ser iniciado, todas as câmeras encontradas em sua rede de área local
serão exibidas.
Você se conectará à Câmera de IP pelo navegador da web automaticamente; a Câmera de IP pedirá
um nome de usuário e senha. Insira admin como nome de usuário e senha padrão.
Further Configuration
For detailed configuration, please check user’s manual on the bundled CD.
If you have any other question, please contact the dealer where you purchased this product or you can
contact PLANET directly at the following email address: [email protected]
Ulteriori informazioni
Questa guida serve solo per l’avvio della configurazione, si consiglia di visionare il manuale completo sul
CD fornito in dotazione per ulteriori approfondimenti.
Per domande o chiarimenti si prega contattare il rivenditore dove è stato effettuato l’acquisto oppure
contattare direttamente la PLANET al seguente indirizzo di posta elettronica: [email protected]
Weitere Konfiguration
Detaillierte Hinweise zur Konfiguration entnehmen Sie bitte der Bedienungsanleitung auf der mitgelieferten
CD.
Falls Sie weitere Fragen haben, wenden Sie sich bitte an den Händler, bei dem Sie dieses Produkt
erworben haben, oder unter folgender eMail-Adresse direkt an PLANET: [email protected]
Mais Configurações
Para detalhes de configuração, veja o manual do usuário no CD integrado.
Caso você tenha outras dpuvidas, por favor, entre em contato com o revendedor onde você adquiriu este
produto ou entre em contato diretamente com a PLANET no seguinte endereço de email:
[email protected]
English / Italian
IP Camera will reboot.
Remove the LAN cable when reminded in the
dialogue.
The wireless connection will take effect.
La IP camera si riavvierà.
Rimuovere il cavo LAN quando richiesto.
La connessione wireless connection verrà
stabilita.
IP-Kamera startet neu.
Ziehen Sie das LAN-Kabel, sobald Sie im Dialog
daran erinnert werden.
Die WLAN-Verbindung wird hergestellt.
A Câmera por IP reinicará.
Remova o cabo de LAN quando lembrado na
caixa de diálogo.
A conexão wireless entrará em efeito.
PC
(DHCP Client or 192.168.0.X)
802.11 b/g/n Wireless Access Point
N
N
N
N
PC
(DHCP Client or 192.168.0.X)
802.11 b/g/n Wireless Access Point
N
N
N
N