Getting started – using the nexstar+ control – Celestron NexStar Evolution 6 150mm f/10 Schmidt-Cassegrain GoTo Telescope User Manual
Page 15
ENGLISH
I
15
This section of the manual can be skipped if you are using a smart device with WiFi instead of the NexStar+ controller
The NexStar Evolution includes a computerized hand control to operate the telescope directly without the use of the WiFi
connection to Celestron SkyPortal The hand control can be plugged into any of the 4 AUX ports on the mount
GETTING STARTED – USING THE NEXSTAR+ CONTROL
1
8
9
3
11
10
11
12
13
2
4
5
6
15
14
7
4
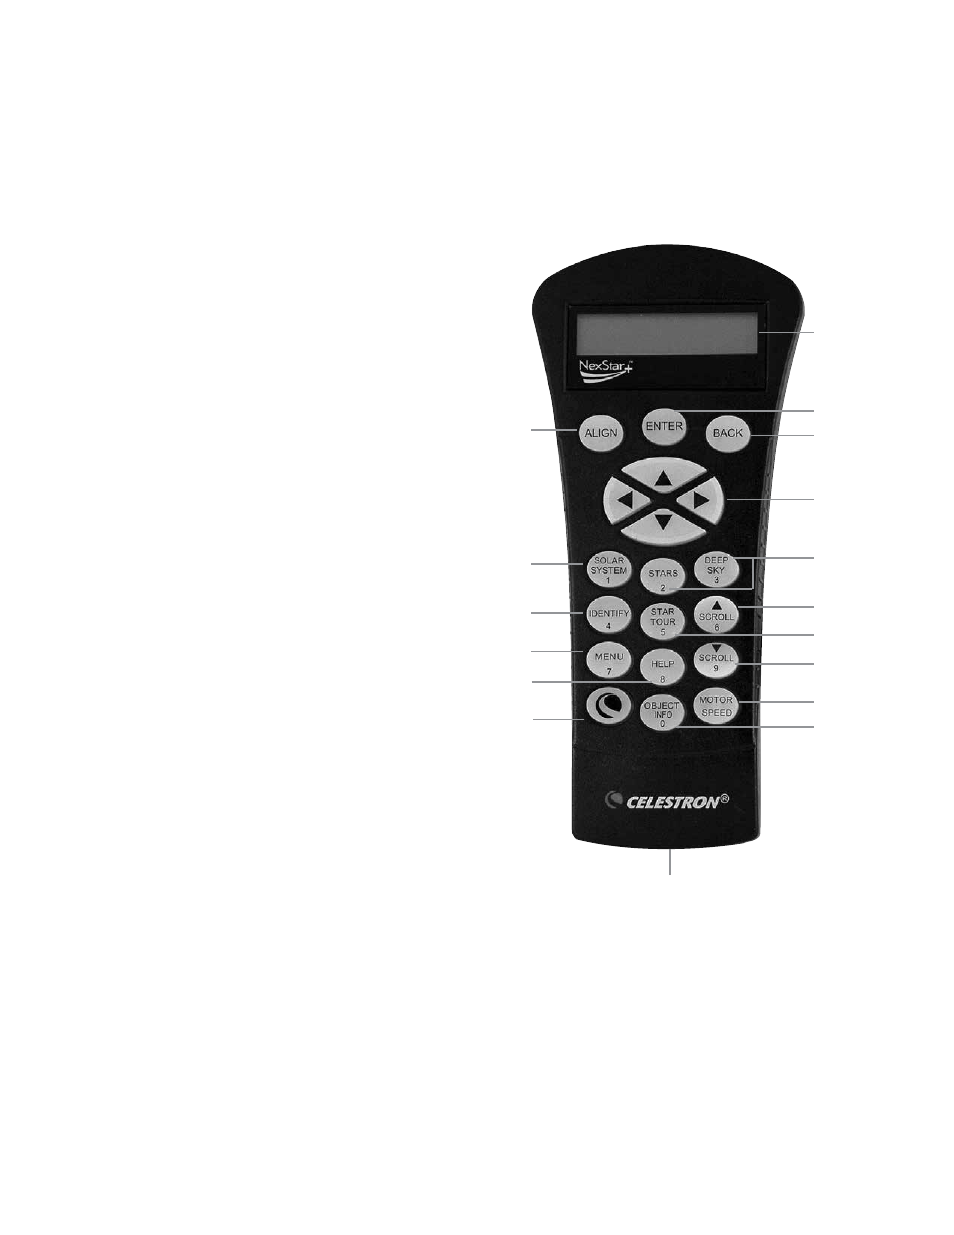
1 Liquid Crystal Display (LC D) Window: Has a four-line,
18 character display screen that has red backlighting for
comfortable viewing of telescope information and scrolling text
2 Align: Instructs the hand control to begin the process of
aligning your telescope
3 Direction Keys: Allows complete control of the mount in
any direction Use the direction keys to center objects in the
eyepiece or manually slew telescope
4 Catalog Keys: The mount has a key on the hand control
to allow direct access to each of the main catalogs in
its 40,000+ object database Your mount contains the
following catalogs in its database:
• Solar System – All 7 planets in our Solar System plus the
Moon, Sun and Pluto
• Stars – Custom lists of all the brightest stars, double stars,
variable stars and asterisms
• Deep Sky – Custom lists of all the best galaxies, nebulae
and clusters as well as the complete Messier and select
NGC objects
5 Identify: Searches the databases and displays the name
and offset distances to the nearest matching objects
6 Menu: Displays the many setup and utilities functions, such
as tracking rate and user defined objects and many others
7 Option (Celestron Logo): Can be used in combination
with other keys to access more advanced features and
functions
8 Enter: Pressing ENTER allows you to select any of
the functions, accept entered parameters and slew the
telescope to displayed objects
9 Back: Pressing BACK will take you out of the current menu
and display the previous level of the menu path Press
BACK repeatedly to get back to a main menu or use to
erase data entered by mistake
10 Sky Tour: Activates the tour mode, which seeks out all
the best objects in the sky and automatically slews the
telescope to those objects
11 Scroll Keys: Scrolls up and down within any of the menu
lists A double arrow symbol on the right side of the LCD
indicates that the scroll keys can be used to view
additional information
12 Motor Speed: Slews the telescope faster or slower
when the direction buttons are pressed
13 Object Info: Displays coordinates and useful information
about objects selected from the database
14 RS-232 Jack: Allows you to connect your telescope to
a computer, for use with software programs for point-and
click slewing capability and updating firmware via PC