Aligning the starpointer red dot finderscope, The altitude and azimuth clutches, The wifi and reset switches – Celestron NexStar Evolution 6 150mm f/10 Schmidt-Cassegrain GoTo Telescope User Manual
Page 9
ENGLISH
I
9
1 Turn on the StarPointer by rotating the variable brightness
control clockwise until you hear a click To increase the
brightness level of the red dot, continue rotating the
control knob about 180º until it stops
2
Locate a bright star or planet and center it using the
40mm eyepiece in the telescope
3 With both eyes open, look through the glass window in the
StarPointer
4 If the StarPointer is perfectly aligned, you will see the red LED
dot overlap the alignment star If the StarPointer is not aligned,
take notice of where the red dot is relative to the bright star
5 Without moving the main telescope, turn the StarPointer’s
azimuth and altitude alignment controls until the red dot is
directly over the alignment star
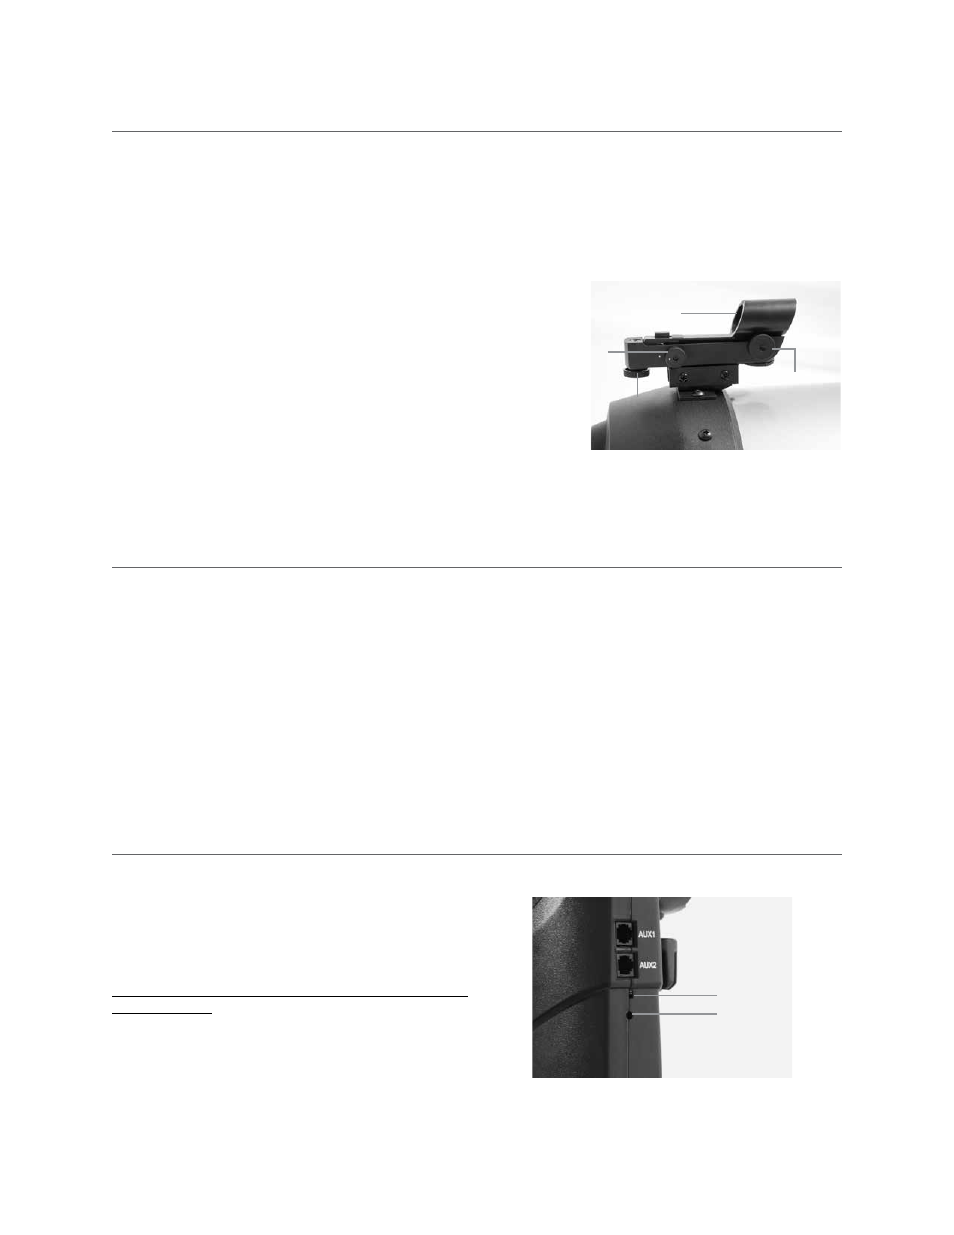
ALIGNING THE STARPOINTER RED DOT FINDERSCOPE
WiFi Switch
Reset Switch
The StarPointer is powered by a long life 3-volt lithium battery (#CR2032) located underneath the front portion of the Star
Pointer The StarPointer must be properly aligned with the telescope before it can be used This is a simple process using the
azimuth and altitude control knobs located on the side and bottom of the StarPointer The alignment procedure is best done at
night since the LED dot will be difficult to see during the day
THE ALTITUDE AND AZIMUTH CLUTCHES
NexStar Evolution features manual clutches that allow you to manually move the altitude (up/down) and azimuth (left/right) axis
without using the motors This can be useful for daytime terrestrial use or when storing the telescope
Note:
You should not unlock the clutches when the telescope is aligned with the app or hand control, or the alignment will
be lost. The telescope accounts for movement made by the motors. If the telescope is moved manually or bumped after it
was aligned, you should perform a new alignment.
This is the recommended starting position of the telescope, but is not required:
1 Unlock the altitude clutch knob and position the telescope so that it’s perpendicular to the fork arm base, then retighten the
altitude clutch knob
2 Unlock the azimuth clutch knob and position the telescope so that it’s aimed towards an unobstructed horizon, then
retighten the azimuth clutch knob
WiFi can be toggled between Direct Connect and Access
Point modes A small flat head screwdriver or ballpoint pen
can be used to access the switch Direct Connect is used to
connect directly to your smart device Access Point mode is
used to connect to your home network through a router Refer
to Appendix B, Advanced WiFi for more information
The WiFi switch should always be in the UP position
for normal use.
The reset switch can be accessed using a ballpoint pen The
reset switch should normally not be used except in the unlikely
event the telescope becomes unresponsive after cycling the
power switch
THE WIFI AND RESET SWITCHES
Window
Up/Down
Adjustment Knob
On/Off Switch
and Brightness
Control
Left/Right
Adjustment Knob