Solar energy set ses p1307 – Brennenstuhl Solar Energy Set SES P1307 Solar celltype Amorphous thin film 13Wp 770x525x40mm Akku 12V/7Ah User Manual
Page 6
6
Solar Energy Set SES P1307
This product is a plug & play style, portable back up power kit that
is powered with solar energy. No utility grid required. This solar
power kit can be used to power small daily electronic & electrical
applications both DC and AC (laptop, small TV). For AC applica-
tions an external inverter (not included) has to be connected to
the power kit. Good for occasions where utility grid is difficult to
access.
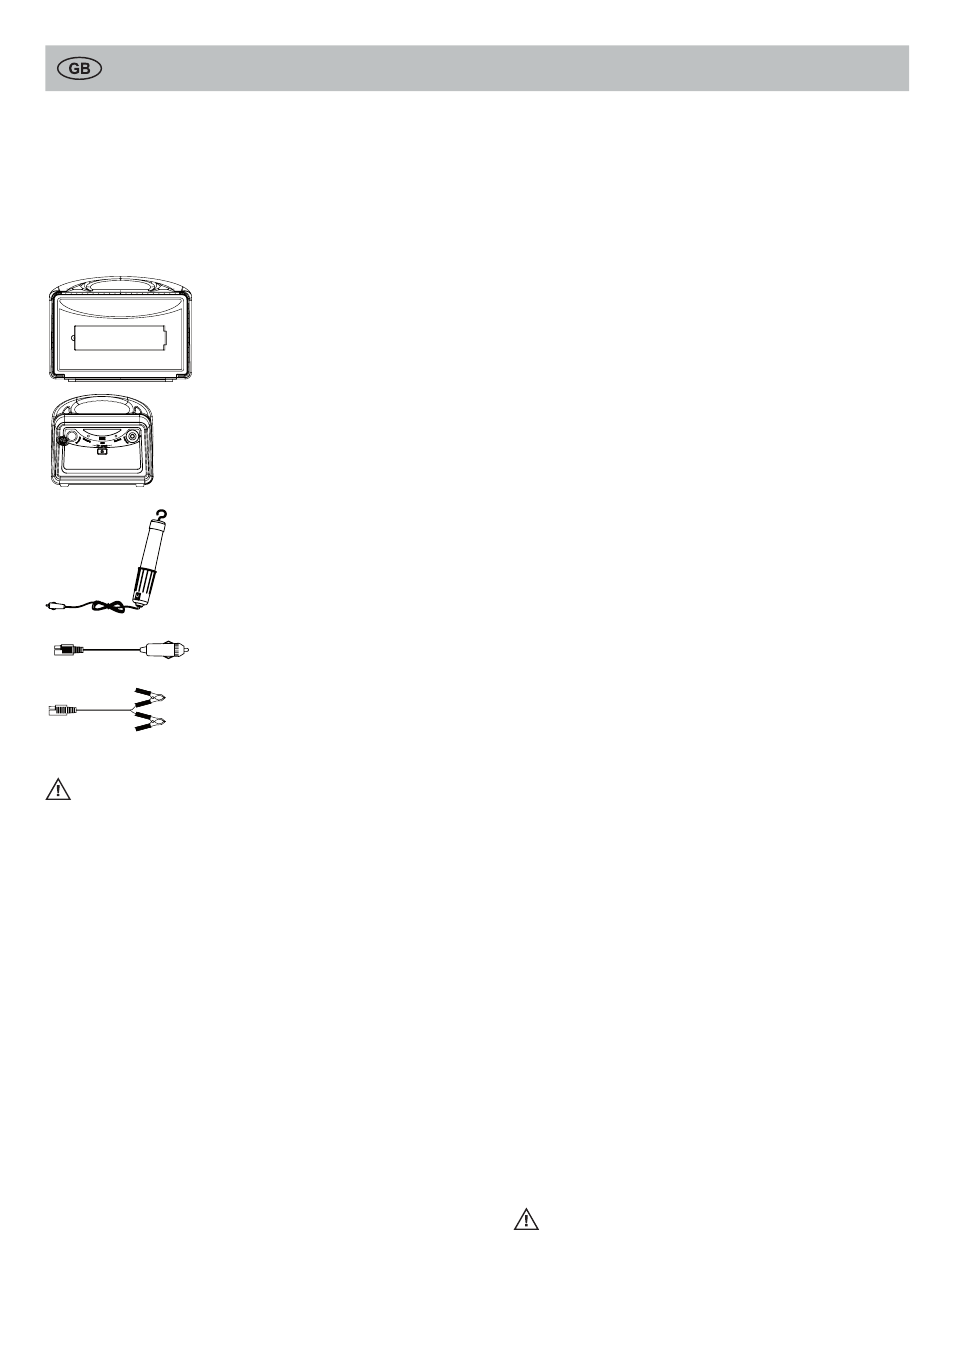
Description of parts
1 Folding Solar Panel
- Amorphous solar cell, charges even
when sun is low
- Angle adjustable design to maxi-
mize solar output
- Able to charge 12V and 24V battery
2 Power Unit
- 12V/7Ah maintenance free sealed
lead acid battery
- Charge controller
- Input & output
3 LED Work Light
For using in 12V cigarette lighter
adapter (CLA) socket
4 Adaptor cable to Male CLA
For direct connection to the solar
panel for charging external battery
5
Adaptor cable with battery clamps
For connection an external battery to
the solar panel or Power Unit (Input
battery DC 12V)
CAUTION
y
y
Before using, carefully read and understand the instruction
user’s manual.
y
y
Use the folding solar panel to charge the power unit for about
3 days before the first operation for initial charging.
y
y
The solar panel generates electricity when exposed to light.
y
y
The solar panel is suitable for outdoor use (IP43, protected
against water spray). The power station must not get damp or
wet.
y
y
The energy set is not suitable for fixed installation.
y
y
Move the switch on the folding solar panel to 12V before con-
necting it to the power unit.
y
y
Turn OFF the power unit when not using the product in order to
reduce self power losses.
y
y
Always switch off power before connecting or disconnecting the
application.
y
y
Connect the external inverter (not included) to the “Inverter” out-
put on the power unit only.
y
y
Do not exceed 150W at the 12V/DC output sockets.
y
y
Do not short circuit the battery clamps, fail to do so may cause
sparking or explosion.
y
y
This appliance is not intended for use by young children or
infirm person unless they are being adequately supervised by a
responsible person to ensure that they can use the application
safely.
OPERATION
Folding solar panel
y
y
Flip the folding solar panel open.
y
y
Place the folding solar panel at a position that can have direct
contact with sunlight, face the solar cell to the sun. Make sure
that no shadow is covering the solar cell to ensure better power
output.
y
y
This folding solar panel is designed in a way that it can be
tilted to different angle to maximize power output. Proper angle
should be similar to your local latitude. Angle can be adjusted
by shifting the metal rods to different breaches on the support
(please see “Product Overview”).
y
y
Please make sure that no shadow falls on the solar panel. Even
if only parts of the solar panel are covered by shadow the per-
formance will be considerably reduced.
y
y
The blue status LED flashes when light hits the solar panel.
This shows that solar energy is created and that the solar panel
is properly working.
y
y
Then, connect the main cable of this folding solar panel to
the “Solar” input at back of the power unit. The panel will then
charge the built-in battery of the power unit.
y
y
A voltage switch underneath the left side solar cell, allows you
to charge battery of different voltage. Shift the switch to 12V to
charge 12V battery, shift to 24V allows you to charge 24V bat-
teries.
y
y
The plate on the winding post of the main cable can be rotated
to enable easy winding. Rotate the plates inward while winding,
and rotate them outward to secure the main cable inside the
wire cabinet.
Power Unit
y
y
The power unit is an independent source that supplies power to
your applications. It consists of a built-in battery, a charge con-
troller, and inputs & outputs.
y
y
Follow the steps described in section “Folding solar panel”. Use
the solar panel to charge the built-in battery (Input solar DC
12V). Completely charging the battery requires approx. 2 to 3
days with full sunlight.
- Make sure that the voltage switch on the folding solar char-
ger is shifted to “12V” before connecting to the power unit.
y
y
Switch on the power unit.
y
y
When the battery is receiving charge from the folding solar
charger, “Charging” LED will light up. The “Charging” LED will
turn off when the battery is fully charged.
y
y
When the system is in proper condition, the “Working” LED
will light. If the battery is empty, and not enough to support
applications the “Working” LED will turn off. Please stop using
any application, and charge the battery using folding solar panel
until it is full again.
y
y
This power unit provides three outputs:
- “12V” Cigarette lighter socket: To supply power to any low
voltage devices that can also be powered through a car ciga-
rette lighter adapter, such as the included LED work light. A
rubber cover is provided to keep dirt and alien objects away in
order to ensure safe use of this output.
Only connect applications with max. power consumption
of 150W.
- “Inverter” Cigarette lighter socket: An external power
inverter (not included) can be connected to this output, enable
you to power AC (110V or 220V) applications with this power
unit. Total power output of the AC application is recommended
to be below 100W. A rubber cover is provided to keep dirt and
alien objects away, in order to ensure safe use of this output.
Make sure that you do not connect power inverter to
the “12V” Cigarette lighter socket. Danger of burning the
built-in charge controller if you do so.
Switch off power inverter when connecting to the power
unit.