Maintenance, Right left, Preventative maintenance: general – Brinly STH-420 BH Lawn Sweeper User Manual
Page 20: Wheel and drive gear
1009727-A
20.
MAINTENANCE
================================================================================================
Preventative Maintenance:
General
1.
Do not allow material to remain in the Hamper for extended periods
of time. Clean the Hamper using a water hose and allow it to dry
completely before storage.
2.
Check all moving parts for wear and freedom of movement.
3.
Check all fasteners for tightness and retighten as required.
4.
Inspect for rust on painted surfaces. Sand lightly and touch up
damaged areas with enamel paint.
5.
Routine lubrication of the Dowel Pin and Drive Pinion is required.
At a minimum it is recommended to do this twice per year: in the
fall before storage, and again in the spring before the fi rst use.
Follow the procedure outlined below in the ‘Wheel and Drive Gear’
maintenance section.
6.
Check the Drive Pinions and Dowel Pins for wear and replace as
needed. These are considered normal wear parts. Contact the
Customer Service Department to purchase replacement parts.
7.
Lubricate the Wheel Axles annually following the procedure outlined
in the Maintenance section.
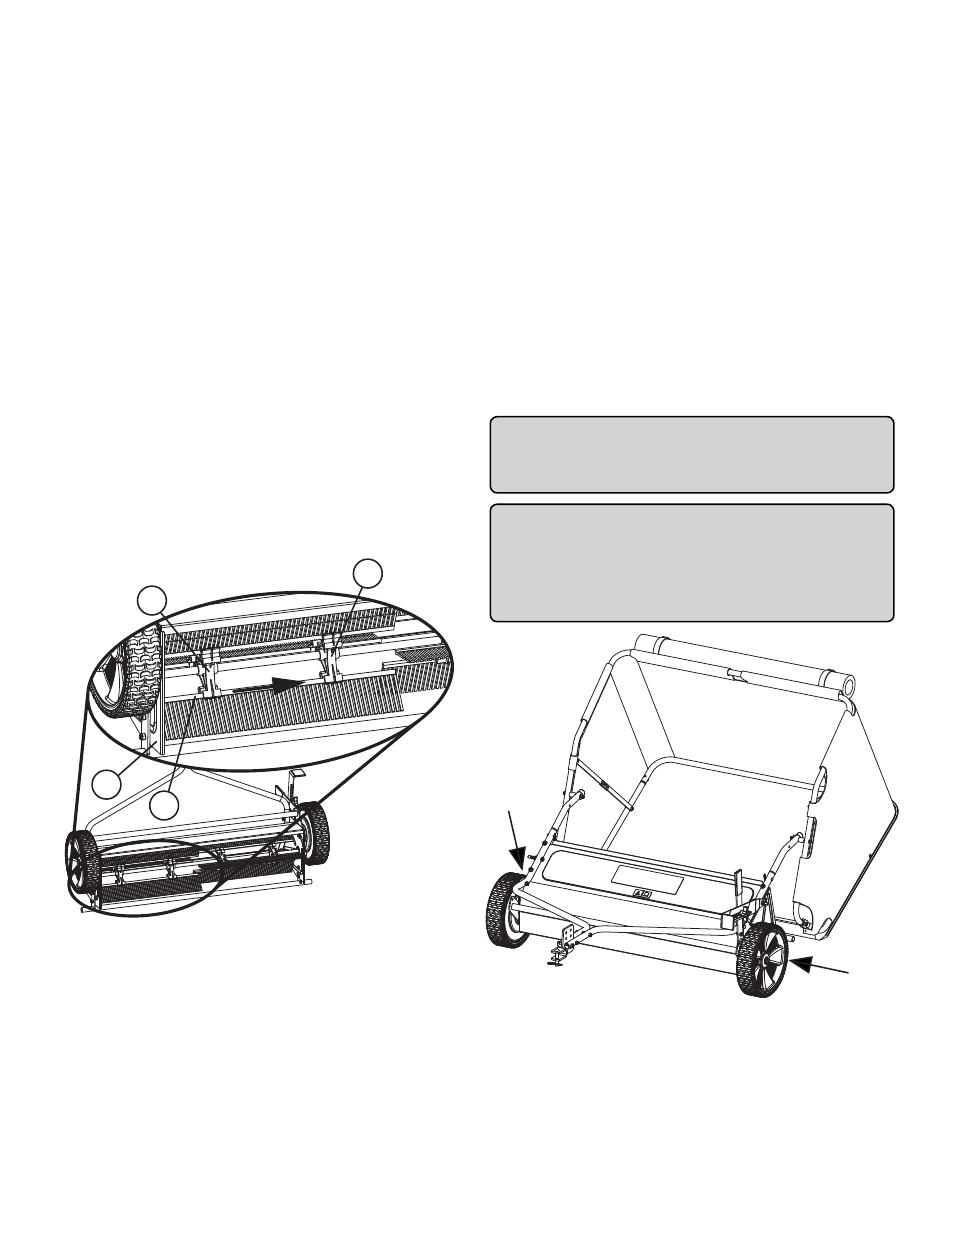
Brush Section Replacement
Note: This procedure will show an example for right side Brush Section
(55) replacement. Reverse pull directions for left side Brush Section
replacement.
Tools Needed:
Safety Glasses, Work Gloves
Rubber Mallet
45
55
60
60
1.
Stand the sweeper in storage position on a clean fl at surface such as
garage fl oor or sidewalk (do not hang hamper from clevis assembly).
2.
Inspect the Brush Section and notice which side has the short bristles
(these will be located near the metal rail of the Brush Section). It
is important that the new Brush Section is assembled in the same
orientation.
3.
Using the rubber mallet, tap the metal rail of the Brush Section (55)
to the left. This will loosen the Brush Section from the Brush Holders
(60).
4.
Wearing work gloves, fi rmly grasp the Brush Section (55) between
the Brush Holders (60) and pull to the right. Continue to pull the
Brush Section (55) to the right until it is free from both Brush Holders
(60).
Note: It may be necessary to have a second person hold the sweeper
in place while pulling the Brush Section (55) free.
5.
Align the metal rail of the new Brush Section (55) with groove on
inside Brush Holder (60). Note: Orientation of Brush Section (55)
short bristles must be as observed in Step 2.
6.
Tap Brush Section (55) into Brush Holder (60) using the rubber
mallet.
7.
Continue to tap Brush Section (55) into the fi rst Brush Holder (60). Be
sure to align the metal rail of the Brush Section (55) with the groove
on the second Brush Holder (60).
8.
Continue to tap Brush Section (55) into Brush Holders (60) until the
metal rail aligns with the remaining two Brush Sections (55) or about
1/2 to 3/4 inch from Brush Housing (45) side panel.
9.
Turn brush assembly and confi rm there is no contact between the
metal rail of the Brush Section (55) and the Brush Housing (45) side
panel. If there is contact, pull the Brush Section (55) to the right until
brush assembly spins freely.
10. Repeat as need for the remaining Brush Sections (55).
Wheel and Drive Gear
Important: Safety glasses should be worn while performing
maintenance operations on the sweeper. Solvent proof
gloves (rubber or latex), should be worn when using any
cleaning or lubrication products.
Important: Drive Pinions (64 & 65) are Right and Left hand
specifi c as indicated on the bottom surface of the part. Left
hand Drive Pinion (64) is indicated with ‘L’ and right hand
Drive Pinion is indicated with ‘R’.
Refer to the illustration below showing the right and left
side of sweeper.
Right
Left
Tools Needed:
•
Safety Glasses, Rubber or Latex Gloves
•
Medium Flat Tip Screwdriver
•
Retaining Ring Pliers (External)
•
7/16 inch Wrench
•
1/4 inch Wrench