Dust cover and bearing retainer maintenance – Brinly STH-420 BH Lawn Sweeper User Manual
Page 22
1009727-A
22.
42
63
63
20
53
20
61
45
48
48
56
43
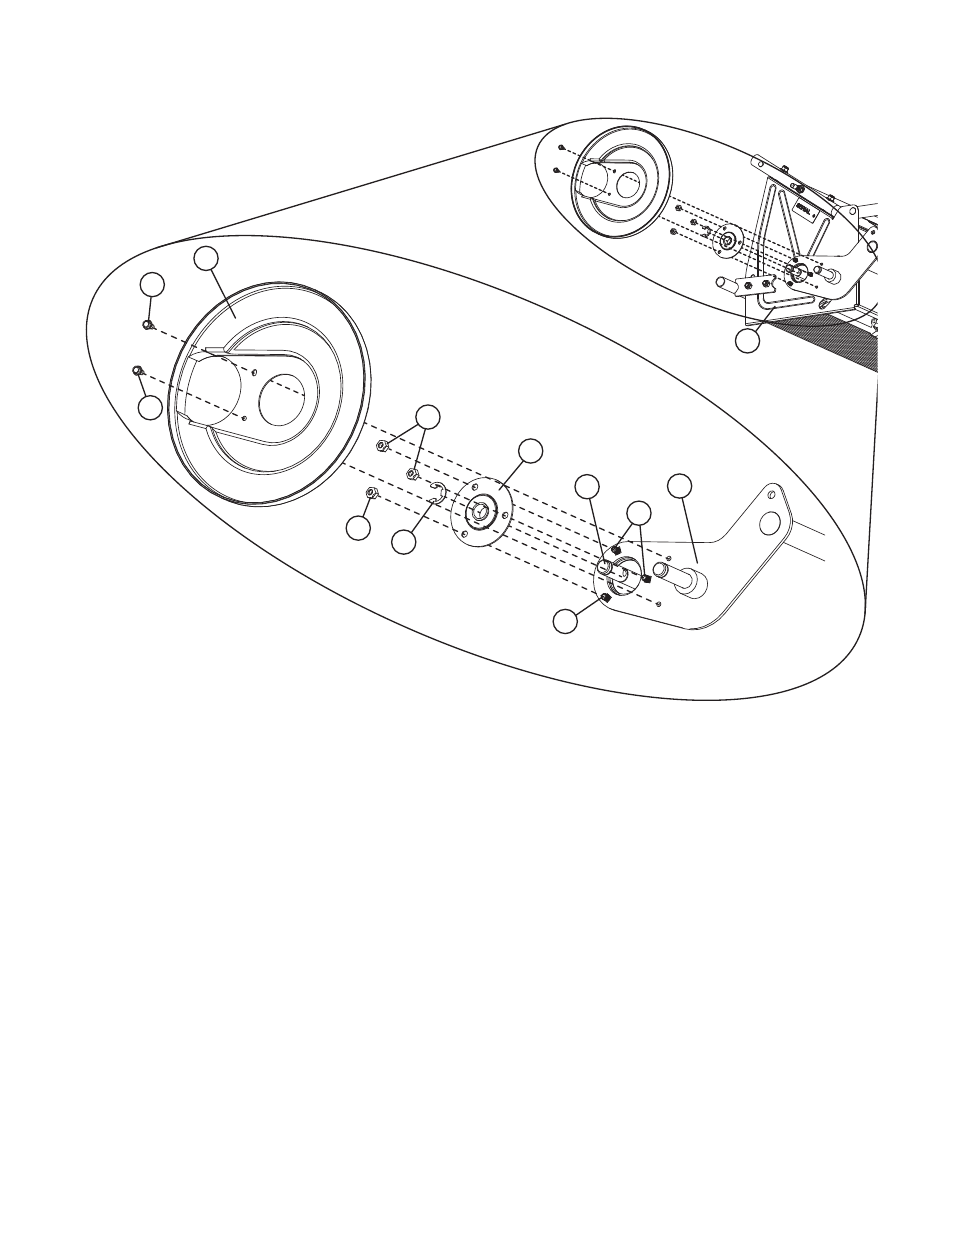
Dust Cover and Bearing
Retainer
MAINTENANCE
================================================================================================
Assembly and Lubrication
If Bearing Retainer (61) was removed, continue with Step 1. If Bearing Retainer (61) was not removed, begin at Step 5.
1.
Insert new Bearing Retainer (61) onto Brush Axle (56). The Bearing Retainer (61) should fi t fl ush on the Lower Pivot (43) side plate with the Bearing
Retainer (61) fl ange fi tting inside the hole in the Lower Pivot (43) side plate and hole in the Brush Housing (45).
Note: Take care when assembling the new Bearing Retainer (61) so that Carriage Bolts (48) remain in Lower Pivot (43) side plate.
2.
Assemble the 3 Lock Nuts (20) securing the Bearing Retainer (61). Tighten all three Lock Nuts (20).
3.
Snap E-Ring (53) into place on the Brush Axle (56). Note: Be sure E-Ring is fully engaged with groove on Brush Axle (56).
4.
Assemble the Dust Cover (42) to the Lower Pivot (43) side plate using the Tapping Screws (63). Warning: Do not over tighten!
5.
Apply WD40, 3 in 1 oil or other similar light lubricant directly to the inside of the Dowel Pin hole.
6.
Replace the Large Flat Washer (58) onto the Brush Axle (56) until it touches the Bearing Retainer (61).
7.
Turn the Brush Axle (56) so that the Dowel Pin hole is horizontal with the ground.
8.
Apply WD40, 3 in 1 oil or other similar light lubricant to the Dowel Pin (57) and insert into the Dowel Pin hole on the Brush Axle (56). Note: center
the Dowel Pin (57) so that an even amount is showing on both sides of the Brush Axle (56).
9.
Insert the Drive Pinion (65) onto Brush Axle until it touches the Large Flat Washer (58). Note: Dowel Pin (57) will now be inside the Drive Pinion
(65).
10. Insert Flat Washer (59) over the Brush Axle (56) and into the recess on the Drive Pinion (65).
11. Assemble the Retaining Ring (62) onto the Brush Axle (56). Be sure that the Retaining Ring (62) is fully engaged with the groove on the Brush Axle
(56).
12. If removed, replace the Wheel Axle (44) from the inside of the Brush Housing (45).
13. Apply a light coating of general purpose axle oil/grease to the Wheel Axle (44).
14. While holding the Wheel Axle (44) on the inside of the Brush Housing (45), insert the Wheel (46) onto the Wheel Axle (44). Note: wheel may have to
be turned slightly to engage Wheel gear with Drive Pinion gear.
15. Replace the Machine Bushing (50) and snap E-Ring (53) into place on Wheel Axle (44). Note: Be sure E-Ring is fully engaged with groove on
Wheel Axle (44).
Repeat for left side Wheel and Drive Gear service.