2out-of-the-box installation, Easy front-panel operation, Install iopower management software – Linkskey LKV-IOP08 User Manual
Page 5
ioPower User Guide Quick Installation
Rev. 1.41 Copyright© All rights reserved. Feb 2005
2
Out-of-the-box Installation
Take the ioPower out of the box and begin installation….
Step 1. Connect the ioPower to the power outlet via its
power chord.
Step 2. Connect a host PC serial port to the serial port on
the ioPower backpanel, using a serial (RS-232)
cable, then power on the host PC.
Step 3. Insert the ioPower Support CD-ROM into the CD-
ROM drive of the Host PC, and then install the
ioPower Management Software on your host PC.
(Refer to next section for more details).
Step 4. Connect your AC-powered devices each to one of
the eight power output outlets on ioPower
backpanel. Now you can control the power-on/off of
your AC-powered devices by the (1) pressing and
hold a front-panel button by over 2 seconds and
release it to activate/deactivate the power port, or (2)
using the management software interface on the
host PC.
The front-panel buttons implement a time-delayed and action
upon button release mechanism to prevent accidental
pressing of the button to
Step 5. Run the ioPower Management Software,
Step 5-1. Run ioPower Management Software
Step 5-2. Select Setting/Connect to connect to
ioPower.
Step 5-3 Select Setting/Configuration to configure
the connection settings and the timer settings. (refer
to the following sections).
Easy Front-panel Operation
To control the power on/off remotely via the ioPower
Management Software Interface or set the timer to control
the power on/off time of any of your devices, please refer to
the following instructions.
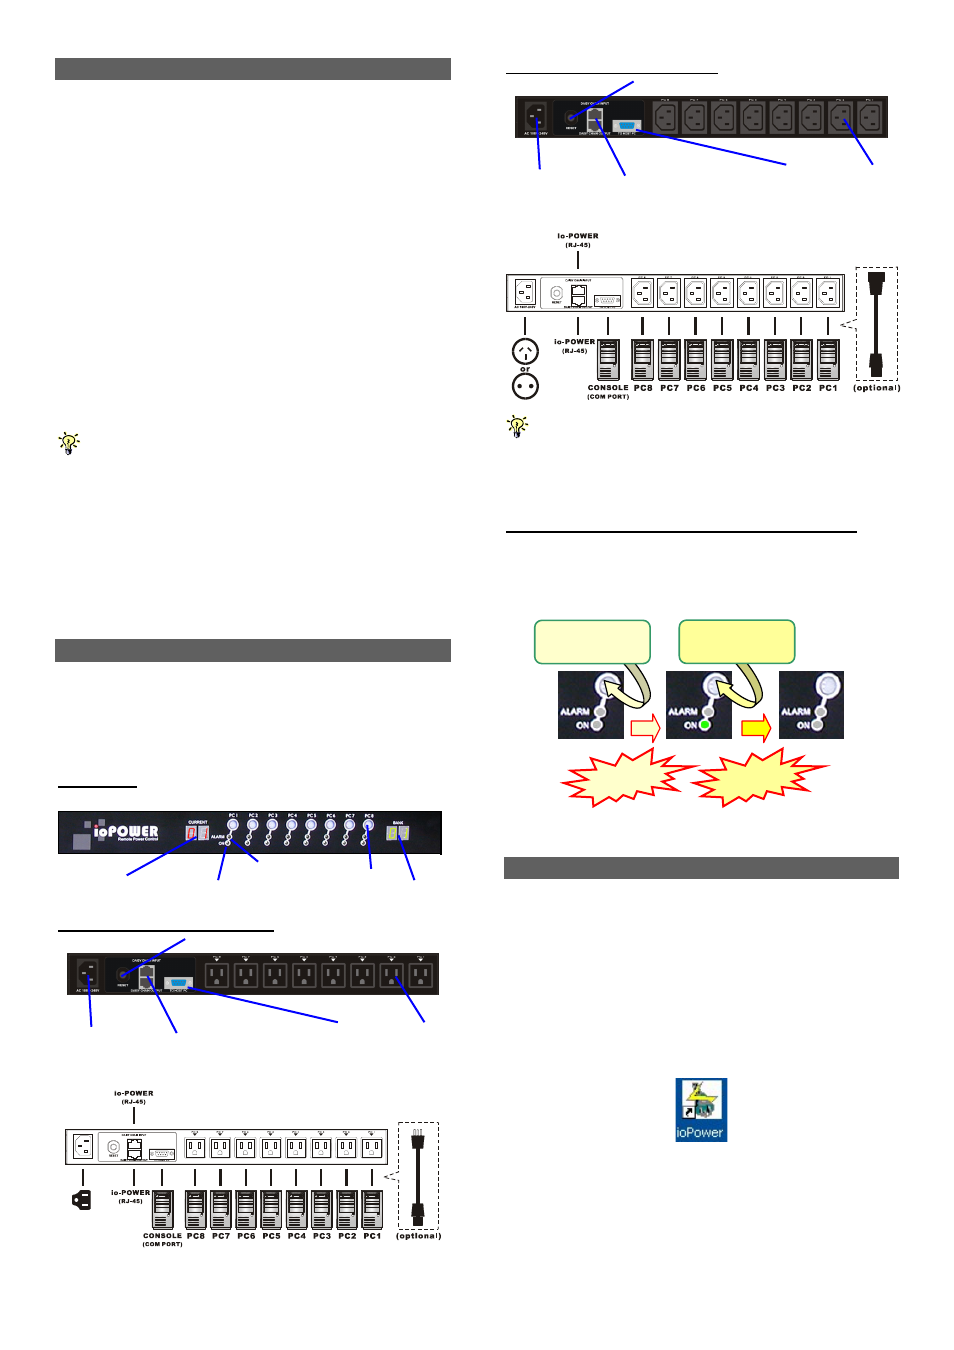
Front-panel
Rear panel – for the US Region
Rear panel – for the EU Region
You might need to use extra adapter cords between ioPower and
your devices, especially when the devices are not of the plug
specification that fits the standard power outlets on the backpanel of
ioPower. These adapter chords are not included with your package
carton and are available by optional purchase.
“One-touch” Power ON/OFF via Front-panel Button
To power ON/OFF any connected device, simply press and
hold the corresponding Power Button for over 2 seconds to
toggle your device On and Off upon button release.
Powered Off Powered-On Powered-Off
By default, each port is in powered-off state when ioPower is
powered on.
Install ioPower Management Software
Step 1. Insert the Support CD-ROM disc to your host PC
CD-ROM Drive. (or you can download the installer program
from available support website)
Step 2. The installer program will auto-run when you
insert the Support CD to your CD drive. (If not, then
double-click the installation program executable file to start
program installation.)
Step 3. Follow subsequent instructions to finish installation.
Step 4. After you have finished installation, you will see a
desktop icon and an ioPower program group appears within
the Programs menu.
Desktop Icon
(ioPower Management Software)
Power Input
( IEC 320 C14 )
11-~240 Vac@60Hz
Daisy-chain port (RJ-45)
- Stack-in (upper)
- Stack-out (lower)
Serial port
(RS-232)
Power Output
(UL-498 5-15R)
POWER Reset button
Current Loads Display
Alarm LED: (Red)
Power ON LED: (Green)
Power Button
Bank Number Display
Power Input
( IEC 320 C14 )
11-~240 Vac@60Hz
Daisy-chain port (RJ-45)
- Stack-in (upper)
- Stack-out (lower)
Serial port
(RS-232)
Power Output
(IEC 320 C13)
POWER Reset button
Release!
Release!
Press and hold
for 2 “ ….
Press and hold
for 2 “ ….