Fig.17, Fig.19, Fig.20 – Sealey SSC12710 User Manual
Page 12: Fig.18 fig.16
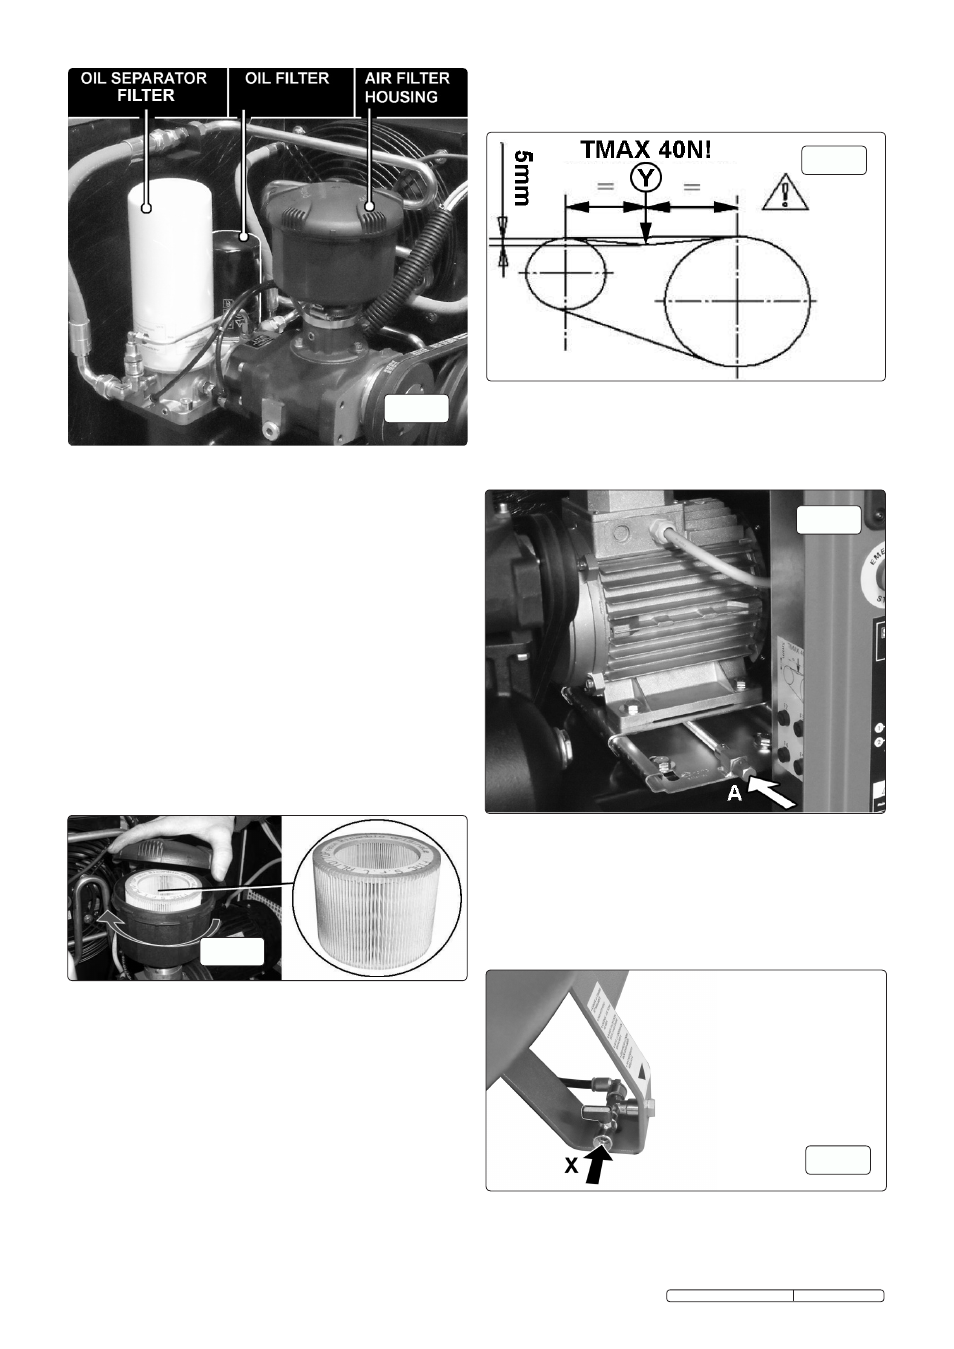
7.3. REPLACING THE OIL FILTER.
replace the oil filter after the first
500 hours of use then every
2500/3000 hours and in any event, each time the oil is
changed. refer to fig.16.
7.3.1. Loosen and remove the four bolts retaining the front panel
using a 3mm hex key. Lift off the panel and put to one side.
7.3.2. Loosen the oil filter using a suitable wrench. unscrew the filter
and lift off. Lubricate the sealing gasket on the new filter and
screw into place. once the sealing gasket has made contact
with the housing tighten a further ¾ of a turn. refit cabinet front
panel.
7.4. REPLACING THE OIL SEPARATOR FILTER.
7.4.1. refer to fig.16. Loosen and remove the four bolts retaining
the front panel using a 3mm hex key. Lift off the panel and put
to one side.
7.4.2. Loosen the oil separator filter using a suitable wrench.
unscrew the filter and lift off. Lubricate the sealing gasket on
the new filter and screw into place. once the sealing gasket
has made contact with the housing tighten a further ¾ of a
turn. refit cabinet front panel.
7.7. REPLACING THE dRIvE bELT.
7.7.1 Loosen and remove the four bolts retaining the front panel
using a 3mm hex key. Lift off the panel and put to one side.
7.7.2 referring to fig.19, turn the nut 'A' to slacken the belt. slide the
belt out, replace it with a new one and tighten as described in
the previous section.
7.5. REPLACING THE AIR FILTER CARTRIdGE.
7.5.1. referring to fig.16. Loosen and remove the four bolts retaining
the front panel using a 3mm hex key. Lift off the panel and put
to one side.
7.5.2. turn the top of the filter housing anti-clockwise and lift off. Lift
out the old air filter, clean out the air filter housing and replace
the air filter with a new one. Ensure the new filter is correctly
seated within the housing. Place the top of the filter housing
onto the housing itself in the same orientation that it was
removed and turn clockwise to lock in place. see fig.17. refit
cabinet front panel.
7.6. CHECKING dRIvE bELT TENSION.
7.6.1 Every
500 hours of use it is advisable to check and if
necessary tighten the belt.
7.6.2 Loosen and remove the four bolts retaining the front panel
using a 3mm hex key. Lift off the panel and put to one side.
7.6.3 using a dynamo meter apply a perpendicular force at point 'Y'
of between 25n and 35n (see fig.18).
fig.17
7.8. dRAINING THE CONdENSATE.
7.8.1 Drain the condensate from the air tank on a weekly basis using
the tap outlet secured to the foot of the tank. see fig.20. Attach
a suitable tailpiece and drainage tube to thread 'X'. Direct the
tube into a suitable container and open the drainage tap.
7.8.2 the condensate drained is considered as a polluting mix that
must be disposed of according to local authority regulations.
Ideally the condensate should be passed through special
water/oil separators prior to disposal.
fig.19
7.9. CLEANING THE AIR/OIL RAdIATOR.
clean the radiator on a weekly basis to remove dust and
impurities. using a compressed air gun on a low pressure
setting, blow from the inside outwards making sure that no dirt
settles inside the compressor. see fig.21.
fig.20
Original Language Version
fig.18
fig.16
ssc12710 & ssc12710D Issue: 3 - 23/02/12
the belt must give by roughly 5mm. refer to fig.19, turn the nut
'A' to tighten the belt. Apply a maximum force 40n.
An
excessive force could damage the bearings in both the
motor and the screw unit!