Sealey SECS00 User Manual
Electronic combination security safes, Fig.1, Instruction manual for
3. INstallatIoN
1. safety
3.1 Consideration should be given to the placing of the safe to ensure that it is placed in a discreet location and will not be easily found by
intruders.
3.2 Each safe is supplied with anchor bolts suitable for fixing to brick and concrete.
3.3 Fixing to hollow partition walls is not recommended. If fixed to wood it must be to a solid wooden structure.
3.4 Open the door of the safe (see 4.1 for opening instructions) and with the help of a second person, position it where required and mark
the mounting positions through the pre-drilled holes in the back or base of the safe.
3.5 When mounting to a wall, ensure that the safe is sitting on a firm level surface.
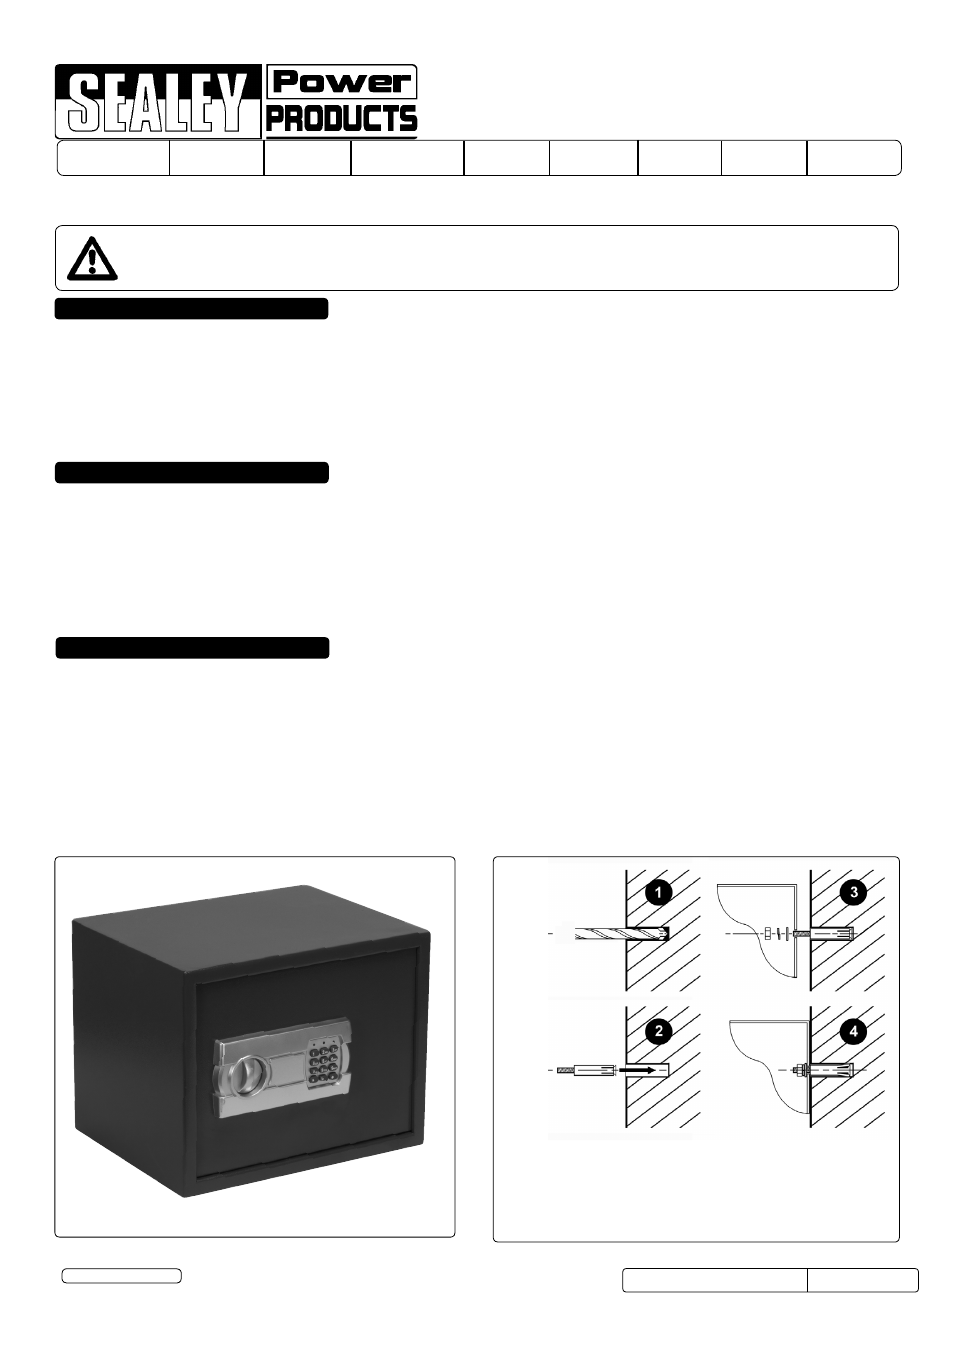
3.6 Drill 10mm holes to a depth of 38mm (fig.1.1) and insert the anchor bolts with nuts and washers removed (fig.1.2).
3.7 Position the safe over the four protruding mounting studs and support it there whilst placing a washer, split washer and nut onto each
stud (fig.1.3).
3.8 Continue to support the safe whilst tightening the fixings using a 10mm spanner. (fig.1.4)
WaRNING! These safes are heavy and care should be exercised in transit and handling to ensure that no one is injured.
WaRNING! The installation of the safe should be carried out by 2 people.
For maximum security, these safes must be securely fixed to a floor or wall.
Ensure that any safe secured to a wall, is on a firm level surface.
Do Not install in areas where damp and condensation are present.
WaRNING! The warnings, cautions and instructions referred to in this instruction manual cannot cover all possible conditions and situations
that may occur. It must be understood that common sense and caution are factors which cannot be built into this product, but must be applied
by the operator.
Thank you for purchasing a Sealey Product. Manufactured to a high standard this product will, if used according to these instructions and properly
maintained, give you years of trouble free performance.
IMPORTANT: Please ReaD tHese INstRUCtIoNs CaRefUlly. Note tHe safe oPeRatIoNal ReQUIReMeNts, WaRNINGs aND
CaUtIoNs. Use tHIs PRoDUCt CoRReCtly aND WItH CaRe foR tHe PURPose foR WHICH It Is INteNDeD. faIlURe to Do so May
CaUse DaMaGe aND/oR PeRsoNal INJURy, aND WIll INValIDate tHe WaRRaNty. Please KeeP INstRUCtIoNs CaBINet foR
fUtURe RefeReNCe.
InsTruCTIOn manual FOr:
eleCtRoNIC CoMBINatIoN
seCURIty safes
Original Language Version
sECs00,sECs01,sECs01Ds,sECs02
sECs03, sECs04, sECs05, sECs06 Issue: 4 - 16/11/12
2. INtRoDUCtIoN
Heavy-duty construction with twin locking bolts. simple to operate electronic keypad accepts numbers of between three and eight digits,
giving millions of combinations. model sECs01Ds also features safety deposit slot. Three lEDs show security, power and operating status. `
also supplied with two keys for manual override should batteries fail. Includes screws and wall plugs.
•
CaUtIoN: If you, or an intruder, uses an incorrect group of numbers, the cabinet will not open and a yellow light will illuminate. Entering an
incorrect PIn 3 times will freeze the system for 20 seconds.
•
Keep the cabinet key and any record of the code separate from the cabinet and unidentified.
fig.1
safe Illustrated:
seCs02
© Jack sealey ltd
model no’s:
seCs00 seCs01 seCs01Ds seCs02 seCs03 seCs04 seCs05 seCs06