Deq-ii edit menu (continued), Using clear, Step two – Oxmoor DEQ-1 User Manual
Page 15: Using title, Step three
Page 13
DEQ
PRE
OUT
OUT
CANCEL
CLEAR
Clear Preset?
1
1
DEQ 1
OUT
OUT
Overwrite Preset?
PRE
ENTER
1
CANCEL
DEQ-II EDIT MENU (CONTINUED)
Figure 3.1: PASTE Screen
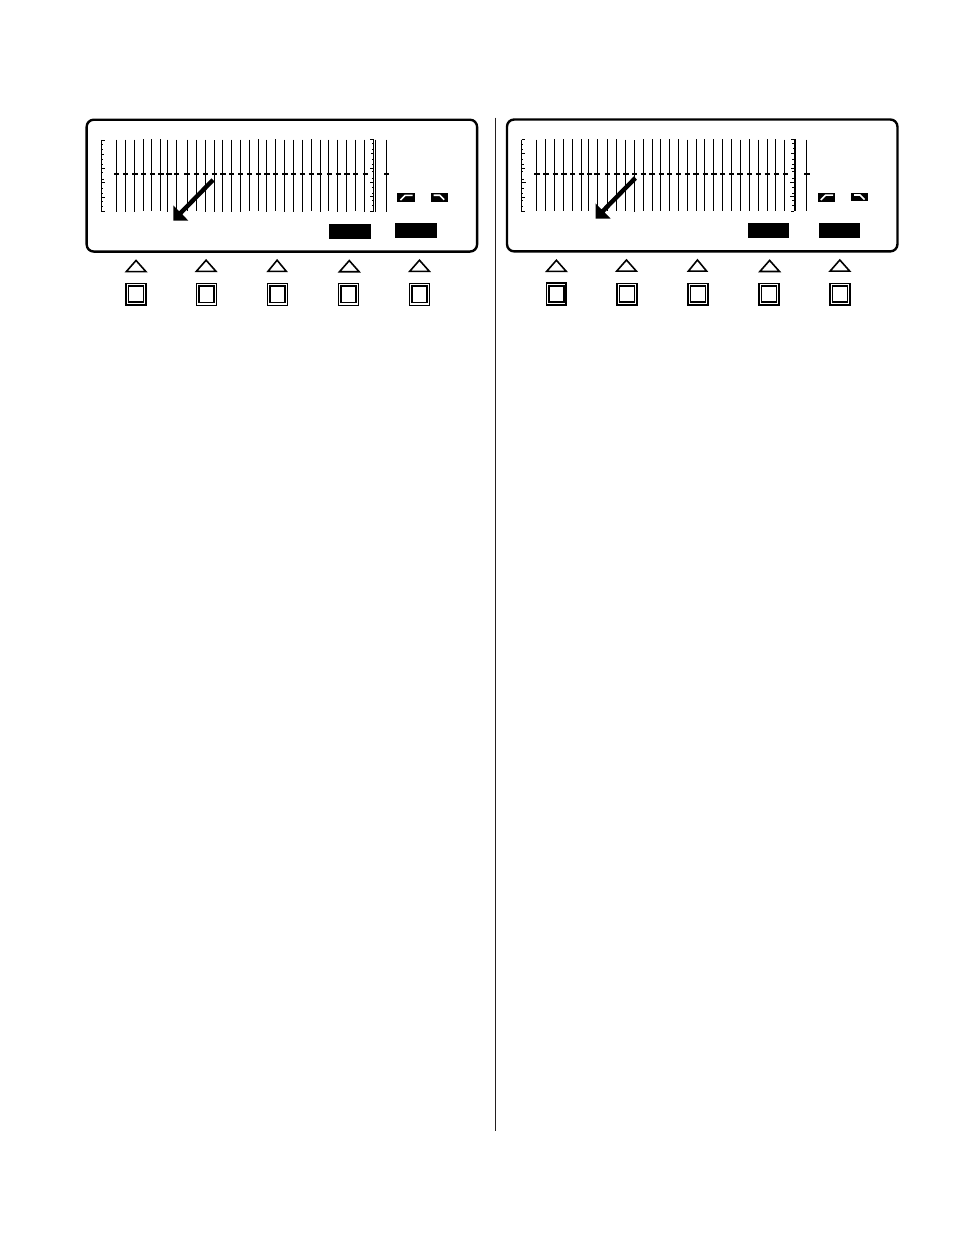
Figure 3.2: CLEAR Screen
indicate that a paste is in progress. Then the copied curve
is pasted into the new Preset. Finally, you are returned to
the EDIT menu. Go back to the Preset that you copied
the curve from and verify that the curves are identical.
Note that while modifications to locked Presets are not
allowed, the curves stored in locked Presets may be freely
copied to other (unlocked) Presets and adjusted in the
new Preset as desired. Also, remember that you may
change Presets or DEQs from within any of the main
menus (EQUALIZE, EDIT, and UTILITY).
USING CLEAR
Another desirable feature is the ability to erase the set-
tings of a given Preset to restore the Preset to its default
settings. The CLEAR function provides this facility.
To clear a Preset:
Step One:
Access the EDIT menu by pressing the EDIT
menu key. The Softkey/Message Area should now be
labeled COPY, PASTE, CLEAR, TITLE, and ENTER. Note
that if the active Preset is locked you will not have
access to the CLEAR function (CLEAR will be in
normal-video)
. Note also that the Band Cursor and band
status information have been removed from the display
as an indication that the faders may not be adjusted
(faders may only be adjusted while in the EQ menu). If
CLEAR is not shown in reverse-video you will need to
unlock the Preset before you may clear it.
Step Two:
Once the CLEAR Softkey is labeled in reverse-
video it may be used. Press the CLEAR Softkey. You
should see the query “Clear Preset?” and the Softkey
labels CANCEL and CLEAR (see Figure 3.2). To abort
the clear process simply press the CANCEL Softkey and
you will be returned to the EDIT menu without clearing
the Preset. To complete the CLEAR process press the
CLEAR Softkey. You will notice that the curve has been
restored to its default settings and that you have returned
to the EDIT menu. Be careful, once a preset has been
"Cleared" all settings are lost.
USING TITLE
(See USING TITLE on page 11 of this manual.)
To set a Preset Title:
Step One:
Press the Softkey labeled TITLE. You will
note that the Softkey/Message Area has been replaced
with the legend “PRESET:” with the name of the current
Preset. You will notice, at the right end of the Softkey/
Message Area, that there are two Softkey labels, CANCEL
and ENTER. The Band Cursor and band status
information have been blanked to indicate that settings
may not be adjusted. In the position immediately to the
right of the colon is a flashing cursor.
Step Two:
Titles are entered by using the UP and DOWN
arrow keys to cycle through the character set and the
LEFT and RIGHT arrow keys to position the cursor. The
cursor indicates which position in the Title will be
changed by the UP and DOWN keys. To practice entering
a Title, use the UP and DOWN keys to find your first
initial. Use the RIGHT key to move one position to the
right. Note that the character you have already chosen
remains in the first position. Now, use UP and DOWN
to set a character for the second position. Continue using
the arrow keys to move the cursor and select characters
until you are comfortable with their functions. Notice
that when you cycle beyond either end of the character
set the character selection scrolls to the opposite end of
the character set. Also, when you attempt to move the
cursor beyond the end of the 16th character field, the
cursor scrolls to the opposite end of the field. Delete a
character by replacing it with a "space" character
Step Three:
When you have entered the desired Title
you can store it by pressing the ENTER Softkey. Doing
so simultaneously stores the Title in nonvolatile memory
(as part of the Preset) and returns you to the EDIT menu.
By pressing the CANCEL Softkey, you will be returned
to the EDIT menu without saving the Title.